

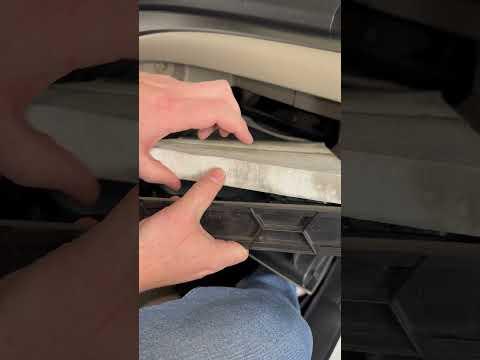





How to Replace the Cabin Air Filter on a 2009-2022 Honda Pilot (Engine: V6 3.5L)
Step-by-step glove box removal guide with tools, parts, safety tips, and DIY cost savings for 2009, 2010, 2011, 2012, 2013, 2014, 2015, 2016, 2017, 2018, 2019, 2020, 2021, 2022
How to Replace the Cabin Air Filter on a 2009-2022 Honda Pilot (Engine: V6 3.5L)
Step-by-step glove box removal guide with tools, parts, safety tips, and DIY cost savings for 2009, 2010, 2011, 2012, 2013, 2014, 2015, 2016, 2017, 2018, 2019, 2020, 2021, 2022


🔧 Pilot - Cabin Air Filter Replacement
Replacing the cabin air filter on your Pilot is a simple beginner-friendly job. The filter sits behind the glove box and cleans air entering the HVAC system, so replacing it helps with airflow, odors, dust, and pollen.
Difficulty Level: Beginner | Estimated Time: 10-15 minutes
⚠️ Safety & Precautions
- ⚠️ Turn the ignition OFF before starting.
- ⚠️ Remove loose items from the glove box so they do not fall into the footwell.
- ⚠️ Do not force the glove box stops; the plastic tabs can crack if bent too hard.
- ⚠️ Battery disconnect is not required for this repair.
🔧 Required Tools
You'll need the following tools for this repair:
- Safety glasses
- Nitrile gloves
- Flashlight
🔩 Required Parts
HowToo sells all the parts you need for this repair:
- Cabin air filter - Qty: 1
📋 Before You Begin
- Park your Pilot on level ground.
- Shift to Park and set the parking brake.
- Turn the ignition OFF.
- Open the passenger front door fully for more room.
- Empty the glove box before lowering it.
- A cabin air filter may have an airflow arrow. That arrow should point in the same direction as the old filter when removed.
🔨 Step-by-Step Instructions
Follow these steps in order:
Step 1: Open and Empty the Glove Box
- Use your hands to open the glove box.
- Remove everything inside so the glove box can swing down safely.
- Use a flashlight if the area is dark.
- Keep small items in a cup.
Step 2: Release the Glove Box Damper
- Look on the right side of the glove box for the small damper arm.
- The damper is a small plastic arm that slows the glove box when it opens.
- Use your hands to gently slide or unhook the damper arm from the glove box.
- Do not pull hard; it should release with light pressure.
Step 3: Lower the Glove Box
- Use both hands to press inward on the left and right sides of the glove box.
- This lets the glove box stops clear the dashboard opening.
- Slowly lower the glove box down toward the floor.
- Press evenly on both sides.
Step 4: Remove the Cabin Filter Cover
- Use your flashlight to look behind the lowered glove box.
- Find the rectangular cabin air filter cover on the HVAC box.
- Use your hands to squeeze the tabs on both ends of the cover.
- Pull the cover straight outward and set it aside.
Step 5: Remove the Old Filter
- Use your hands to slide the old cabin air filter straight out.
- Before removing it fully, note the direction of the airflow arrow printed on the filter.
- Some filters may say “AIR FLOW.” That means the direction air moves through the filter.
- Keep the dirty side facing up if possible so dust does not spill into the HVAC case.
Step 6: Install the New Filter
- Use your hands to slide the new cabin air filter into the slot.
- Match the airflow arrow direction to the old filter’s arrow direction.
- Make sure the filter sits flat and does not fold or bunch up.
- Do not crush the filter edges.
Step 7: Reinstall the Filter Cover
- Use your hands to place the filter cover back onto the HVAC box.
- Push until both side tabs click into place.
- Gently tug the cover to make sure it is locked.
Step 8: Raise and Reconnect the Glove Box
- Use both hands to raise the glove box back toward the dashboard opening.
- Press inward on both sides again so the glove box stops pass into position.
- Reconnect the right-side damper arm by hand.
- Open and close the glove box once to confirm smooth movement.
✅ After Repair
- ✅ Start your Pilot and turn the blower fan on low, medium, and high.
- ✅ Check that air flows normally from the vents.
- ✅ Listen for clicking, flapping, or rattling behind the glove box.
- ✅ If airflow is weak, recheck that the filter is not installed backward or folded.
- ✅ No scan tool reset is required for this repair.
💰 DIY vs Shop Cost
Shop Cost: $60-$120 (parts + labor)
DIY Cost: $15-$35 (parts only)
You Save: $45-$85 by doing it yourself!
Shop labor rates vary but typically run $100-$150/hour. This repair takes a shop approximately 0.2-0.4 hours.
🎯 Ready to get started?
HowToo makes it easy: same-day/2-day shipping on every part, plus all the tools and specialty tools you need! Check out the parts and tools sections below to add everything to your cart.