


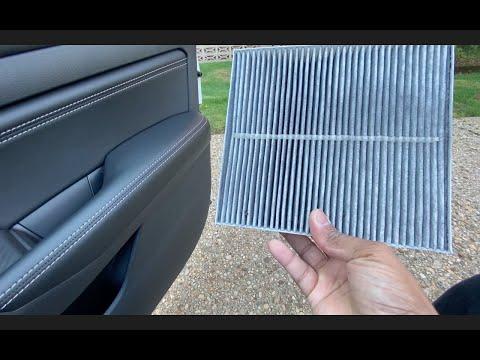






How to Replace the Cabin Air Filter in a 2019-2025 Nissan Altima (Trim: Edition ONE | Engine: Inline 4 2.0L)
Step-by-step DIY instructions with required tools, filter orientation, and safety tips for 2019, 2020
How to Replace the Cabin Air Filter in a 2019-2025 Nissan Altima (Trim: Edition ONE | Engine: Inline 4 2.0L)
Step-by-step DIY instructions with required tools, filter orientation, and safety tips for 2019, 2020


🔧 Altima - Cabin Air Filter Replacement
This is an easy first DIY job. The filter sits behind the glove box, which lowers out of the way without removing screws. I’d use a charcoal filter in Sonīpat’s dusty air because it also helps cut traffic odors.
Difficulty Level: Beginner | Estimated Time: 10-20 minutes
⚠️ Safety & Precautions
- ⚠️ Switch the ignition and climate-control fan off before opening the filter housing.
- 🧤 Wear gloves because the old filter may contain dust, pollen, and debris.
- 🔌 Battery disconnection isn’t required.
- 📦 Empty the glove box first so its contents don’t become floor decorations.
🔧 Required Tools
You'll need the following tools for this repair:
- Small LED flashlight
- Plastic trim removal tool (specialty)
- Nitrile work gloves
- Safety glasses
🔩 Required Parts
HowToo sells all the parts you need for this repair:
- Cabin air filter - Qty: 1
A disposable charcoal filter is my first pick for dust and outside odors. The matching cabin-filter aisle is open in the parts list.
📋 Before You Begin
- 🚗 Park your Altima on level ground and switch the ignition off.
- 🌀 Turn the climate-control fan completely off.
- 📭 Open and empty the glove box.
- 🔎 Check the new filter for an airflow arrow before installation.
🔨 Step-by-Step Instructions
Follow these steps in order:
Step 1: Disconnect the glove box damper
- Open the glove box fully and use the small LED flashlight to inspect its right side.
- Find the small plastic damper arm. The damper is the short arm that lets the glove box lower slowly.
- Use the plastic trim removal tool to gently lift the damper arm off its retaining pin.
- Support the glove box while releasing it.
Step 2: Lower the glove box
- Press both glove box side walls inward by hand until the plastic stops clear the dashboard opening.
- Slowly lower the glove box toward the passenger floor.
- Leave its lower hinges connected. Complete removal usually isn’t necessary.
Step 3: Remove the filter cover
- Use the small LED flashlight to locate the narrow rectangular filter cover on the HVAC housing behind the glove box.
- Release the cover’s retaining tab with your fingers.
- If the tab is tight, press it gently with the plastic trim removal tool. Don’t pry against the thin cover.
- Pull the cover away and place it somewhere safe.
Step 4: Remove the old filter
- Wear the nitrile work gloves and safety glasses.
- Note the direction of any airflow arrow printed on the old filter.
- Pull the old filter straight out. Compress its soft sides slightly if it catches on the opening.
- Keep the dirty side facing upward so debris doesn’t spill into the blower housing.
Step 5: Inspect the housing
- Use the small LED flashlight to check the empty filter slot.
- Remove loose leaves by hand while wearing the nitrile work gloves.
- Don’t push debris deeper into the HVAC housing.
Step 6: Install the new filter
- Match the new filter’s airflow arrow to the direction shown by the old filter or filter housing.
- Gently compress the filter’s sides and slide it evenly into the slot.
- Make sure the pleats aren’t folded over and the filter sits completely inside the housing.
- Never force it. Recheck its orientation instead.
Step 7: Reinstall the filter cover
- Position the filter cover over the opening by hand.
- Engage its locating edge first, then press the retaining tab until it clicks.
- Pull lightly on the cover to confirm it’s locked.
Step 8: Raise the glove box
- Lift the glove box and press both sides inward by hand.
- Guide the side stops back through the dashboard opening.
- Reconnect the damper arm to its retaining pin by hand.
- Open and close the glove box slowly to confirm smooth movement.
✅ After Repair
- ✅ Start your Altima and run the fan at each speed.
- 🌬️ Confirm that airflow is strong and no fluttering or rubbing noise comes from behind the glove box.
- 🔍 If airflow is weak, switch the fan off and check that the filter isn’t folded or installed backward.
- 📅 Inspect the filter more often in dusty conditions. Replace it when it’s dark, clogged, musty, or airflow drops.
💰 DIY vs Shop Cost
Shop Cost: $60-$120 (parts + labor)
DIY Cost: $14-$38 (parts only)
You Save: $22-$106 by doing it yourself!
Shop labor rates vary but typically run $100-$150/hour. This repair takes a shop approximately 0.2-0.5 hours.
🎯 Ready to get started?
HowToo makes it easy: same-day/2-day shipping on every part, plus all the tools and specialty tools you need! Check out the parts and tools sections below to add everything to your cart.
