

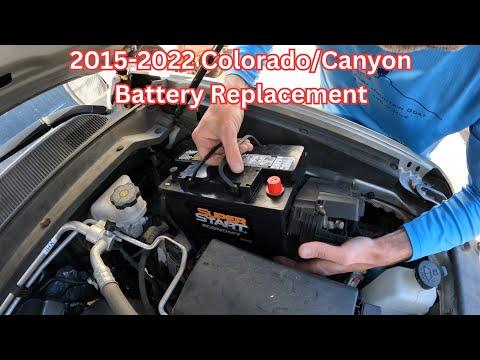





How to Replace the Battery on a 2015-2026 Chevrolet Colorado (Engine: Inline 4 2.5L)
Step-by-step DIY guide with tools, AGM battery size, torque specs, and safety tips for 2015, 2016, 2017, 2018, 2019, 2020, 2021, 2022
How to Replace the Battery on a 2015-2026 Chevrolet Colorado (Engine: Inline 4 2.5L)
Step-by-step DIY guide with tools, AGM battery size, torque specs, and safety tips for 2015, 2016, 2017, 2018, 2019, 2020, 2021, 2022


🔧 Colorado - Battery Replacement
Replacing the battery on your Colorado is a beginner-friendly job. The battery sits under the hood, and the main goal is to remove the old battery safely, clean the terminals, install the new battery securely, and make sure the electrical system powers up correctly.
Difficulty Level: Beginner | Estimated Time: 30-60 minutes
⚠️ Safety & Precautions
- ⚠️ Wear safety glasses and gloves. Car batteries can leak acid and release flammable gas.
- ⚠️ Always remove the negative cable first and install it last. This lowers the chance of an electrical short.
- ⚠️ Do not touch your wrench between the positive terminal and any metal part of the truck.
- ⚠️ Keep sparks, cigarettes, and open flames away from the battery.
- ⚠️ Your Colorado may lose some learned settings after battery disconnect, such as clock, window indexing, and radio presets.
- ⚠️ Battery registration is not required on your Colorado after replacing the 12V battery.
🔧 Required Tools
You'll need the following tools for this repair:
- 10mm socket
- 13mm socket
- 3/8-inch ratchet
- 3/8-inch extension
- Battery terminal puller (specialty)
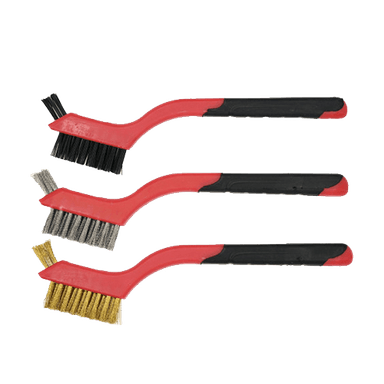
- Battery terminal cleaning brush
- Battery carrier strap
- Torque wrench inch-pound
- Memory saver 12V OBD-II (specialty)
- Nitrile gloves
- Safety glasses
🔩 Required Parts
HowToo sells all the parts you need for this repair:
- 12V AGM battery H7 / Group 94R - Qty: 1
- Battery terminal protectant spray - Qty: 1
- Battery terminal felt washers - Qty: 2
📋 Before You Begin
- 🅿️ Park your Colorado on level ground, shift to Park, and set the parking brake.
- 🔑 Turn the ignition off and remove the key from the vehicle.
- ⏱️ Wait at least 2 minutes before disconnecting the battery so control modules can go to sleep.
- 🔌 A memory saver is optional. A memory saver is a small backup power device that plugs into the OBD-II port to help keep radio presets and learned settings while the battery is disconnected.
- 📍 The OBD-II port is under the driver-side lower dash, near the steering column.
🔨 Step-by-Step Instructions
Follow these steps in order:
Step 1: Open the hood and locate the battery
- Use your hand to release the hood latch, then secure the hood with the prop rod if equipped.
- The battery is in the engine compartment on the passenger side.
- Use safety glasses and nitrile gloves before touching the battery.
Step 2: Connect the memory saver if using one
- Use the memory saver 12V OBD-II tool and plug it into the OBD-II port under the driver-side dash.
- Make sure the memory saver has power before disconnecting the battery.
- Optional, but helpful for presets.
Step 3: Remove the negative battery cable
- Use a 10mm socket, 3/8-inch ratchet, and 3/8-inch extension to loosen the negative terminal nut.
- The negative terminal is marked with a minus sign (-) and usually has a black cable.
- Lift the negative cable off the battery post. If it is stuck, use a battery terminal puller.
- Move the cable aside so it cannot spring back and touch the battery post.
Step 4: Remove the positive battery cable
- Lift the red protective cover from the positive terminal by hand.
- Use a 10mm socket, 3/8-inch ratchet, and 3/8-inch extension to loosen the positive terminal nut.
- The positive terminal is marked with a plus sign (+) and usually has a red cover.
- Lift the positive cable off the battery post. If it is stuck, use a battery terminal puller.
- Keep the positive cable away from metal brackets and the battery post.
Step 5: Remove the battery hold-down bracket
- Use a 13mm socket, 3/8-inch ratchet, and 3/8-inch extension to remove the battery hold-down bolt.
- The hold-down is the clamp that keeps the battery from moving while driving.
- Remove the hold-down clamp and set it aside.
Step 6: Lift out the old battery
- Use a battery carrier strap to lift the battery straight up and out of the tray.
- Batteries are heavy. Keep your back straight and lift with your legs.
- Do not tip the battery sideways.
- Ask for help if it feels heavy.
Step 7: Clean the battery tray and cable terminals
- Use a battery terminal cleaning brush to clean the inside of both cable terminals.
- Use the battery terminal cleaning brush to clean any corrosion from the battery tray area.
- Corrosion looks like white, blue, or green powder. Avoid touching it with bare skin.
Step 8: Install the new battery
- Use the battery carrier strap to lower the new 12V AGM H7 / Group 94R battery into the tray.
- Make sure the positive post is on the same side as the positive cable.
- The battery must sit flat in the tray.
Step 9: Reinstall the battery hold-down bracket
- Use the 13mm socket, 3/8-inch ratchet, and 3/8-inch extension to reinstall the hold-down clamp and bolt.
- Use the torque wrench inch-pound with the 13mm socket to tighten the hold-down bolt.
- Torque to 25 Nm (18 ft-lbs)
- Try to gently move the battery by hand. It should not slide or rock.
Step 10: Install the positive cable first
- Place one battery terminal felt washer over the positive battery post.
- Push the positive cable fully down onto the positive battery post by hand.
- Use the 10mm socket and torque wrench inch-pound to tighten the positive terminal nut.
- Torque to 6 Nm (53 in-lbs)
- Close the red protective cover over the positive terminal.
Step 11: Install the negative cable last
- Place one battery terminal felt washer over the negative battery post.
- Push the negative cable fully down onto the negative battery post by hand.
- Use the 10mm socket and torque wrench inch-pound to tighten the negative terminal nut.
- Torque to 6 Nm (53 in-lbs)
- A small spark when connecting the negative cable can be normal.
Step 12: Protect the terminals
- Use battery terminal protectant spray on both connected battery terminals.
- Do not soak the area. A light coating is enough.
Step 13: Remove the memory saver if used
- Use your hand to unplug the memory saver 12V OBD-II tool from the OBD-II port.
- Make sure the port cover or lower dash area is back in place if moved.
✅ After Repair
- ✅ Start your Colorado and make sure the engine cranks strongly.
- ✅ Check that the battery warning light turns off after the engine starts.
- ✅ Verify the radio, clock, power windows, locks, and exterior lights work.
- ✅ If the driver window auto-up feature does not work, hold the window switch down until fully open, then hold it up until fully closed for 2 seconds.
- ✅ Drive normally for 10-15 minutes so the vehicle can relearn idle and charging behavior.
- ♻️ Recycle the old battery at a parts store or recycling center. Do not throw it in household trash.
💰 DIY vs Shop Cost
Shop Cost: $260-$430 (parts + labor)
DIY Cost: $190-$320 (parts only)
You Save: $70-$110 by doing it yourself!
Shop labor rates vary but typically run $100-$150/hour. This repair takes a shop approximately 0.5-1.0 hours.
🎯 Ready to get started?
HowToo makes it easy: same-day/2-day shipping on every part, plus all the tools and specialty tools you need! Check out the parts and tools sections below to add everything to your cart.