


How to Replace the Alternator on a 2020 Chevrolet Equinox 1.5L
Step-by-step DIY alternator replacement with tools, parts list, torque specs, safety tips, and post-repair checks
How to Replace the Alternator on a 2020 Chevrolet Equinox 1.5L
Step-by-step DIY alternator replacement with tools, parts list, torque specs, safety tips, and post-repair checks
🔧 Equinox - Alternator Replacement
This job replaces the alternator on your Equinox, which charges the battery and powers the electrical system while the engine runs. You’ll remove the drive belt, swap the alternator, and reinstall everything so the charging system works correctly again.
Difficulty Level: Intermediate | Estimated Time: 2–3 hours
⚠️ Safety & Precautions
- ⚠️ Always disconnect the battery negative cable before working; this prevents short circuits and sparks.
- ⚠️ Let the engine cool completely; you’ll be working near hot engine parts.
- ⚠️ Keep tools and fingers clear of the belt and pulleys when rotating the tensioner.
- ⚠️ Wear safety glasses and gloves; metal edges and debris can cause injury.
- ⚠️ If any warning lights remain on after repair, do not ignore them—have the system scanned.
🔧 Required Tools
You'll need the following tools for this repair:
- 🧰 3/8" drive ratchet
- 🧰 1/2" drive ratchet
- 🧰 10mm socket
- 🧰 13mm socket
- 🧰 15mm socket
- 🧰 E12 external Torx socket
- 🧰 3/8" drive extension (6")
- 🧰 Serpentine belt tool or long-handle 15mm wrench
- 🧰 Flat-blade screwdriver (medium)
- 🧰 Trim clip removal tool
- 🧰 Torque wrench 3/8" drive (5–80 ft-lbs range)
- 🧰 Torque wrench 1/2" drive (30–150 ft-lbs range)
- 🧰 Digital multimeter
- 🧰 Work light or flashlight
- 🧰 Mechanic’s gloves
- 🧰 Safety glasses
🔩 Required Parts
HowToo sells all the parts you need for this repair:
- 🔩 Alternator (1.5L engine, correct for trim) - Qty: 1
- 🔩 Serpentine drive belt - Qty: 1 recommended while you’re here
- 🔩 Alternator mounting bolts - Qty: 3 recommended if originals are corroded
- 🔩 Alternator electrical connector locking tab - Qty: 1 if existing is damaged
- 🔩 Battery terminal protector spray - Qty: 1
- 🔩 Dielectric grease - Qty: 1 small tube
📋 Before You Begin
- Park the Equinox on level ground, shift to Park, and set the parking brake.
- Turn off all electrical loads: lights, AC, radio, and remove the key from the vehicle.
- Open the hood and secure it with the prop rod.
- Disconnect the negative battery cable:
- Use a 10mm socket to loosen the clamp nut, then lift the cable off and tuck it aside so it cannot spring back.
- A serpentine belt tool is a long, thin wrench that gives you leverage in tight spaces.
🔨 Step-by-Step Instructions
Follow these steps in order:
Step 1: Remove engine cover and air intake duct
- Pull up on the plastic engine cover to release its rubber grommets and lift it off; no tools needed.
- Use a flat-blade screwdriver to loosen the clamps on the air intake duct between the air filter box and the throttle body.
- Disconnect any small hoses or electrical connectors on the duct by hand (press the release tab and pull straight off).
- Lift the air duct out and set it aside to create more working room near the alternator.
Step 2: Note the belt routing
- Look for the belt routing sticker under the hood; if it’s missing, draw a simple diagram of how the belt snakes around each pulley.
- Take a clear phone picture of the belt path.
Step 3: Release tension and remove the serpentine belt from alternator
- Locate the belt tensioner pulley (spring-loaded pulley that keeps the belt tight, just below the alternator).
- Place a 15mm socket on the tensioner bolt using your serpentine belt tool or a long-handle ratchet.
- Rotate the tensioner slowly clockwise to relieve belt tension. It will feel springy; that’s normal.
- While holding the tensioner moved, slide the belt off the alternator pulley with your other hand.
- Slowly let the tensioner return to its resting position.
- You can leave the belt hanging on the other pulleys, or pull it completely out if you’re replacing it.
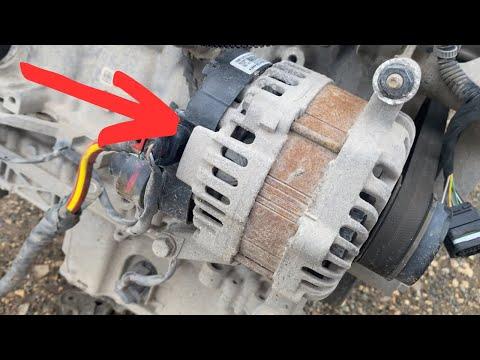
Step 4: Disconnect alternator electrical connections
- On the back of the alternator, locate the main battery cable attached with a nut.
- Use a 13mm socket to remove the nut and lift the cable off the stud; set the cable aside.
- Locate the small alternator plug (voltage regulator connector). Press its locking tab, then pull the connector straight out by hand.
- If the tab is stubborn, gently work it with a flat-blade screwdriver, but don’t pry hard or break it.
Step 5: Remove alternator mounting bolts
- Identify the upper and lower alternator bolts attaching it to the engine bracket.
- Use an E12 external Torx socket and 3/8" ratchet with 6" extension to loosen and remove the upper alternator bolt.
- Use the same E12 external Torx socket and ratchet to remove the lower alternator bolt(s).
- Support the alternator with your free hand as you remove the last bolt so it doesn’t drop.
Step 6: Remove the alternator from the engine bay
- Wiggle the alternator away from the mounting bracket; it may be snug in the locating sleeves.
- Rock it gently—don’t force or pry hard.
- Once free, angle it out through the top of the engine bay where you removed the intake duct. It might take a little rotating and tilting to find the right path.
Step 7: Prepare and install the new alternator
- Compare the old and new alternator side by side: mounting ears, pulley size, electrical connector location, and clocking should match.
- Lightly clean the mounting surfaces on the engine bracket with a clean rag so the alternator sits flat.
- Position the new alternator in place and slide it into the bracket by hand, lining up the bolt holes.
- Start all alternator bolts by hand using the E12 external Torx socket but do not tighten fully until all are threaded.
- Once all bolts are started, use the E12 external Torx socket and 3/8" ratchet to snug them down evenly.
- Torque the alternator mounting bolts to 50 Nm (37 ft-lbs) using a 3/8" torque wrench.
Step 8: Reconnect alternator wiring
- Apply a tiny dab of dielectric grease inside the small alternator connector if you have it.
- Push the small plug straight into the alternator until you hear or feel it click.
- Place the main battery cable eyelet back over the alternator stud.
- Install the nut and tighten with a 13mm socket, then torque to 15 Nm (11 ft-lbs) using a 3/8" torque wrench.
Step 9: Install the serpentine belt
- If you’re installing a new belt, route it according to your diagram or the under-hood sticker, leaving the alternator pulley for last.
- Double-check that the belt is fully seated in the grooves of every ribbed pulley.
- Place a 15mm socket on the belt tensioner bolt again with your serpentine belt tool or long ratchet.
- Rotate the tensioner clockwise to create slack while you slip the belt over the alternator pulley.
- Slowly release the tensioner so it tightens the belt.
- Check once more that the belt is centered and seated properly on all pulleys.
Step 10: Reinstall air intake duct and engine cover
- Reposition the air intake duct between the airbox and throttle body.
- Slide the duct fully over both ends, then tighten the clamps with a flat-blade screwdriver.
- Reconnect any hoses or electrical connectors you removed earlier.
- Line up the engine cover over its mounting pegs and press down firmly at each corner until it snaps into place.
Step 11: Reconnect the battery
- Place the negative battery cable back on the negative battery post.
- Use a 10mm socket to tighten the clamp nut. Do not overtighten; just snug.
- Torque the battery terminal clamp nut to 5 Nm (44 in-lbs) using a 3/8" torque wrench.
- Lightly spray battery terminal protector on the terminals if you have it.
Step 12: Check charging system operation
- Turn the key to ON, check that no abnormal messages appear, then start the engine.
- With the engine idling, measure battery voltage at the battery posts using a digital multimeter.
- You should see about 13.5–14.8 volts with the engine running and a few accessories on (lights or AC).
- If voltage is below 13V or above 15V, shut off the engine and recheck connections.
✅ After Repair
- Verify the battery/charging warning light on the dash turns off after starting.
- Listen for any new belt squeaks or grinding noises around the alternator area.
- Take a short test drive with headlights, AC, and radio on, then recheck for warning lights.
- After the first drive, recheck belt routing and tension visually, and make sure all connectors are fully seated.
💰 DIY vs Shop Cost
Shop Cost: $650–$900 (parts + labor)
DIY Cost: $250–$450 (parts only)
You Save: $400–$450 by doing it yourself!
Shop labor rates vary but typically run $100–$150/hour. This repair takes a shop approximately 1.5–2.0 hours.
🎯 Ready to get started?
HowToo makes it easy: same-day/2-day shipping on every part, plus all the tools and specialty tools you need! Check out the parts and tools sections above to add everything to your cart.
