

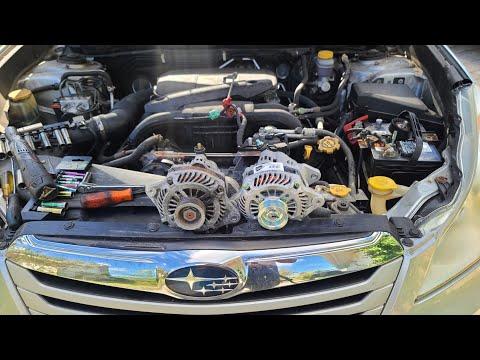





How to Replace the Alternator on a 2010-2012 Subaru Outback (Engine: Flat 4 2.5L)
Step-by-step DIY guide with tools, parts, belt tension tips, torque specs, and charging voltage checks for 2010, 2011, 2012
How to Replace the Alternator on a 2010-2012 Subaru Outback (Engine: Flat 4 2.5L)
Step-by-step DIY guide with tools, parts, belt tension tips, torque specs, and charging voltage checks for 2010, 2011, 2012


🔧 Outback - Alternator Replacement
Replacing the alternator on your Outback involves removing the serpentine belt, disconnecting the electrical connections, unbolting the alternator, and installing the new unit. The alternator charges the battery while the engine runs, so a weak or failed alternator can cause battery warnings, dim lights, stalling, or a no-start condition.
Difficulty Level: Beginner to Intermediate | Estimated Time: 1.5-2.5 hours
⚠️ Safety & Precautions
- ⚠️ Disconnect the negative battery cable before touching the alternator wiring to prevent sparks or short circuits.
- ⚠️ Let the engine cool fully before working near the belt, pulleys, and exhaust-side areas.
- ⚠️ Keep fingers, hair, sleeves, and tools away from the belt path.
- ⚠️ Do not pry on the plastic electrical connector; it can crack with age.
- ⚠️ The serpentine belt is the single belt that drives accessories like the alternator and power steering pump.
🔧 Required Tools
You'll need the following tools for this repair:
- 10mm wrench
- 10mm socket
- 12mm socket
- 14mm socket
- 3/8-inch ratchet
- 3/8-inch extension
- Torque wrench 5-80 ft-lbs
- Flathead screwdriver
- Needle-nose pliers
- Battery terminal brush
- Digital multimeter
- Paint marker
- Nitrile gloves
- Safety glasses
🔩 Required Parts
HowToo sells all the parts you need for this repair:
- Alternator - Qty: 1
- Serpentine belt - Qty: 1
- Battery terminal protectant - Qty: 1
📋 Before You Begin
- 🅿️ Park your Outback on level ground, shift to Park, and set the parking brake.
- ❄️ Open the hood and allow the engine to cool.
- 🔋 Use a 10mm wrench to disconnect the negative battery cable first. Move it aside so it cannot spring back onto the battery post.
- 📸 Take a photo of the belt routing before removal. This helps you reinstall it correctly.
- 🖊️ Use a paint marker to mark the position of the alternator adjustment bolt before loosening it. This gives you a helpful starting point for belt tension.
🔨 Step-by-Step Instructions
Follow these steps in order:
Step 1: Disconnect the Battery
- Put on safety glasses and nitrile gloves.
- Use a 10mm wrench to loosen the negative battery terminal clamp.
- Lift the negative cable off the battery post and position it away from the battery.
- Use a battery terminal brush to clean corrosion from the battery post if needed.
- Negative cable comes off first.
Step 2: Locate the Alternator and Belt Adjuster
- The alternator sits at the top front of the engine, making it easy to access.
- Use a flashlight if needed and identify the alternator belt, upper alternator pivot bolt, lower mounting bolt, and belt adjustment bolt.
- The adjustment bolt is used to loosen or tighten belt tension. Belt tension means how tight the belt is around the pulleys.
Step 3: Loosen the Alternator Belt
- Use a 12mm socket and 3/8-inch ratchet to loosen the alternator lock bolt on the adjustment bracket.
- Use a 12mm socket and ratchet to turn the adjustment bolt counterclockwise until the belt becomes loose.
- Use a 14mm socket and ratchet to slightly loosen the lower alternator mounting bolt if the alternator does not pivot freely.
- Slide the belt off the alternator pulley by hand.
- Do not force the belt off.
Step 4: Remove the Alternator Electrical Connections
- Use a flathead screwdriver gently to release the locking tab on the alternator electrical connector, then unplug it by hand.
- Use a 10mm socket and ratchet to remove the nut from the alternator output wire terminal.
- Lift the output wire off the stud and move it aside.
- Keep the small nut in a safe place if the replacement alternator does not include one.
Step 5: Remove the Alternator Mounting Bolts
- Use a 12mm socket and ratchet to remove the upper alternator lock bolt from the adjustment bracket.
- Use a 14mm socket and ratchet to remove the lower alternator mounting bolt.
- Support the alternator with one hand while removing the final bolt.
- Lift the alternator out of the engine bay.
- It may need a gentle wiggle.
Step 6: Compare the New Alternator
- Place the old and new alternators side by side.
- Check that the pulley, mounting ears, electrical connector, and output stud are in the same locations.
- Use needle-nose pliers to transfer any small wire bracket or protective cap if the replacement unit requires it.
Step 7: Install the New Alternator
- Lower the new alternator into position by hand.
- Install the lower mounting bolt by hand first to avoid cross-threading.
- Use a 14mm socket and ratchet to snug the lower mounting bolt, but do not fully tighten it yet.
- Install the upper lock bolt into the adjustment bracket by hand.
- Use a 12mm socket and ratchet to snug the upper lock bolt, but leave it loose enough for adjustment.
Step 8: Reconnect the Alternator Wiring
- Place the alternator output wire onto the output stud.
- Use a 10mm socket and torque wrench to tighten the output wire nut to Torque to 8 Nm (71 in-lbs).
- Push the electrical connector into the alternator until it clicks.
- Gently tug the connector by hand to confirm it is locked.
Step 9: Reinstall and Tension the Belt
- Route the serpentine belt over the pulleys using your photo as a guide.
- Make sure the belt ribs sit fully inside each pulley groove.
- Use a 12mm socket and ratchet to turn the adjustment bolt clockwise until the belt is tight.
- Press the longest straight section of belt with your thumb. It should move about 1/4 inch with firm pressure.
- If installing a new belt, tension it slightly tighter because it may stretch a little after initial run-in.
- Check every pulley groove carefully.
Step 10: Tighten the Alternator Bolts
- Use a 12mm socket and torque wrench to tighten the upper alternator lock bolt to Torque to 25 Nm (18 ft-lbs).
- Use a 14mm socket and torque wrench to tighten the lower alternator mounting bolt to Torque to 35 Nm (26 ft-lbs).
- Use a 12mm socket and ratchet to confirm the adjustment bolt is seated and not loose.
Step 11: Reconnect the Battery
- Apply battery terminal protectant to the battery post if available.
- Place the negative battery cable back onto the negative battery post.
- Use a 10mm wrench to tighten the terminal clamp until snug.
- Do not overtighten the clamp because the battery post can be damaged.
Step 12: Check Charging Voltage
- Set a digital multimeter to DC volts. A multimeter is a small tester used to measure electrical voltage.
- Touch the red meter lead to the positive battery post and the black meter lead to the negative battery post.
- With the engine off, the battery should usually read about 12.4-12.7 volts if charged.
- Start the engine and check voltage again with the digital multimeter.
- With the engine running, charging voltage should usually be about 13.5-14.8 volts.
✅ After Repair
- ✅ Listen for belt squeal after startup. A squeal usually means the belt is too loose or not seated correctly.
- ✅ Turn on headlights, rear defroster, and blower motor, then recheck charging voltage with the digital multimeter.
- ✅ Shut the engine off and inspect that the belt is centered on every pulley.
- ✅ After a short drive, recheck belt tension once the engine cools.
- ✅ If the battery warning light stays on, stop driving and recheck the alternator connector, output wire, belt tension, and battery condition.
💰 DIY vs Shop Cost
Shop Cost: $450-$850 (parts + labor)
DIY Cost: $180-$450 (parts only)
You Save: $270-$400 by doing it yourself!
Shop labor rates vary but typically run $100-$150/hour. This repair takes a shop approximately 1.0-1.5 hours.
🎯 Ready to get started?
HowToo makes it easy: same-day/2-day shipping on every part, plus all the tools and specialty tools you need! Check out the parts and tools sections below to add everything to your cart.