


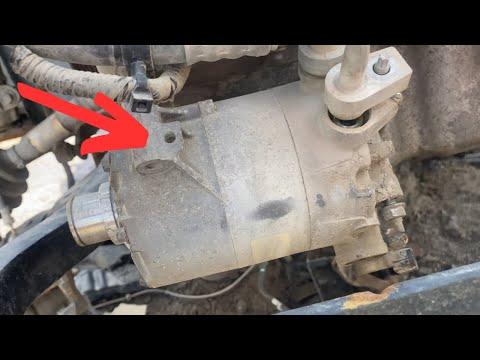







How to Replace the A/C Compressor on a 2017-2019 Ford Escape (Trim: SE | Engine: Inline 4 2.0L | Body: Sport Utility)
Step-by-step instructions covering tools, parts, torque specs, safety, and R-1234yf service for 2017, 2018, 2019
How to Replace the A/C Compressor on a 2017-2019 Ford Escape (Trim: SE | Engine: Inline 4 2.0L | Body: Sport Utility)
Step-by-step instructions covering tools, parts, torque specs, safety, and R-1234yf service for 2017, 2018, 2019


🔧 Escape - A/C Compressor Replacement
This is an advanced repair. You can replace the compressor mechanically, but a certified A/C shop must recover the refrigerant before disassembly and evacuate and recharge the system afterward. The compressor is removed from underneath your Escape.
Difficulty Level: Advanced | Estimated Time: 4-6 hours, plus refrigerant service
Assumption: This procedure covers the U.S.-market R-1234yf system. Confirm the refrigerant specification on the underhood label before service.
⚠️ Safety & Precautions
- ⚠️ Never loosen an A/C fitting while the system contains refrigerant. High-pressure refrigerant can cause severe frostbite and eye injury.
- 🧰 Have a certified shop recover the refrigerant with R-1234yf equipment before beginning. Venting refrigerant is unsafe and prohibited.
- 🛡️ Wear safety glasses and refrigerant-resistant gloves whenever the system is open.
- 🏗️ Support your Escape on jack stands placed at approved lifting points. Never work under a vehicle supported only by a jack.
- 🔋 Disconnect the negative battery cable before unplugging or removing the compressor.
- 🔥 Let the engine and exhaust cool completely before working underneath.
- 🧼 Cap every open A/C line immediately. Moisture and dirt can destroy the new compressor.
- 🚫 Do not use stop-leak, universal refrigerant, or a do-it-yourself recharge can.
🔧 Required Tools
You'll need the following tools for this repair:
- R-1234yf recovery machine (specialty)
- R-1234yf manifold gauge set (specialty)
- R-1234yf vacuum pump (specialty)
- Digital refrigerant scale rated to 0.1 ounce (specialty)
- Floor jack rated 2-ton minimum
- Jack stands rated 2-ton minimum
- Wheel chocks
- 3/8-inch drive ratchet
- 3/8-inch drive torque wrench rated 5-75 ft-lbs
- 3/8-inch drive breaker bar
- 8mm socket
- 10mm socket
- 13mm socket
- 15mm socket
- 8mm wrench
- 10mm wrench
- Serpentine belt tool (specialty)
- Torx T25 bit
- Torx T30 bit
- Trim-clip removal tool
- Flat-blade screwdriver
- Needle-nose pliers
- Clean graduated measuring cup
- Clean A/C port caps
- Refrigerant-resistant gloves
- Safety glasses
🔩 Required Parts
HowToo sells all the parts you need for this repair:
- Vehicle-matched A/C compressor or compressor kit - Qty: 1
- A/C compressor line sealing washers or O-rings - Qty: 1 set
- Ford-specification R-1234yf PAG compressor oil - Qty: As determined by oil balancing
- R-1234yf refrigerant - Qty: Per underhood charge label
- Serpentine belt - Qty: 1 if cracked, glazed, contaminated, or worn
- Receiver-drier element - Qty: 1 if contamination or internal compressor failure is present
- A/C condenser - Qty: 1 if metal debris is found or flushing is not permitted
The compressor aisle is open in the parts sidebar. The complete compressor kit is usually the smarter buy because it reduces the chance of missing seals or supporting parts. Buy once, cry once.
📋 Before You Begin
- Park your Escape on level pavement, select Park, apply the parking brake, and chock both rear wheels.
- Have a certified shop recover the refrigerant. Ask them to record how much refrigerant and oil the machine removes.
- Confirm the recovered system reads approximately zero pressure before opening any connection.
- Open the hood and photograph the serpentine-belt routing.
- Inspect the recovered oil for glitter, dark debris, or metallic particles. Contamination changes this from a compressor-only repair to a system-cleaning repair.
- Ford specifies R-1234yf refrigerant and matching PAG oil for the U.S.-market 2019 Escape. The system must be charged by weight, not by gauge pressure. manualzz.com)
- Do not assume all oil supplied inside a new compressor belongs in the system. Ford calls for an oil-balancing procedure so total system oil is neither increased nor reduced. fordescape4.com
🔨 Step-by-Step Instructions
Follow these steps in order:
Step 1: Recover the refrigerant
- Use an R-1234yf recovery machine to recover the system completely. This should be performed by a properly equipped shop.
- Record the refrigerant and oil quantities removed by the machine.
- Do not continue until the high-side and low-side readings are approximately zero.
Step 2: Disconnect the battery
- Switch off the ignition and remove the key from the vehicle.
- Use a 10mm wrench to loosen the negative battery-terminal clamp.
- Remove the negative cable and position it where it cannot spring back onto the terminal.
Step 3: Raise and support the vehicle
- Use the floor jack at an approved front lifting point.
- Place both jack stands under the approved support points and lower the vehicle onto them.
- Push the vehicle gently before going underneath. If it moves, reposition the stands.
Step 4: Remove the lower splash shield
- Use the trim-clip removal tool to release the plastic retainers.
- Use the appropriate 8mm socket, Torx T25 bit, or Torx T30 bit to remove the remaining fasteners.
- Support the shield while removing its final fastener, then lower it out of the way.
Step 5: Release the serpentine belt
- Compare your routing photograph with the belt before moving it.
- Fit the serpentine belt tool or 3/8-inch drive breaker bar to the tensioner.
- Rotate the tensioner slowly to remove belt tension.
- Slip the belt off the compressor pulley, then release the tensioner slowly.
- Inspect the belt for cracking, shiny ribs, missing material, or refrigerant-oil contamination.
- Never let the tensioner snap back.
Step 6: Disconnect the compressor wiring
- Locate the electrical connector on the compressor.
- Use your fingers or needle-nose pliers to release the locking tab gently.
- Pull on the connector body, not the wires.
- Inspect the terminals for corrosion, heat damage, or compressor-oil contamination.
Step 7: Disconnect the refrigerant lines
- Confirm again that the system contains no pressure.
- Use the correct 10mm socket or 13mm socket to remove the compressor line-manifold fastener.
- Pull the manifold straight away from the compressor without sharply bending the aluminum lines.
- Remove and discard the old sealing washers or O-rings.
- Install clean caps over the lines immediately.
- On the common Ford arrangement, tighten the compressor line-manifold fastener during installation to 9 Nm (80 lb-in). Confirm this against the fastener arrangement supplied with the replacement compressor. fordescape4.com
Step 8: Remove the old compressor
- Support the compressor with one hand or a stable support.
- Use the matching 13mm socket or 15mm socket to loosen the mounting fasteners evenly.
- Remove the lower fasteners first and the easiest-to-reach upper fastener last.
- Lower the compressor carefully without striking the radiator, condenser, or cooling hoses.
Step 9: Inspect for internal failure
- Pour the old compressor oil into a clean graduated measuring cup while slowly rotating the compressor hub by hand.
- Look for silver glitter, black sludge, or metal fragments.
- If debris is present, stop. Replace the receiver-drier element and any non-flushable contaminated component, commonly including the condenser.
- A new compressor installed into a contaminated system can fail almost immediately.
Step 10: Balance the compressor oil
- Read the replacement compressor instructions before removing its shipping plugs.
- Drain and measure the old compressor oil with the clean graduated measuring cup.
- Drain and measure the new compressor oil into a separate clean container.
- Refill the new compressor with the quantity and oil specification directed by its instructions and Ford's oil-balancing procedure.
- Do not automatically add the entire system capacity to a compressor-only repair. Oil remains inside the condenser, evaporator, and lines.
- Rotate the compressor hub by hand approximately ten turns after balancing the oil.
Step 11: Install the new compressor
- Keep the shipping plugs installed until the compressor is positioned near the refrigerant lines.
- Lift the compressor into position and start every mounting fastener by hand.
- Use the correct 13mm socket or 15mm socket to snug the fasteners evenly.
- Use the 3/8-inch drive torque wrench to tighten the compressor mounting fasteners to 25 Nm (18 ft-lbs).
- Do not use an impact wrench. The aluminum mounting points are easy to damage.
Step 12: Reconnect the refrigerant lines
- Remove the caps only when you are ready to connect the lines.
- Install new sealing washers or O-rings in the same locations and orientation as the originals.
- Apply a thin film of the correct PAG oil to the new seals. Do not soak them.
- Seat the manifold squarely against the compressor by hand.
- Use the appropriate 10mm socket or 13mm socket and tighten the line-manifold fastener to 9 Nm (80 lb-in). fordescape4.com)
Step 13: Reconnect the wiring and belt
- Push the compressor electrical connector into place until its lock clicks.
- Route the belt around every pulley using your photograph as a guide.
- Use the serpentine belt tool to rotate the tensioner and slip the belt over the final pulley.
- Release the tensioner slowly.
- Check every rib. The belt must sit completely inside every pulley groove.
Step 14: Reinstall the splash shield
- Raise the splash shield into position.
- Use the 8mm socket, Torx T25 bit, or Torx T30 bit to reinstall its screws.
- Use your fingers to press the plastic retainers fully into place.
- Do not overtighten the small shield fasteners. Tighten them only until secure.
Step 15: Lower the vehicle and reconnect the battery
- Use the floor jack to lift the vehicle slightly off the stands.
- Remove the jack stands and lower the vehicle slowly.
- Reconnect the negative battery cable with the 10mm wrench.
- Tighten the clamp until secure without crushing or distorting it.
Step 16: Evacuate and recharge the system
- Use the R-1234yf manifold gauge set and vacuum pump to evacuate the system for at least 30 minutes.
- Close the manifold valves and confirm the system holds vacuum for at least 15 minutes.
- If vacuum drops, find and repair the leak before charging.
- Use the digital refrigerant scale and charge the exact refrigerant weight printed on your Escape's underhood label.
- Do not charge by pressure alone. Ambient temperature changes pressure readings significantly.
✅ After Repair
- Start the engine with the climate control switched off and listen for belt noise.
- Switch the A/C on, select maximum cooling, and set the blower to medium-high.
- Confirm the compressor operates smoothly without grinding, knocking, or excessive vibration.
- Check both compressor connections with an electronic leak detector suitable for R-1234yf.
- Verify cold center-vent air and stable high-side and low-side pressures.
- Inspect the belt again with the engine off. Make sure it remains centered on every pulley.
- If the compressor failed internally, confirm the condenser and receiver-drier were addressed before operating the system for an extended period.
💰 DIY vs Shop Cost
Shop Cost: $1,100-$1,800, including parts, labor, recovery, and recharge
DIY Cost: $410-$650 for parts and professional refrigerant service
You Save: Approximately $500-$1,100 by doing the mechanical work yourself!
Shop labor rates vary but typically run $100-$150/hour. The complete repair generally bills approximately 3-5 hours, depending on contamination and supporting parts.
🎯 Ready to get started?
HowToo makes it easy: same-day/2-day shipping on every part, plus all the tools and specialty tools you need! Check out the parts and tools sections below to add everything to your cart.
