

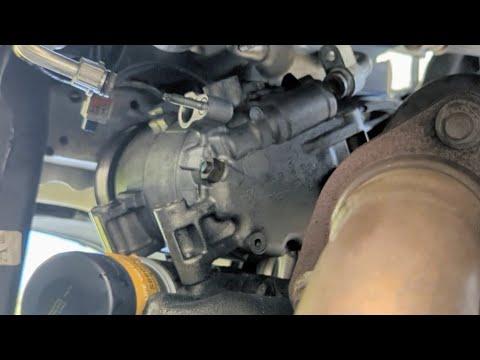







How to Replace the A/C Compressor on a 2016-2020 Honda Civic (Trim: Si | Engine: Inline 4 1.5L)
Step-by-step R-1234yf repair guide with tools, parts, torque specs, and safety tips for 2016, 2017, 2018
How to Replace the A/C Compressor on a 2016-2020 Honda Civic (Trim: Si | Engine: Inline 4 1.5L)
Step-by-step R-1234yf repair guide with tools, parts, torque specs, and safety tips for 2016, 2017, 2018


🔧 Civic - A/C Compressor Replacement
Don’t replace the compressor until a Honda shop checks warranty coverage and confirms the failure. Your Civic may qualify for Honda’s extended coverage of certain compressor shaft-seal leaks. If replacement is necessary, have an R-1234yf-equipped shop recover the refrigerant first, then you can perform the mechanical swap and return for evacuation and charging.
This isn’t a great first-ever repair. Access is tight, oil quantity must be balanced correctly, and internal compressor debris can turn a simple replacement into a complete A/C-system repair. Nobody wants to buy the same compressor twice.
Difficulty Level: Advanced | Estimated Time: 4-6 hours, plus professional recovery and charging
Assumption: These instructions cover complete compressor replacement, not shaft-seal repair.
⚠️ Safety & Precautions
- ⚠️ Do not loosen an A/C fitting until a shop has recovered the refrigerant.
- R-1234yf refrigerant is mildly flammable and can cause severe frostbite or eye injury.
- Never vent refrigerant, use compressed air, or substitute R-134a.
- Work outside or in a well-ventilated area with no flames, sparks, or smoking.
- Disconnect the negative battery terminal before replacing A/C components.
- Cap every open A/C line immediately. Moisture and dirt can destroy the new compressor.
- Support the Civic only on rated jack stands. Never work beneath a floor-jack-supported vehicle.
- Wear safety glasses and refrigerant-resistant gloves whenever fittings are open.
🔧 Required Tools
You'll need the following tools for this repair:
- R-1234yf recover/recycle/recharge machine (specialty)
- R-1234yf refrigerant scale (specialty)
- R-1234yf electronic leak detector (specialty)
- Metric socket set, 8mm-17mm
- Metric combination wrench set, 8mm-17mm
- 3/8-inch drive ratchet
- 3/8-inch drive torque wrench, 7-80 ft-lbs
- 3/8-inch drive breaker bar
- 3/8-inch drive extension set, 3-12 inches
- Serpentine-belt tensioner tool, 14mm
- Flat-blade trim-clip remover
- Plastic A/C line caps and plugs
- Graduated oil measuring cylinder, 250mL
- Drain pan, 2-quart minimum
- Floor jack, rated 2-ton minimum
- Jack stands, rated 2-ton minimum
- Wheel chocks
- Refrigerant-resistant gloves
- Safety glasses
🔩 Required Parts
HowToo sells all the parts you need for this repair:
- New A/C compressor or complete compressor kit - Qty: 1
- R-1234yf-compatible suction-line O-ring - Qty: 1
- R-1234yf-compatible discharge-line O-ring - Qty: 1
- Honda-specified POE compressor oil - Qty: As measured
- R-1234yf refrigerant - Qty: 375-425g
- Receiver-drier or desiccant element - Qty: 1 if required by the compressor warranty or contamination procedure
- Serpentine drive belt - Qty: 1 if cracked, glazed, contaminated, or noisy
The matching compressor, compressor-kit, oil, and sealing aisles are open in the parts sidebar. Do not select oil solely by a generic viscosity label. The container must specifically match the compressor manufacturer and your Civic’s R-1234yf system.
📋 Before You Begin
- Have a Honda service department check the compressor shaft-seal warranty extension before purchasing anything. A leaking shaft seal may be repairable under Honda coverage. static.nhtsa.gov
- Have the system diagnosed. Low refrigerant, a condenser leak, electrical trouble, and a slipping clutch can imitate compressor failure.
- Have a properly equipped shop recover and weigh the R-1234yf charge. Honda specifies dedicated R-1234yf equipment and prohibits venting. civicx.com
- Park on level ground, select first gear, apply the parking brake, and chock both rear wheels.
- Record the recovered oil quantity. That amount affects the final oil balance.
- If the compressor failed internally, inspect the lines for metallic, gray, or black residue. Honda’s contamination procedure may require the condenser, expansion valve, evaporator, hoses, or lines in addition to the compressor. civicx.com
- Do not open the replacement compressor ports until you’re ready to connect the lines.
🔨 Step-by-Step Instructions
Follow these steps in order:
Step 1: Recover the refrigerant
- Use an R-1234yf recover/recycle/recharge machine to recover and weigh the refrigerant through both service ports.
- Record how much compressor oil the machine removes.
- This operation should be performed by a trained mobile-A/C technician if you don’t have certified equipment.
Step 2: Disconnect the battery
- Switch the ignition off and keep the key away from the Civic.
- Use a 10mm wrench to loosen the negative battery-terminal nut.
- Lift off and isolate the negative cable so it cannot spring back onto the terminal.
Step 3: Raise the front of the Civic
- Use the floor jack at the approved front-center lifting point.
- Place both jack stands beneath the reinforced side support points.
- Lower the Civic onto the stands and gently push the body to verify stability.
Step 4: Remove the engine undercover
- Use the flat-blade trim-clip remover for the plastic retainers.
- Use the appropriate 8mm or 10mm socket for the undercover screws.
- Keep each fastener grouped by position because Honda uses more than one retainer style.
Step 5: Remove the drive belt
- Photograph or sketch the belt routing before removal.
- Use the 14mm belt-tensioner tool to rotate the automatic tensioner and release belt tension.
- Slip the belt off the compressor pulley, then slowly release the tensioner.
- Remove the belt if it blocks compressor access.
- Never let the tensioner snap back.
Step 6: Disconnect the compressor wiring
- Reach the compressor from above or below as access permits.
- Press the locking tab by hand and disconnect the compressor electrical connector.
- Release its harness clip with the flat-blade trim-clip remover.
- Inspect the connector for melted plastic, oil contamination, corrosion, or loose terminals.
Step 7: Disconnect the refrigerant lines
- Confirm the system has been fully recovered before continuing.
- Use the appropriate metric socket to remove the suction and discharge line retaining bolts.
- Support each line with a metric combination wrench where applicable. Do not bend or twist the aluminum pipes.
- Separate the lines gently and cap every opening immediately with plastic A/C line caps.
- Discard both old O-rings.
- During installation, tighten each compressor hose connection to 9.8 Nm (7.2 ft-lbs). Honda’s compressor repair bulletin identifies this torque for the line connections. static.oemdtc.com
Step 8: Remove the compressor
- Support the compressor with one hand or a small block beneath it.
- Use the appropriate metric socket, extension, and ratchet to loosen the compressor mounting bolts evenly.
- Remove the lower bolts first and the easiest upper bolt last.
- Lower the compressor carefully without contacting the radiator or condenser fins.
- Keep the original mounting bolts organized for reuse.
Step 9: Inspect for internal contamination
- Use a clean cotton swab inside the old compressor’s discharge port and line.
- If the swab shows shiny metal, dark-gray material, or black residue, stop the installation.
- Do not flush the new compressor. Follow Honda’s contamination repair path, which can require multiple A/C components rather than the compressor alone. civicx.com
- If the ports are clean, continue with compressor oil balancing.
Step 10: Balance the compressor oil
- Read the replacement compressor manufacturer’s oil instructions before removing its shipping plugs.
- Hold the old compressor level over the graduated oil measuring cylinder.
- Rotate its shaft by hand while draining it, then record the amount recovered.
- Account for the oil recorded by the refrigerant recovery machine.
- Adjust the new compressor’s factory oil charge exactly as directed by its manufacturer and Honda’s oil-replacement table.
- Do not automatically pour in a full bottle. Honda notes that a new compressor arrives with a full oil charge that must be calculated and adjusted. civicx.com
Step 11: Install the replacement compressor
- Position the new compressor against its mounting bracket without opening its refrigerant ports.
- Start every mounting bolt by hand for at least three full turns.
- Use the metric socket and torque wrench to tighten the mounting bolts to the specification supplied with the matched compressor or current Honda service information.
- Do not substitute a generic mounting torque because bolt position and compressor revision can change the value.
Step 12: Install new O-rings and reconnect the lines
- Match the new O-rings to the old ones without reusing the old seals.
- Apply a thin film of the specified POE compressor oil to each new O-ring.
- Remove one cap at a time, install the line immediately, and start its bolt by hand.
- Use the metric socket and torque wrench to tighten each line connection to 9.8 Nm (7.2 ft-lbs).
- Reconnect the compressor electrical connector until its lock clicks.
Step 13: Reinstall the drive belt
- Route the belt according to your photograph, leaving the easiest pulley until last.
- Use the 14mm belt-tensioner tool to rotate the tensioner.
- Slip the belt onto the final pulley and release the tensioner slowly.
- Inspect every pulley and confirm all belt ribs are fully seated.
Step 14: Reinstall the undercover and battery cable
- Use the appropriate 8mm or 10mm socket and the original clips to reinstall the engine undercover.
- Raise the Civic with the floor jack, remove the stands, and lower it fully.
- Reconnect the negative battery cable with the 10mm wrench.
Step 15: Evacuate, charge, and leak-test the system
- Use the R-1234yf recover/recycle/recharge machine to evacuate the system for at least 30 minutes.
- Verify approximately -93.3 kPa (-27.55 inHg) and confirm the vacuum remains stable. A rapidly rising reading indicates a leak. civicx.com
- Add the calculated oil quantity with an R-1234yf-compatible oil injector.
- Charge by weight with 375-425g of R-1234yf. Never charge by pressure alone. civicx.com
- Use the R-1234yf electronic leak detector around both compressor fittings and the shaft area.
✅ After Repair
- Start the engine with the A/C initially switched off and inspect the belt tracking.
- Set the system to maximum cooling, recirculation on, and blower on high.
- Run the engine between 1,500 and 2,000 rpm for approximately ten minutes.
- Confirm the compressor engages smoothly and both cooling fans operate as commanded.
- Check for abnormal knocking, belt squeal, oily residue, or refrigerant leaks.
- Measure center-vent temperature and compare high-side and low-side pressures with Honda specifications for the ambient temperature.
- Recheck the line connections with the leak detector after the system has operated.
- If cooling fades again, do not add refrigerant blindly. Find the leak first.
💰 DIY vs Shop Cost
Shop Cost: Approximately ₹75,000-₹160,000, depending on compressor choice, refrigerant, contamination, and local R-1234yf equipment availability
DIY Cost: Approximately ₹35,000-₹75,000 for parts, refrigerant service, seals, and oil
You Save: Approximately ₹30,000-₹85,000 by doing the mechanical work yourself
Labor and R-1234yf service prices vary widely in Haryana. A clean compressor-only replacement usually takes a shop approximately 3-5 hours; contamination can multiply the cost.
🎯 Ready to get started?
HowToo makes it easy: same-day/2-day shipping on every part, plus all the tools and specialty tools you need! Check out the parts and tools sections below to add everything to your cart.