







How to Replace Taillight Bulbs on a 2007 Toyota Tacoma (Brake, Turn Signal, Reverse)
Step-by-step taillight assembly removal, bulb socket locations, tools/parts list, and final light testing tips for 2005, 2006, 2007, 2008, 2009, 2010, 2011, 2012, 2013, 2014, 2015
How to Replace Taillight Bulbs on a 2007 Toyota Tacoma (Brake, Turn Signal, Reverse)
Step-by-step taillight assembly removal, bulb socket locations, tools/parts list, and final light testing tips for 2005, 2006, 2007, 2008, 2009, 2010, 2011, 2012, 2013, 2014, 2015


🔧 Tacoma - Taillight Bulb Replacement
You’ll remove each taillight assembly, twist out the bulb sockets, and swap the bulbs. This is a simple job, but the housing has alignment pins that need a straight pull to avoid cracking the lens.
Difficulty Level: Beginner | Estimated Time: 0.5-1.0 hours
⚠️ Safety & Precautions
- ⚠️ Park on level ground, set the parking brake, and turn the lights OFF.
- ⚠️ Let bulbs cool before touching; they can get very hot.
- ⚠️ Don’t touch new bulb glass with bare fingers; skin oil can shorten bulb life.
- ⚠️ Pull the taillight housing straight back; the alignment pins can snap if twisted.
- ⚠️ Battery disconnect is not required for this repair.
🔧 Required Tools
You'll need the following tools for this repair:
- #2 Phillips screwdriver
- Plastic trim removal tool (specialty)
- Clean nitrile gloves
- Safety glasses
- Small flashlight
🔩 Required Parts
HowToo sells all the parts you need for this repair:
- Rear tail/stop bulb - Replace in pairs - Qty: 2
- Rear turn signal bulb - Replace in pairs - Qty: 2
- Reverse (backup) bulb - Replace in pairs - Qty: 2
📋 Before You Begin
- Park the Tacoma on a flat surface and set the parking brake.
- Open the tailgate for easier access to the taillight screws.
- Put on clean nitrile gloves and safety glasses.
- Tip: Take a quick photo of socket positions.
🔨 Step-by-Step Instructions
Follow these steps in order:
Step 1: Remove the driver-side taillight assembly
- Use a small flashlight to locate the two screws on the taillight lens (accessible with the tailgate open).
- Remove both screws using a #2 Phillips screwdriver.
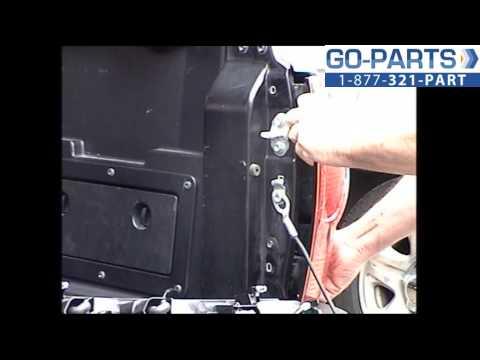
- Grip the taillight housing and pull it straight rearward to release the alignment pins.
- If it’s stuck, gently help it with a plastic trim removal tool (specialty) by prying at the edge a little at a time. (An alignment pin is a smooth “peg” that snaps into a grommet to hold the lamp.)
Step 2: Identify the bulb sockets
- Look behind the housing and find the twist-lock bulb sockets.
- Use your small flashlight to confirm which socket you’re changing (tail/stop, turn, reverse).
- Tip: Turn only one socket at a time.
Step 3: Remove the bulb socket(s)
- Twist the socket counterclockwise by hand to unlock it, then pull it straight out.
- If it’s tight, use clean nitrile gloves for better grip (do not use pliers).
Step 4: Replace the bulb(s)
- Pull the old bulb straight out of the socket (some bulbs are wedge-fit; they just pull out).
- Install the new bulb fully into the socket.
- Do not touch the bulb glass—use clean nitrile gloves.
- Tip: Match the bulb number printed on the old bulb.
Step 5: Reinstall the socket(s) and test (driver side)
- Insert each socket back into the housing and twist clockwise by hand until it locks.
- Before reinstalling the housing, turn the ignition ON and test each function:
- Parking lights (tail light)
- Brake pedal (stop light)
- Turn signal / hazard
- Reverse lights (key ON, shift to reverse with clutch in and parking brake set)
Step 6: Reinstall the driver-side taillight assembly
- Line up the alignment pins and press the housing straight forward until it seats flush.
- Reinstall the two screws using a #2 Phillips screwdriver. Snug them up—do not over-tighten.
Step 7: Repeat on the passenger side
- Repeat Steps 1 through 6 on the passenger-side taillight using the same #2 Phillips screwdriver and plastic trim removal tool (specialty) if needed.
- Tip: Replacing bulbs in pairs keeps brightness even.
✅ After Repair
- Do a final full light check: tail, brake, left/right turn, hazards, reverse.
- Make sure both taillight housings sit flush and don’t wobble.
- If a new bulb doesn’t work, remove it and re-seat it firmly in the socket, then re-test.
💰 DIY vs Shop Cost
Shop Cost: $80-$180 (parts + labor)
DIY Cost: $10-$45 (parts only, depending on which bulbs)
You Save: $70-$135 by doing it yourself!
Shop labor rates vary but typically run $100-$150/hour. This repair takes a shop approximately 0.5-1.0 hours.
🎯 Ready to get started?
HowToo makes it easy: same-day/2-day shipping on every part, plus all the tools and specialty tools you need! Check out the parts and tools sections below to add everything to your cart.