


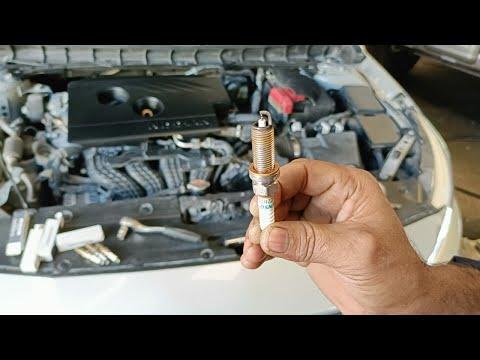






How to Replace Spark Plugs on a 2019-2024 Nissan Altima 2.0L Turbo (Engine: Inline 4 2.0L)
Step-by-step instructions with required tools, plug gap, torque specs, and safety tips for 2019, 2020, 2021, 2022, 2023, 2024
How to Replace Spark Plugs on a 2019-2024 Nissan Altima 2.0L Turbo (Engine: Inline 4 2.0L)
Step-by-step instructions with required tools, plug gap, torque specs, and safety tips for 2019, 2020, 2021, 2022, 2023, 2024


🔧 Altima - Spark Plug Replacement
This is a manageable job if you work on a completely cold engine and start every plug by hand. Your Altima uses four long-life iridium spark plugs, and Nissan specifies replacement every 105,000 miles. nissanusa.com)
Difficulty Level: Intermediate | Estimated Time: 1-2 hours
Verified specification: The KR20DDET uses four NGK DILKAR7N9HG-type plugs with a nominal 0.9 mm (0.035 inch) gap. Nissan says not to clean or regap these iridium plugs. carmanualsonline.info)
⚠️ Safety & Precautions
- ⚠️ Let the engine become completely cold before removing the plugs.
- ⚠️ Switch the ignition off, engage the parking brake, and keep the key away from the vehicle.
- ⚠️ Never remove a plug while dirt is sitting around its well.
- ⚠️ Start each new plug by hand. Cross-threading can damage the aluminum cylinder head.
- ⚠️ Don’t use anti-seize compound unless the plug manufacturer specifically requires it.
- ⚠️ Don’t pry against the ignition coils or pull them by their wiring.
- ⚠️ Battery disconnection isn’t normally required for this repair.
🔧 Required Tools
You'll need the following tools for this repair:
- 8mm socket
- 10mm socket
- 14mm thin-wall spark plug socket
- 3/8-inch drive ratchet
- 3/8-inch drive 6-inch extension
- 3/8-inch drive inch-pound torque wrench
- Small flat-blade screwdriver
- Compressed-air blow gun
- 0.9mm wire spark plug gap gauge
- Clean shop towels
- Nitrile gloves
- Safety glasses
🔩 Required Parts
HowToo sells all the parts you need for this repair:
- KR20DDET-compatible iridium spark plugs - Qty: 4
Replace all four together. The spark-plug aisle is open in the parts sidebar and already scoped to your Altima.
📋 Before You Begin
- Park on level ground, select Park, and engage the parking brake.
- Allow the engine to cool for several hours. Overnight is ideal.
- Open the hood and remove loose dirt from the top of the engine.
- Take a photo of any hoses or brackets before moving them.
- Work on one cylinder at a time so every coil returns to its original position.
- No infotainment service mode, scan tool, battery registration, or programming is required.
🔨 Step-by-Step Instructions
Follow these steps in order:
Step 1: Remove the engine cover
- Use the appropriate 8mm or 10mm socket if retaining fasteners are fitted.
- If the cover uses rubber grommets, grip it near each mounting point and pull straight upward.
- Set the cover and its fasteners aside.
Step 2: Clear access to the ignition coils
- Identify the four ignition coils positioned in a row on top of the engine.
- Use the 8mm or 10mm socket to move any small bracket obstructing direct access.
- Don’t disconnect intake hoses unless they genuinely block coil removal.
Step 3: Disconnect the first ignition coil
- Press the electrical connector lock and pull the connector straight backward.
- Use the small flat-blade screwdriver only to release a stubborn locking tab.
- Don’t pull on the wires. Connector repairs turn a simple tune-up into a bad afternoon.
Step 4: Remove the ignition coil
- Use the correctly fitting 8mm or 10mm socket and ratchet to remove the coil retaining bolt.
- Twist the coil gently to release its rubber boot, then pull it straight upward.
- Inspect the boot for cracks, swelling, oil, or white tracking marks.
Step 5: Clean the spark plug well
- Put on the safety glasses.
- Use the compressed-air blow gun to remove sand and debris from the well.
- Cover nearby openings with clean shop towels while blowing.
- If oil is pooled around the plug, stop and address the sealing leak before continuing.
Step 6: Remove the old spark plug
- Fit the 14mm thin-wall spark plug socket to the 6-inch extension and ratchet.
- Seat the socket fully and turn counterclockwise with steady pressure.
- Once loose, remove the ratchet and spin the plug out gently with the extension.
- If the plug becomes unusually tight, reverse direction slightly and work slowly. Don’t force it.
Step 7: Inspect the removed plug
- Check for heavy black carbon, wet fuel, oily deposits, a cracked insulator, or a damaged electrode.
- Compare all four old plugs as they come out. One noticeably different plug may identify a cylinder-specific problem.
- Keep the old plugs arranged in cylinder order until the engine has passed its final test.
Step 8: Inspect the new spark plug
- Confirm the new plug matches the old plug’s thread length and terminal arrangement.
- Use the 0.9mm wire spark plug gap gauge only to verify the nominal 0.9 mm (0.035 inch) gap.
- Don’t force a wedge-style gauge between the fine electrodes and don’t bend the electrode to adjust it. Nissan specifically warns against regapping its iridium plugs. nissanusa.com)
- Keep the plug threads clean and dry.
Step 9: Hand-thread the new spark plug
- Place the plug in the 14mm thin-wall spark plug socket and attach only the extension.
- Lower it carefully into the well so the electrode doesn’t strike the cylinder head.
- Turn the extension clockwise by hand for several complete rotations.
- If it doesn’t turn easily, remove it and start again. Never use the ratchet to begin the threads.
Step 10: Torque the spark plug
- Attach the inch-pound torque wrench to the extension and spark plug socket.
- Tighten the plug to 19.6 Nm (14 ft-lbs or 168 in-lbs). This specification is listed for the KR20DDET engine. lemon-manuals.gy
- Stop as soon as the torque wrench clicks. Don’t give it an extra pull.
Step 11: Reinstall the ignition coil
- Push the coil straight over the plug until its boot is fully seated.
- Start the retaining bolt by hand, then tighten it gently with the matching 8mm or 10mm socket.
- Reconnect the electrical connector until its lock clicks.
- Small coil bolts need very little force.
Step 12: Replace the remaining three plugs
- Repeat Steps 3 through 11 for each remaining cylinder.
- Use the compressed-air blow gun before opening every plug well.
- Torque every spark plug individually to 19.6 Nm (14 ft-lbs).
Step 13: Reassemble the engine cover
- Verify that all four coil connectors are locked and no tools remain in the engine bay.
- Reinstall any brackets using the appropriate 8mm or 10mm socket.
- Align the engine cover with its mounts and press it down evenly, or reinstall its original fasteners.
✅ After Repair
- Start the engine and let it idle for two to three minutes.
- Listen for a smooth, even idle and watch for a flashing check-engine light.
- Switch the engine off immediately if it shakes badly, misfires, or the warning light flashes.
- If there’s a misfire, recheck every coil connector and make sure each coil is fully seated.
- Take a short, gentle test drive after the idle check passes.
- No spark-plug programming or relearn procedure is normally required.
💰 DIY vs Shop Cost
Shop Cost: $250-$500 USD equivalent, depending on local parts and labor
DIY Cost: $50-$120 USD equivalent for four plugs
You Save: Approximately $150-$380 by doing it yourself!
Labor prices around Sonīpat can differ considerably from U.S. rates. The job normally takes a shop approximately 1-1.5 hours.
🎯 Ready to get started?
HowToo makes it easy with same-day/2-day shipping on every part, plus all the tools and specialty tools you need! Check out the parts and tools sections below to add everything to your cart.
