

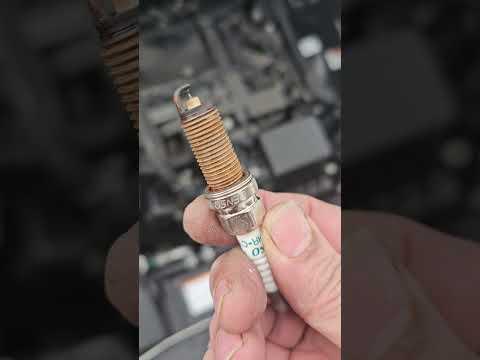






How to Replace Spark Plugs on a 2016-2026 Toyota Prius 1.8L (Engine: Inline 4 1.8L)
Step-by-step DIY guide with required tools, cowl removal, torque specs, and safety tips for 2016, 2017, 2018, 2019, 2020, 2021, 2022
How to Replace Spark Plugs on a 2016-2026 Toyota Prius 1.8L (Engine: Inline 4 1.8L)
Step-by-step DIY guide with required tools, cowl removal, torque specs, and safety tips for 2016, 2017, 2018, 2019, 2020, 2021, 2022


🔧 Prius - Spark Plug Replacement
Your Prius uses four long-life iridium spark plugs beneath the ignition coils. Access requires removing the windshield wiper arms and cowl assembly, then replacing each plug carefully to protect the aluminum cylinder-head threads.
Difficulty Level: Intermediate | Estimated Time: 1.5-2.5 hours
Assumption: This procedure is for the stock U.S.-market 1.8L 2ZR-FXE engine.
⚠️ Safety & Precautions
- ⚠️ Let the engine cool completely before removing the spark plugs.
- ⚡ Keep hands and tools away from orange hybrid high-voltage cables and connectors.
- 🔋 Disconnect the 12-volt battery negative terminal so the hybrid system cannot start the engine unexpectedly.
- 🗝️ Keep the smart key at least 15 feet from your Prius while working.
- 🚫 Never apply anti-seize compound to the spark-plug threads; it can cause over-tightening.
- 🧤 Wear gloves and safety glasses when cleaning the plug wells.
🔧 Required Tools
You'll need the following tools for this repair:
- 10mm socket
- 12mm socket
- 14mm thin-wall spark plug socket with rubber retainer
- 3/8-inch drive ratchet
- 3/8-inch drive 3-inch extension
- 3/8-inch drive 6-inch extension
- 3/8-inch drive torque wrench rated 10-80 Nm
- 1/4-inch drive inch-pound torque wrench rated 50-150 in-lbs
- Wiper arm puller (specialty)
- Small flat-blade trim tool
- Plastic clip-removal tool
- 0.9mm wire-type spark plug gap gauge
- Low-pressure compressed-air nozzle
- Masking tape and permanent marker
- Fender cover
- Nitrile mechanic gloves
- Safety glasses
🔩 Required Parts
HowToo sells all the parts you need for this repair:
- OEM-spec iridium spark plugs - Qty: 4
- Windshield cowl retaining clips - Qty: As needed
Use only plugs cataloged for the 2ZR-FXE engine. The original specification is a fine-wire iridium plug with a nominal 0.9mm gap; verify the replacement application rather than selecting plugs by appearance.
📋 Before You Begin
- 🅿️ Park your Prius on level ground, select Park, apply the parking brake, and press the POWER switch off.
- 🌡️ Wait until the engine is completely cold. Aluminum threads are easiest to damage when hot.
- 🗝️ Remove the smart key from the work area and wait at least five minutes.
- 📍 Use masking tape and a permanent marker to mark both wiper-blade positions on the windshield.
- 🔋 Open the hatch before disconnecting the 12-volt battery. Disconnect its negative terminal with a 10mm socket and isolate the cable so it cannot spring back.
- 🛡️ Place a fender cover over the painted bodywork.
🔨 Step-by-Step Instructions
Follow these steps in order:
Step 1: Remove the Windshield Wiper Arms
- Use a small flat-blade trim tool to lift the plastic cap from each wiper-arm pivot.
- Use a 14mm socket and 3/8-inch ratchet to remove both wiper-arm nuts.
- Use masking tape and a permanent marker to label the driver and passenger arms.
- Rock each arm gently at its pivot. If stuck, use a wiper arm puller rather than prying against the glass.
- Leave the position tape on the windshield.
Step 2: Remove the Cowl Top Panel
- Use a plastic clip-removal tool to remove the cowl retaining clips and rubber weatherstrip fasteners.
- Release the cowl panel from the lower windshield edge with the plastic clip-removal tool.
- Lift the cowl sections away carefully. Do not force the plastic near the windshield.
- Place the clips in a container so they are not lost.
Step 3: Remove the Wiper Motor and Linkage Assembly
- Press the lock and unplug the wiper-motor electrical connector by hand. Pull on the connector body, not its wires.
- Use a 10mm socket, extension, and 3/8-inch ratchet to remove the wiper linkage mounting bolts.
- Lift out the motor and linkage as one assembly.
- Use a 10mm and 12mm socket as applicable to remove the upper cowl brace fasteners, then lift the brace out for access.
- Keep each fastener grouped with the component it secures.
Step 4: Clean the Ignition-Coil Area
- Use a low-pressure compressed-air nozzle while wearing safety glasses to clear dirt from around all four ignition coils.
- An ignition coil is the narrow electrical unit fitted directly over each spark plug.
- Do not allow debris to fall into an open spark-plug well.
Step 5: Remove the Ignition Coils
- Press each connector lock and unplug the four ignition-coil connectors by hand.
- Use masking tape and a permanent marker to label the coils 1 through 4 from the passenger side toward the driver side.
- Use a 10mm socket and 3/8-inch ratchet to remove one retaining bolt from each coil.
- Twist each coil gently, then pull it straight upward.
- Inspect the rubber boots for cracks, oil, or white electrical tracking marks.
Step 6: Remove the Old Spark Plugs
- Use a low-pressure compressed-air nozzle to clean each plug well again before loosening a plug.
- Use a 14mm thin-wall spark plug socket, 6-inch extension, and 3/8-inch ratchet to loosen each plug counterclockwise.
- Remove the plugs one at a time. Stop if a plug binds after initially loosening; work it gently back and forth rather than forcing it.
- Check the old plugs for oil fouling, heavy deposits, cracked ceramic, or one plug that looks noticeably different.
Step 7: Inspect the New Spark Plugs
- Use a 0.9mm wire-type spark plug gap gauge to verify the nominal gap without forcing the gauge between the fine electrodes.
- Do not bend or scrape the iridium center electrode. Replace any plug that was dropped or has cracked ceramic.
- Do not apply anti-seize to the threads and do not coat the electrodes.
Step 8: Install the New Spark Plugs
- Place one new plug in the 14mm thin-wall spark plug socket and attach the 6-inch extension without the ratchet.
- Turn the extension clockwise by hand until the plug seats. It should thread in smoothly for several turns.
- If resistance appears immediately, remove the plug and restart it by hand to avoid cross-threading.
- Attach the 3/8-inch drive torque wrench and tighten each new plug to 18 Nm (13 ft-lbs).
- Repeat for all four cylinders.
Step 9: Reinstall the Ignition Coils
- Push each labeled ignition coil straight over its spark plug until fully seated.
- Install each coil bolt by hand, then use a 10mm socket and 1/4-inch drive torque wrench to tighten it to 10 Nm (89 in-lbs).
- Reconnect each electrical connector by hand until its lock clicks.
- Gently tug each connector body to verify it is secure.
Step 10: Reassemble the Cowl Area
- Position the upper cowl brace and start every fastener by hand.
- Use the correct 10mm or 12mm socket and torque wrench to tighten the brace fasteners to their original positions. Do not interchange bolts or overtighten the sheet-metal mounts.
- Position the wiper motor and linkage assembly, then start its mounting bolts by hand.
- Use a 10mm socket and torque wrench to tighten the wiper-linkage mounting bolts securely to their original factory seating.
- Reconnect the wiper-motor connector by hand until it clicks.
- Reinstall the cowl panels, weatherstrip, and retaining clips using the plastic clip-removal tool by hand.
Step 11: Reinstall the Wiper Arms
- Align the wiper blades with the masking-tape marks on the windshield.
- Install the arm nuts by hand, then use a 14mm socket and torque wrench to tighten them to 26 Nm (19 ft-lbs).
- Press the plastic pivot caps into place by hand.
- Remove the masking tape from the windshield.
Step 12: Reconnect the 12-Volt Battery
- Use a 10mm socket and 1/4-inch drive torque wrench to reconnect the negative terminal securely.
- Make sure the terminal cannot rotate by hand. Do not overtighten or deform it.
✅ After Repair
- ✅ Confirm no tools or loose hardware remain in the engine compartment.
- 🚗 Press the brake pedal and start your Prius. Confirm the green READY indicator illuminates.
- 👂 Listen for smooth operation and verify there is no shaking, misfire, or warning light.
- 🧹 Turn the wipers on briefly with a wet windshield. Verify both blades park at the tape-marked height and do not strike the body or windshield edge.
- ⚠️ If the check-engine light flashes, shut the vehicle off immediately and recheck the coil connectors and coil seating.
- 🕒 Reconnect-related clock or personal settings may need to be restored.
💰 DIY vs Shop Cost
Shop Cost: $250-$450 (parts + labor)
DIY Cost: $45-$100 (parts only)
You Save: $150-$350 by doing it yourself!
Shop labor rates vary but typically run $100-$150/hour. This repair takes a shop approximately 1.0-1.5 hours.
🎯 Ready to get started?
HowToo makes it easy: same-day/2-day shipping on every part, plus all the tools and specialty tools you need! Check out the parts and tools sections below to add everything to your cart.