


How to Replace Side View Mirrors on a 2017-2019 Ford Fusion (Trim: Energi Platinum)
Step-by-step door panel removal, wiring, tools, parts, torque specs, and safety tips for 2017, 2018
How to Replace Side View Mirrors on a 2017-2019 Ford Fusion (Trim: Energi Platinum)
Step-by-step door panel removal, wiring, tools, parts, torque specs, and safety tips for 2017, 2018
🔧 Fusion - Side View Mirror Replacement
Replacing a side view mirror on your Fusion means removing the front door trim panel, unplugging the mirror wiring, unbolting the mirror from inside the door, and installing the new mirror assembly. This is a good beginner-friendly repair if you work slowly and protect the door trim.
Difficulty Level: Beginner-Intermediate | Estimated Time: 45-90 minutes per side
⚠️ Safety & Precautions
- ⚠️ Disconnect the 12-volt battery negative cable before unplugging mirror or door electrical connectors.
- ⚠️ Your Fusion is a plug-in hybrid, but this repair does not require high-voltage service. Do not touch orange high-voltage cables or components.
- ⚠️ Wear safety glasses if the mirror glass is cracked or broken.
- ⚠️ Support the mirror with one hand when removing the last nut so it does not fall and scratch the door.
- ⚠️ Do not pry against painted metal with a metal screwdriver. Use plastic trim tools to avoid damage.
🔧 Required Tools
You'll need the following tools for this repair:
- 10mm socket
- 7mm socket
- Ratchet wrench 1/4-inch drive
- Socket extension 6-inch
- Torque wrench inch-pound 1/4-inch drive
- Plastic trim removal tool set
- Small flat-blade screwdriver
- Panel clip removal pliers
- Painter’s tape 2-inch wide
- Microfiber towel
- Work light
- Mechanic gloves
- Safety glasses
🔩 Required Parts
HowToo sells all the parts you need for this repair:
- Side view mirror assembly - Qty: 1 per affected side
- Front door trim panel clips - Qty: 4-8 recommended
- Mirror mounting nuts - Qty: 3 if damaged or missing
📋 Before You Begin
- Park your Fusion on level ground and turn the ignition off.
- Open the affected front door fully.
- Cover the painted area below the mirror with a microfiber towel and secure it with painter’s tape 2-inch wide.
- Use a 10mm socket to disconnect the 12-volt battery negative cable. On Fusion Energi models, the 12-volt battery is in the trunk area.
- A plastic trim removal tool is a non-metal pry tool used to remove panels without scratching them.
- A panel clip is a small plastic fastener that snaps the door panel to the door shell.
🔨 Step-by-Step Instructions
Follow these steps in order:
Step 1: Remove the Front Door Switch Trim
- Use a plastic trim removal tool to gently pry up the window switch trim from the armrest.
- Use a small flat-blade screwdriver to press the connector lock tabs.
- Unplug the window switch and mirror switch connectors by hand.
- Tip: Take a photo first.
Step 2: Remove the Door Panel Screws
- Use a plastic trim removal tool to remove the small screw covers in the pull handle and door trim areas.
- Use a 7mm socket with a ratchet wrench 1/4-inch drive to remove the door panel screws.
- Set the screws aside in order so they go back in the same locations.
Step 3: Release the Front Door Panel
- Use a plastic trim removal tool at the lower edge of the door panel to start releasing the clips.
- Use panel clip removal pliers if a clip stays stuck in the metal door.
- Pull around the lower and side edges until the clips release.
- Lift the door panel straight upward to unhook it from the window ledge.
- Use a small flat-blade screwdriver to unlock any remaining electrical connectors.
- Disconnect the interior door handle cable by hand if it blocks panel removal.
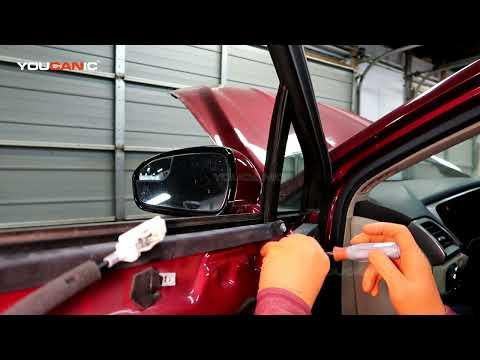
Step 4: Remove the Mirror Sail Panel
- The sail panel is the small triangular trim piece at the front upper corner of the door.
- Use a plastic trim removal tool to gently pry the sail panel away from the door.
- Pull it straight outward to release the clips.
- If equipped with a tweeter speaker, use a small flat-blade screwdriver to release the connector lock and unplug it.
Step 5: Unplug the Mirror Connector
- Use a work light to locate the mirror wiring connector inside the upper front area of the door.
- Use a small flat-blade screwdriver to press the connector lock tab.
- Unplug the mirror connector by hand.
- Free the mirror wiring harness from any clips by hand.
Step 6: Remove the Old Mirror
- Support the mirror outside the door with one hand.
- Use a 10mm socket, socket extension 6-inch, and ratchet wrench 1/4-inch drive to remove the 3 mirror mounting nuts.
- Guide the mirror wiring through the opening.
- Remove the mirror from the outside of the door.
- Tip: Do not drop the nuts.
Step 7: Install the New Mirror
- Feed the new mirror wiring through the door opening by hand.
- Set the mirror gasket flat against the door. The gasket is the rubber seal between the mirror and painted door surface.
- Start all 3 mirror mounting nuts by hand.
- Use a 10mm socket and socket extension 6-inch to snug the nuts evenly.
- Use a torque wrench inch-pound 1/4-inch drive to tighten the mirror nuts to Torque to 8 Nm (71 in-lbs).
Step 8: Connect and Test the New Mirror
- Plug the mirror connector in by hand until it clicks.
- Temporarily reconnect the window switch and mirror switch connectors by hand.
- Use a 10mm socket to reconnect the 12-volt battery negative cable.
- Turn the ignition on.
- Test mirror glass adjustment, power fold if equipped, heat if equipped, puddle lamp if equipped, memory function if equipped, and blind spot indicator if equipped.
- If something does not work, turn ignition off and check the connector seating.
Step 9: Reinstall the Sail Panel
- If equipped with a tweeter speaker, reconnect the speaker connector by hand until it clicks.
- Line up the sail panel clips.
- Press the sail panel into place by hand until it snaps in evenly.
Step 10: Reinstall the Door Panel
- Reconnect the interior door handle cable by hand if removed.
- Reconnect all door panel electrical connectors by hand.
- Hook the top of the door panel over the window ledge.
- Line up the clips and press around the edges with your palm until they snap in.
- Use a 7mm socket to reinstall the door panel screws.
- Use a torque wrench inch-pound 1/4-inch drive to tighten the door panel screws to Torque to 2 Nm (18 in-lbs).
- Snap the screw covers and switch trim back into place by hand.
Step 11: Final Battery and Function Check
- Use a 10mm socket to confirm the 12-volt battery negative cable is snug.
- Start your Fusion and check for warning messages.
- Use the mirror switch to adjust the mirror in all directions.
- Set the mirror to your normal driving position.
✅ After Repair
- ✅ Check the mirror from outside to confirm it sits flush against the door.
- ✅ Verify the door locks, window switch, speaker, and mirror switch all work.
- ✅ If your Fusion has blind spot monitoring, confirm the blind spot indicator lights briefly during startup self-check.
- ✅ If your Fusion has memory mirrors, store your preferred mirror position again using the seat memory buttons.
- ✅ Drive at low speed and listen for wind noise around the new mirror.
💰 DIY vs Shop Cost
Shop Cost: $350-$800 per side depending on mirror options and paint finish
DIY Cost: $120-$450 per side for parts only
You Save: $230-$350 by doing it yourself!
Shop labor rates vary but typically run $100-$150/hour. This repair takes a shop approximately 0.8-1.5 hours.
🎯 Ready to get started?
HowToo makes it easy: same-day/2-day shipping on every part, plus all the tools and specialty tools you need! Check out the parts and tools sections below to add everything to your cart.
