







How to Replace Shock Absorbers on a 2015-2020 Ford F-150 (Trim: XL)
Step-by-step front strut and rear shock guide with tools, parts, torque specs, and safety tips for 2015, 2016, 2017, 2018, 2019, 2020
How to Replace Shock Absorbers on a 2015-2020 Ford F-150 (Trim: XL)
Step-by-step front strut and rear shock guide with tools, parts, torque specs, and safety tips for 2015, 2016, 2017, 2018, 2019, 2020


🔧 F-150 - Shock Absorber Replacement
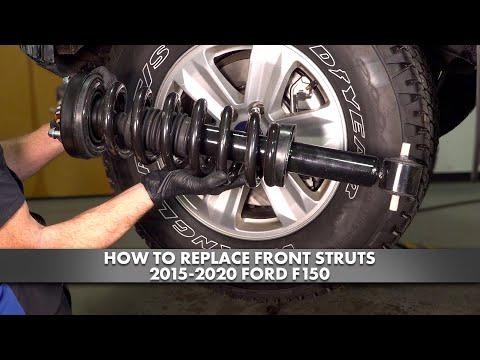
This repair replaces the shock absorbers, which help control bouncing and keep the tires planted on the road. On your F-150, the front uses shock/coil spring strut-style assemblies, and the rear uses separate shock absorbers.
Difficulty Level: Intermediate | Estimated Time: 2-4 hours
⚠️ Safety & Precautions
- ⚠️ Work on a flat, solid surface and never rely on a jack alone.
- ⚠️ Use jack stands under the frame before removing any shock absorber.
- ⚠️ Do not loosen or remove the center nut on a front strut/coil spring assembly unless using a proper spring compressor. The coil spring is under heavy tension and can cause serious injury.
- ⚠️ Replace shock absorbers in pairs: both front or both rear. For best ride control, replace all four if they are worn.
- ⚠️ Battery disconnect is not required for this repair.
🔧 Required Tools
You'll need the following tools for this repair:
- Floor jack rated 3-ton minimum
- Jack stands rated 3-ton minimum
- Wheel chocks
- 1/2-inch drive breaker bar
- 1/2-inch drive torque wrench
- 13mm socket
- 15mm socket
- 18mm socket
- 21mm socket
- 27mm socket
- 15mm wrench
- 18mm wrench
- 21mm wrench
- 27mm wrench
- Ratchet
- Socket extension set
- Trim clip removal tool
- Pry bar
- Rubber mallet
- Penetrating oil
- Paint marker
- Safety glasses
- Mechanic gloves
🔩 Required Parts
HowToo sells all the parts you need for this repair:
- Front shock/strut assemblies - Replace in pairs - Qty: 2
- Rear shock absorbers - Replace in pairs - Qty: 2
- Front upper shock mounting nuts - Qty: 6
- Shock mounting hardware kit - Qty: 1
📋 Before You Begin
- 📋 Park your F-150 on level ground and shift to Park.
- 📋 Set the parking brake and place wheel chocks in front of and behind the wheels that stay on the ground.
- 📋 Spray penetrating oil on the shock mounting bolts and nuts 10-15 minutes before removal.
- 📋 A torque wrench is a tool that tightens bolts to the correct tightness so they are not too loose or too tight.
- 📋 A jack stand is a fixed support that safely holds the truck after lifting it with a floor jack.
- 📋 A breaker bar is a long handle used to loosen tight bolts by giving you more leverage.
🔨 Step-by-Step Instructions
Follow these steps in order:
Step 1: Loosen the Wheel Lug Nuts
- Use a 21mm socket and 1/2-inch drive breaker bar to loosen the lug nuts on the wheels you are removing.
- Only loosen them about 1/2 turn while the tires are still on the ground.
- Do not remove lug nuts yet.
Step 2: Lift and Support the Truck
- Use the floor jack rated 3-ton minimum to lift the front or rear of your F-150 by the frame.
- Place jack stands rated 3-ton minimum under the frame rails.
- Slowly lower the truck onto the jack stands.
- Gently shake the truck by hand to confirm it is stable before working underneath.
Step 3: Remove the Wheels
- Use the 21mm socket and ratchet to remove the loosened lug nuts.
- Remove the wheels and place them flat under the frame as an extra safety backup.
Step 4: Remove the Rear Shock Absorber Lower Bolt
- Support the rear axle lightly with the floor jack rated 3-ton minimum. Do not lift the truck off the stands.
- Use an 18mm socket and 18mm wrench to remove the lower rear shock bolt and nut.
- If the bolt is stuck, use penetrating oil and gently tap it with a rubber mallet.
Step 5: Remove the Rear Shock Absorber Upper Bolt
- Use an 18mm socket, 18mm wrench, and socket extension set to remove the upper rear shock bolt and nut from the frame bracket.
- Remove the rear shock absorber from the truck.
- Repeat Steps 4-5 on the other rear shock.
Step 6: Install the New Rear Shock Absorber
- Position the new rear shock absorber into the upper frame bracket by hand.
- Install the upper bolt and nut by hand first to prevent cross-threading.
- Use the floor jack rated 3-ton minimum to slightly raise or lower the axle until the lower shock hole lines up.
- Install the lower bolt and nut by hand.
- Use an 18mm socket, 18mm wrench, and 1/2-inch drive torque wrench to tighten the rear shock upper and lower bolts to Torque to 103 Nm (76 ft-lbs).
Step 7: Remove the Front Stabilizer Bar Link Nut
- For front shock/strut assembly replacement, use a 15mm socket and 15mm wrench to remove the stabilizer bar link nut at the lower control arm if it blocks access.
- The stabilizer bar link connects the suspension side-to-side to reduce body roll while turning.
- Move the link aside by hand after the nut is removed.
Step 8: Mark Front Shock Position
- Use a paint marker to mark the position of the lower shock mount and any alignment washers before removal.
- This helps place the new front assembly close to the original position.
- An alignment is still recommended afterward.
Step 9: Remove the Front Lower Shock Mount Nut and Bolt
- Use a 27mm socket, 27mm wrench, and 1/2-inch drive breaker bar to loosen the lower front shock mount nut and bolt.
- Remove the nut, then slide the bolt out by hand.
- If needed, use a rubber mallet and pry bar to carefully free the lower mount.
Step 10: Remove the Front Upper Shock Nuts
- Open the hood.
- Use a 13mm socket, ratchet, and socket extension set to remove the three upper shock mounting nuts from the top of the shock tower.
- Do not remove the large center nut on the shock assembly.
- The large center nut holds spring tension and is dangerous without a spring compressor.
Step 11: Remove the Front Shock/Strut Assembly
- Use a pry bar to carefully guide the lower mount free from the lower control arm.
- Lower the front shock/strut assembly out through the wheel opening.
- Keep hands clear of pinch points around the control arm.
Step 12: Install the New Front Shock/Strut Assembly
- Guide the new front shock/strut assembly into place through the wheel opening.
- Start the three upper mounting nuts by hand.
- Use a 13mm socket and 1/2-inch drive torque wrench to tighten the upper nuts to Torque to 30 Nm (22 ft-lbs).
Step 13: Install the Front Lower Shock Mount Bolt
- Use the floor jack rated 3-ton minimum under the lower control arm to gently raise it until the lower mounting holes line up.
- Slide the lower bolt through by hand.
- Install the nut by hand.
- Use a 27mm socket, 27mm wrench, and 1/2-inch drive torque wrench to tighten the lower shock mount bolt to Torque to 406 Nm (300 ft-lbs).
Step 14: Reinstall the Stabilizer Bar Link
- Use a 15mm socket and 15mm wrench to reinstall the stabilizer bar link nut if removed.
- Tighten the stabilizer bar link nut to Torque to 80 Nm (59 ft-lbs).
Step 15: Reinstall the Wheels
- Place the wheels back on the hubs.
- Use the 21mm socket and ratchet to install the lug nuts finger-tight.
- Use a star pattern so the wheel seats evenly.
Step 16: Lower the Truck and Torque Lug Nuts
- Use the floor jack rated 3-ton minimum to lift the truck slightly off the jack stands.
- Remove the jack stands rated 3-ton minimum.
- Lower the truck until the tires touch the ground.
- Use the 21mm socket and 1/2-inch drive torque wrench to tighten the lug nuts in a star pattern to Torque to 204 Nm (150 ft-lbs).
✅ After Repair
- ✅ Bounce each corner of your F-150 by hand. It should settle quickly without repeated bouncing.
- ✅ Test drive slowly first and listen for clunks, rattles, or rubbing.
- ✅ Recheck all visible shock mounting bolts after the test drive.
- ✅ Recheck lug nut torque after 25-50 miles.
- ✅ If front shock/strut assemblies were replaced, have the front wheel alignment checked.
💰 DIY vs Shop Cost
Shop Cost: $650-$1,200 for all four shocks/assemblies
DIY Cost: $250-$650 for parts only
You Save: $400-$550 by doing it yourself!
Shop labor rates vary but typically run $100-$150/hour. This repair takes a shop approximately 2-4 hours.
🎯 Ready to get started?
HowToo makes it easy: same-day/2-day shipping on every part, plus all the tools and specialty tools you need! Check out the parts and tools sections below to add everything to your cart.