

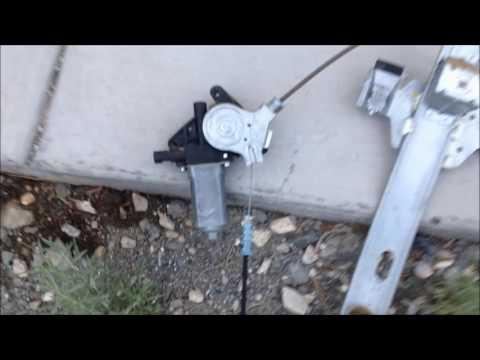






How to Replace Rear Window Regulators on a 2015-2020 Ford F-150 (Trim: Limited)
Step-by-step SuperCrew rear door guide with tools, parts, torque specs, and safety tips for 2015, 2016, 2017, 2018, 2019, 2020
How to Replace Rear Window Regulators on a 2015-2020 Ford F-150 (Trim: Limited)
Step-by-step SuperCrew rear door guide with tools, parts, torque specs, and safety tips for 2015, 2016, 2017, 2018, 2019, 2020


🔧 F-150 - Rear Door Window Regulator Replacement
This is an intermediate repair, but a careful first-timer can handle it. Each rear door panel comes off, the glass is released and secured, then the regulator and motor assembly is removed through the large door opening.
Difficulty Level: Intermediate | Estimated Time: 1.5-2 hours per door
Assumption: These instructions cover the power-window regulator and motor assembly in both SuperCrew rear doors. The left and right procedures are mirror images.
⚠️ Safety & Precautions
- ⚠️ Wear gloves and safety glasses. Door openings have sharp stamped-metal edges.
- ⚠️ Secure the glass before releasing it. Unsupported glass can fall inside the door and shatter.
- ⚠️ Keep your fingers away from the regulator cables and tracks whenever it has electrical power.
- ⚠️ Switch the ignition off before unplugging the motor or door wiring.
- ⚠️ Don’t slam or close the door while the glass is taped in position.
- ⚠️ Battery disconnection isn’t normally required if the ignition remains off after positioning the glass.
🔧 Required Tools
You'll need the following tools for this repair:
- 7mm socket
- 10mm socket
- 1/4-inch drive ratchet
- 1/4-inch drive 6-inch extension
- Inch-pound torque wrench rated 50-150 lb-in
- Plastic interior trim removal tool set
- Small flat-blade screwdriver
- Telescoping magnetic pickup tool
- Painter’s tape rated for glass
- Nylon cable ties
- Work gloves
- Safety glasses
- Portable work light
A trim removal tool is a flat plastic lever that releases clips without gouging the door panel.
🔩 Required Parts
HowToo sells all the parts you need for this repair:
- Left rear power window regulator and motor assembly - Qty: 1
- Right rear power window regulator and motor assembly - Qty: 1
- Rear door trim-panel clips - Qty: 1 set
- Automotive vapor-barrier sealing tape - Qty: 1 roll if the original adhesive won’t reseal
The regulator aisle didn’t populate correctly and is currently showing window switches. Don’t substitute a switch unless electrical testing proves the regulator and motor are working.
📋 Before You Begin
- 📋 Park your F-150 on level ground, shift into Park, set the parking brake, and open the first rear door fully.
- 📋 Lower the window until its glass-to-regulator retainers are visible through the door access openings.
- 📋 If the regulator has failed with the glass raised, leave the glass up and support it before releasing the regulator.
- 📋 Work on one door at a time. Keep left- and right-side parts separated.
- 📋 Take a phone photo of every connector and cable route before disconnecting it.
🔨 Step-by-Step Instructions
Follow these steps in order:
Step 1: Remove the Rear Door Trim Pieces
- Use a plastic interior trim removal tool to lift the trim cover inside the door pull.
- Use the same tool to release the small cover behind the interior door handle.
- Work slowly around the edges. The plastic becomes less forgiving with age and heat.
Step 2: Remove the Door-Panel Fasteners
- Use a 7mm socket, extension, and ratchet to remove the exposed door-panel screws.
- Check the pull-handle pocket, interior-handle area, lower panel edge, and rear edge for screws before pulling the panel.
- Place every screw in a labeled container for that door.
Step 3: Release the Door Panel
- Insert a plastic interior trim removal tool between the panel and metal door near a lower corner.
- Release the perimeter clips one at a time.
- Once the clips are free, lift the panel straight upward to unhook it from the window ledge.
- Support the panel while disconnecting its electrical connectors.
- Use a small flat-blade screwdriver only where necessary to release connector locks.
- Disconnect the interior-handle cable without sharply bending it.
Step 4: Remove the Speaker and Open the Vapor Barrier
- Use a 7mm socket and ratchet to remove the speaker fasteners.
- Pull the speaker outward and unplug its connector.
- Carefully peel the moisture barrier away from the large service opening.
- Don’t cut or discard this barrier. It keeps rainwater away from the interior trim and carpet.
- Sticky but reusable beats torn and leaking.
Step 5: Position and Secure the Window Glass
- Temporarily reconnect the window switch if the regulator still operates.
- Turn the ignition on only long enough to position the glass retainers at the access openings, then switch it off.
- Use a small flat-blade screwdriver or plastic trim tool to release the regulator’s glass-retaining tabs or clips.
- Raise the glass fully by hand.
- Run several long strips of painter’s tape over the top door frame, attaching both ends securely to the glass.
- Use enough tape to hold the glass independently of the regulator.
Step 6: Disconnect the Regulator
- Unplug the window-motor electrical connector.
- Use a 10mm socket, extension, and ratchet to remove the regulator mounting bolt and nuts.
- Hold the regulator as the last fastener is removed so it doesn’t drop against the door skin.
- If a fastener is recessed, use the telescoping magnetic pickup tool to keep it from falling inside the door.
- Ford service information for this regulator arrangement specifies approximately 10.5 Nm (93 lb-in) for the regulator mounting fasteners during installation. lemon-manuals.org.ua)
Step 7: Remove the Old Regulator
- Rotate the regulator and motor assembly inside the door until it lines up with the large service opening.
- Guide the motor through first, followed by the tracks and cables.
- Use nylon cable ties to contain loose or tangled cables if the old regulator has come apart.
- Check the bottom of the door for broken plastic, cable pieces, or dropped hardware.
Step 8: Install the New Regulator
- Compare the new and old assemblies outside the door. Confirm the connector, mounting studs, track positions, and glass retainers match.
- Remove any shipping clips or ties identified by the regulator manufacturer.
- Feed the replacement assembly through the large opening without bending its tracks.
- Connect the motor wiring before access becomes restricted.
- Start every nut and bolt by hand to prevent cross-threading.
- Use a 10mm socket and inch-pound torque wrench to tighten the regulator fasteners evenly to 10.5 Nm (93 lb-in). lemon-manuals.org.ua)
Step 9: Reconnect the Glass
- Confirm both glass channels are properly seated and free of folded weatherstrip.
- Remove the painter’s tape while supporting the glass with one hand.
- Lower the glass evenly into the regulator retainers.
- Press the glass downward until the retaining tabs positively lock.
- If your replacement uses clamp bolts instead of snap retainers, tighten them evenly to the specification supplied with that regulator. Don’t use the regulator mounting torque unless its instructions specifically say to do so.
Step 10: Test Before Closing the Door
- Reconnect the window switch and turn the ignition on.
- Keep hands and tools outside the door while operating the window.
- Run the glass slowly through one complete down-and-up cycle.
- Watch for tilting, clicking, cable rubbing, or the glass leaving either guide channel.
- Check that the wiring harness can’t contact the glass or regulator.
- If anything binds, stop immediately and correct the glass alignment.
Step 11: Reseal the Door
- Switch the ignition off and disconnect the temporary switch connection.
- Press the vapor barrier firmly into its original adhesive.
- Use automotive vapor-barrier sealing tape anywhere the original seal no longer holds.
- Use a 7mm socket and ratchet to reinstall the speaker.
- Tighten the speaker screws evenly until snug. Don’t crush the plastic mounting flange.
Step 12: Reinstall the Door Panel
- Reconnect the interior-handle cable and all electrical connectors.
- Hook the upper edge of the panel over the window ledge.
- Align every retaining clip before pressing the panel toward the door.
- Use the palm of your hand to seat the clips around the perimeter.
- Use a 7mm socket and ratchet to reinstall the panel screws snugly.
- Snap the trim covers back into place with your fingers.
- Repeat Steps 1 through 12 on the opposite rear door.
✅ After Repair
- ✅ Operate each rear window from its own switch and from the driver’s master switch.
- ✅ Confirm the window-lock button disables both rear switches correctly.
- ✅ Run each glass fully down and fully up several times while listening for rubbing or popping.
- ✅ Check that both windows stop squarely against the upper seals.
- ✅ Spray a light stream of water around each repaired window and verify no water reaches the trim-panel side of the vapor barrier.
- ✅ If one-touch operation is lost, close the window and hold the switch in the up position for several seconds, then perform a full down-and-up cycle.
💰 DIY vs Shop Cost
Shop Cost: $700-$1,200 for both rear doors
DIY Cost: $200-$500 for two regulator and motor assemblies plus clips and sealing material
You Save: Approximately $400-$700 by doing it yourself!
Shop labor rates vary but typically run $100-$150/hour. This repair takes a shop approximately 2-3 hours for both doors.
🎯 Ready to get started?
HowToo makes it easy: same-day/2-day shipping on every part, plus all the tools and specialty tools you need! Check out the parts and tools sections below to add everything to your cart.