


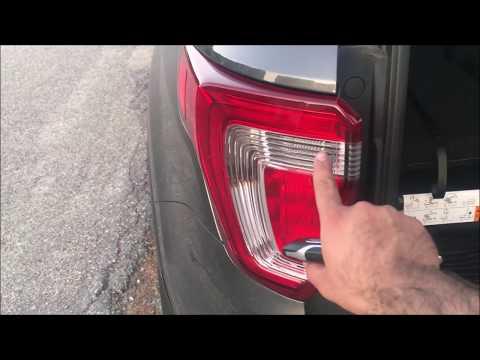







How to Replace Rear Turn Signal Bulbs on a 2013-2019 Ford Explorer
Step-by-step guide with tools, 7440NA bulb size, safety tips, and installation instructions for 2013, 2014, 2015, 2016, 2017, 2018, 2019
How to Replace Rear Turn Signal Bulbs on a 2013-2019 Ford Explorer
Step-by-step guide with tools, 7440NA bulb size, safety tips, and installation instructions for 2013, 2014, 2015, 2016, 2017, 2018, 2019


🔧 Explorer - Rear Turn Signal Bulb Replacement
This is an easy beginner repair. The outer rear lamp comes off with two 8mm bolts, then the amber bulb pulls straight from its socket. Ford specifies a WY21W 21-watt amber bulb, commonly sold in North America as a 7440NA or 7440 amber. fordservicecontent.com)
Difficulty Level: Beginner | Estimated Time: 20-30 minutes per side
⚠️ Safety & Precautions
- ⚠️ Switch off the ignition and all exterior lights.
- 🌡️ Let the rear lamp cool before touching the bulb.
- 🧤 Wear gloves and avoid squeezing the glass bulb.
- 💡 Do not replace the red brake and tail-light LED section. That section is not separately serviceable.
- 🔋 Battery disconnection is not required for this repair.
🔧 Required Tools
You'll need the following tools for this repair:
- 8mm socket
- 1/4-inch drive ratchet
- 3-inch socket extension
- Small flat-blade screwdriver
- Plastic trim removal tool
- Nitrile work gloves
- Safety glasses
- Clean microfiber towel
🔩 Required Parts
HowToo sells all the parts you need for this repair:
- WY21W or 7440NA amber rear turn signal bulbs - Replace in pairs - Qty: 2
The matching rear turn-signal bulb aisle is open in the parts sidebar. Stay with an amber 21-watt incandescent bulb unless an LED replacement is specifically designed to prevent rapid flashing.
📋 Before You Begin
- 🚙 Park your Explorer on level ground and shift into Park.
- 🔑 Turn the ignition and exterior lights completely off.
- 🚪 Open the liftgate fully.
- 🧺 Place a clean microfiber towel nearby for the removed lamp.
- 💡 If replacing both bulbs, complete one side at a time for an easy reference.
🔨 Step-by-Step Instructions
Follow these steps in order:
Step 1: Remove the fastener covers
- Find the two small covers along the inside edge of the rear lamp, exposed with the liftgate open.
- Use the plastic trim removal tool to carefully lift each cover.
- If necessary, use the small flat-blade screwdriver with very light pressure.
- Plastic trim marks easily, so take your time.
Step 2: Remove the rear-lamp bolts
- Use the 8mm socket, 1/4-inch drive ratchet, and 3-inch extension to remove both bolts.
- Place the bolts and covers somewhere they cannot fall into the cargo area.
Step 3: Release the lamp assembly
- Grip the lamp with both hands and pull it straight rearward.
- Use the plastic trim removal tool only if the lamp is stuck.
- Do not twist the housing sideways. Plastic locating pins secure its outside edge and can break if the lamp is levered outward.
- Support the housing instead of letting it hang from its wiring. Those pins are tougher than they look, right up until they aren't.
Step 4: Remove the turn-signal socket
- Release the wiring from its retaining clip by hand if it limits movement.
- Identify the rear direction-indicator socket, not the reversing-lamp socket.
- Turn the socket counterclockwise by hand and pull it from the housing. Ford identifies the rear direction indicator as the separate replaceable bulb position. fordservicecontent.com
Step 5: Replace the bulb
- Use your gloved fingers to pull the old bulb straight out of the socket.
- Inspect the socket for melted plastic, green corrosion, or darkened terminals.
- Press the new WY21W or 7440NA amber bulb straight into the socket until fully seated.
- Do not apply grease directly across the electrical contacts.
Step 6: Test the new bulb
- Insert the socket into the lamp and turn it clockwise until locked.
- Temporarily support the lamp by hand.
- Switch on the hazard lights and confirm the new bulb flashes at a normal speed.
- Switch the ignition and lights off again before installation.
Step 7: Reinstall the lamp assembly
- Reconnect any electrical connector or wiring clip removed earlier.
- Align the lamp's locating pins with their body openings.
- Press the housing straight forward using both hands until it sits flush.
- Never use the mounting bolts to pull a misaligned lamp into position.
Step 8: Install the bolts and covers
- Start both bolts by hand to prevent cross-threading.
- Use the 8mm socket and 1/4-inch drive ratchet to tighten them evenly.
- Torque: Ford's owner procedure does not publish a fastener torque. Tighten lightly until snug.
- Reinstall the two covers by pressing them into place by hand.
✅ After Repair
- ✅ Operate the left and right turn signals individually.
- 🚨 Switch on the hazard lights and confirm both rear indicators flash evenly.
- 🔍 Check that the lamp housing sits flush and does not move when gently pressed.
- ⚡ Rapid flashing usually means a bulb is incorrect, poorly seated, or another signal bulb has failed.
- 💧 After the next wash or rain, inspect the housing for internal condensation.
💰 DIY vs Shop Cost
Shop Cost: $35-$90, approximately ₹3,000-₹7,500
DIY Cost: $3-$16, approximately ₹250-₹1,350
You Save: $20-$75, approximately ₹1,650-₹6,250 by doing it yourself!
Local labor rates vary. This repair takes a shop approximately 0.3-0.5 hours.
🎯 Ready to get started?
HowToo offers same-day/2-day shipping on every part, plus all the tools and specialty tools you need! Check out the parts and tools sections below to add everything to your cart.
