

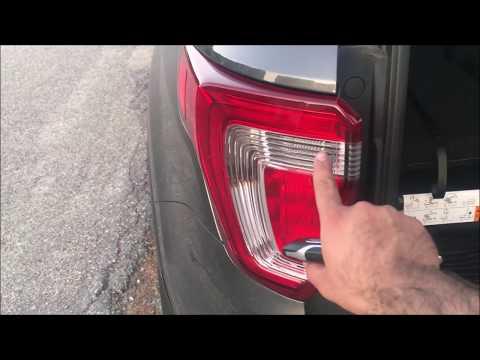







How to Replace Rear Turn Signal Bulbs on a 2012-2019 Ford Explorer
Step-by-step tail lamp removal, bulb replacement, tools, parts, and safety tips for 2012, 2013, 2014, 2015, 2016, 2017, 2018, 2019
How to Replace Rear Turn Signal Bulbs on a 2012-2019 Ford Explorer
Step-by-step tail lamp removal, bulb replacement, tools, parts, and safety tips for 2012, 2013, 2014, 2015, 2016, 2017, 2018, 2019


🔧 Explorer - Rear Turn Signal Bulb Replacement
Replacing the rear turn signal bulb on your Explorer is a beginner-friendly job. You’ll remove the rear tail lamp assembly, twist out the turn signal bulb socket, replace the bulb, then reinstall and test the lamp.
Difficulty Level: Beginner | Estimated Time: 15-30 minutes per side
⚠️ Safety & Precautions
- ⚠️ Turn the ignition off and remove the key before starting.
- ⚠️ Let the bulbs cool before touching the tail lamp assembly.
- ⚠️ Wear gloves or use a clean towel when handling bulbs. Skin oil can shorten bulb life.
- ⚠️ Do not pry directly against painted body panels with metal tools.
- ⚠️ Battery disconnect is not required for this bulb replacement.
🔧 Required Tools
You'll need the following tools for this repair:
- Trim panel removal tool
- Small flathead screwdriver
- Clean nitrile gloves
- Shop towel
- Safety glasses
🔩 Required Parts
HowToo sells all the parts you need for this repair:
- Rear turn signal bulb - Qty: 1 per side
- Rear turn signal bulbs - Replace in pairs - Qty: 2
📋 Before You Begin
- Park your Explorer on a flat surface.
- Shift to Park and set the parking brake.
- Turn the exterior lights off.
- Open the liftgate fully.
- Stand to the side of the lamp you are replacing.
🔨 Step-by-Step Instructions
Follow these steps in order:
Step 1: Open the liftgate and locate the lamp fasteners
- Open the liftgate fully by hand.
- Look at the inner edge of the rear tail lamp assembly, next to the liftgate opening.
- You will see small fastener covers or push-pin retainers depending on the lamp side and prior service history.
- Use a shop towel over the bumper edge to help prevent scratches.
Step 2: Remove the inner lamp fastener covers
- Use a small flathead screwdriver to gently lift the small plastic covers if equipped.
- If your Explorer has push-pin retainers, use a trim panel removal tool to lift the center pin first, then pull the retainer out.
- A trim panel removal tool is a plastic pry tool that helps remove clips without scratching paint or cracking trim.
- Work slowly to avoid broken clips.
Step 3: Pull the tail lamp assembly rearward
- Wear clean nitrile gloves for better grip.
- Hold the tail lamp assembly with both hands.
- Pull the lamp straight rearward, away from the vehicle.
- Do not twist the lamp outward. The outer side is held by alignment pins.
- If it feels stuck, use a trim panel removal tool wrapped in a shop towel to gently help release the outer pins.
Step 4: Locate the rear turn signal bulb socket
- Look at the back of the tail lamp assembly.
- The rear turn signal bulb socket is the socket for the amber flashing turn signal lamp.
- Use a shop towel to support the lamp so it does not hang by the wiring.
Step 5: Remove the turn signal bulb socket
- Grip the bulb socket by hand.
- Turn the socket counterclockwise about a quarter turn.
- Pull the socket straight out of the lamp housing.
- No torque spec applies to this twist-lock bulb socket.
Step 6: Replace the rear turn signal bulb
- Put on clean nitrile gloves.
- Pull the old bulb straight out of the socket by hand.
- Push the new rear turn signal bulb straight into the socket until fully seated.
- If the bulb does not go in easily, rotate it 180 degrees and try again.
- Never force the bulb.
Step 7: Reinstall the bulb socket
- Insert the socket back into the tail lamp housing by hand.
- Turn the socket clockwise about a quarter turn until it locks.
- Make sure the socket seal sits flat against the lamp housing.
- No torque spec applies to this twist-lock bulb socket.
Step 8: Test the turn signal before reinstalling the lamp
- Keep the lamp supported with one hand or a shop towel.
- Turn the ignition to accessory mode.
- Move the turn signal stalk to the side you replaced.
- Check that the new rear turn signal bulb flashes normally.
- Turn the ignition off after testing.
- If it does not flash, remove and reseat the bulb by hand, then test again.
Step 9: Reinstall the tail lamp assembly
- Line up the outer alignment pins with the body grommets by hand.
- Push the tail lamp straight forward into place.
- Use your palm to press evenly until the lamp sits flush with the body.
- Do not hammer or hit the lamp.
Step 10: Reinstall the lamp fasteners
- Reinstall the plastic retainers by hand.
- If your Explorer uses push-pin retainers, press the body in first, then press the center pin flush by hand.
- If plastic covers were removed, snap them back into place by hand.
- No torque spec applies to the plastic retainers.
Step 11: Final lamp check
- Turn the ignition to accessory mode.
- Use the turn signal stalk to test the repaired side again.
- Press the hazard switch to confirm both rear turn signal bulbs flash.
- Use safety glasses when looking closely around the lamp area to avoid dust or debris in your eyes.
✅ After Repair
- ✅ Confirm the repaired rear turn signal flashes at normal speed.
- ✅ Check both hazard lights.
- ✅ Make sure the tail lamp assembly sits flush with the body.
- ✅ Verify the liftgate opens and closes without touching the lamp.
- ✅ If the signal still flashes fast, inspect the opposite bulb or the socket for corrosion.
💰 DIY vs Shop Cost
Shop Cost: $45-$120 per side, including parts and labor
DIY Cost: $5-$20 per bulb, parts only
You Save: $40-$100 by doing it yourself!
Shop labor rates vary but typically run $100-$150/hour. This repair takes a shop approximately 0.3-0.5 hours.
🎯 Ready to get started?
HowToo makes it easy: same-day/2-day shipping on every part, plus all the tools and specialty tools you need! Check out the parts and tools sections below to add everything to your cart.