








How to Replace Rear Turn Signal Bulbs on a 2001-2024 Toyota Highlander
Step-by-step 7440A bulb replacement with tools, safety tips, testing, and torque specs for 2001, 2002, 2003, 2004, 2005, 2006, 2007, 2008, 2009, 2010, 2011, 2012, 2013, 2014, 2015, 2016, 2017, 2018, 2019, 2020, 2021, 2022, 2024
How to Replace Rear Turn Signal Bulbs on a 2001-2024 Toyota Highlander
Step-by-step 7440A bulb replacement with tools, safety tips, testing, and torque specs for 2001, 2002, 2003, 2004, 2005, 2006, 2007, 2008, 2009, 2010, 2011, 2012, 2013, 2014, 2015, 2016, 2017, 2018, 2019, 2020, 2021, 2022, 2024


🔧 Highlander - Rear Turn Signal Bulb Replacement
The rear turn signal bulb sits inside the rear combination lamp assembly. You will remove the lamp, twist out the bulb socket, install an amber replacement bulb, and test it before reassembly.
Difficulty Level: Beginner | Estimated Time: 20-30 minutes
⚠️ Safety & Precautions
- ⚠️ Switch off all exterior lights and keep the ignition off.
- 🧤 Wear clean nitrile gloves to protect your hands and the new bulb.
- 💡 Do not force the lamp sideways; its alignment pins can break.
- 🔋 Battery disconnection is not required for this repair.
🔧 Required Tools
You'll need the following tools for this repair:
- 10mm socket
- 1/4-inch-drive ratchet
- 1/4-inch-drive torque wrench rated 2-20 Nm
- Plastic trim removal tool (specialty)
- Nitrile gloves
- Safety glasses
- Clean microfiber towel
🔩 Required Parts
HowToo sells all the parts you need for this repair:
- Amber 7440A rear turn signal bulbs - Qty: 2, replace in pairs
📋 Before You Begin
- 🅿️ Park your Highlander on level ground, select Park, and apply the parking brake.
- 🚪 Open the power liftgate and wait until it stops completely.
- 💡 Turn off the ignition, hazard flashers, and exterior lights.
- 🧊 Allow the rear lamp to cool if it was recently operating.
🔨 Step-by-Step Instructions
Follow these steps in order:
Step 1: Remove the Rear Lamp Fasteners
- Use the 10mm socket and 1/4-inch-drive ratchet to remove the two bolts along the liftgate-side edge of the affected rear lamp.
- Place the bolts on the clean microfiber towel so they cannot roll away.
Step 2: Release the Rear Lamp Assembly
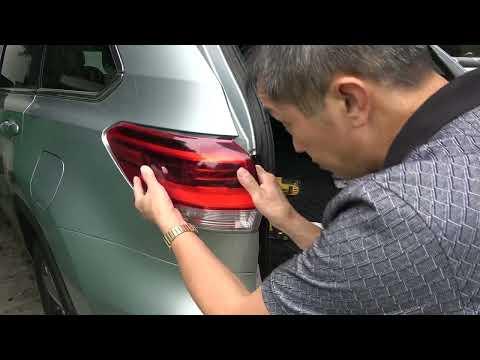
- Wear nitrile gloves and support the lamp with both hands.
- Use the plastic trim removal tool only at the inner edge if the lamp is stuck. Pull the assembly straight rearward to release its locating pins.
- Do not twist the lamp outward or pry against the painted body panel.
- Wiggle gently while pulling straight back.
Step 3: Remove the Turn Signal Socket
- Support the loose lamp by hand; do not let it hang from the wiring.
- Locate the socket containing the amber turn signal bulb by matching it to the new 7440A bulb.
- Use your gloved hand to rotate the socket counterclockwise approximately one-quarter turn, then pull it straight out.
Step 4: Replace the Bulb
- Use your gloved fingers to pull the old bulb straight out of the socket. This is a wedge-base bulb, meaning it pulls out rather than unscrews.
- Check the socket for melted plastic, green corrosion, or burned terminals. A damaged socket must be replaced before installing the bulb.
- Use your gloved fingers to push the new 7440A amber bulb straight into the socket until fully seated.
- Do not apply grease to the bulb contacts unless the replacement-bulb manufacturer specifically requires it.
Step 5: Test the New Bulb
- Use your hand to hold the lamp securely away from painted surfaces.
- Switch on the ignition and operate the turn signal, or press the hazard-flasher switch.
- Confirm that the new bulb flashes brightly and at the normal speed, then switch the ignition and lights off.
- If it does not illuminate, use your gloved hand to remove the bulb, rotate it 180 degrees, reinstall it, and test again.
Step 6: Reinstall the Bulb Socket
- Use your gloved hand to insert the socket into the lamp housing.
- Rotate it clockwise approximately one-quarter turn until its locking tabs stop securely.
- Inspect the socket seal and confirm it sits evenly to keep moisture out.
Step 7: Reinstall the Rear Lamp Assembly
- Align the lamp’s locating pins with their body grommets, then use both hands to press the assembly straight forward until fully seated.
- Start both bolts by hand to prevent crossed threads.
- Use the 10mm socket and 1/4-inch-drive torque wrench to tighten both bolts to 5.4 Nm (48 in-lbs).
- Do not overtighten the bolts; excessive force can crack the plastic lamp housing.
Step 8: Replace the Opposite Bulb
- Repeat Steps 1-7 on the opposite side using the same listed tools.
- Replacing both bulbs together helps maintain equal brightness and reduces the chance of another bulb failing soon.
✅ After Repair
- ✅ Test the left turn signal, right turn signal, and hazard flashers.
- 👀 Confirm both rear signals flash at the same brightness and speed.
- 🔍 Verify each lamp sits flush with the body and does not move when gently pressed.
- 💧 After the next rain or wash, check the lamp housings for internal condensation.
- ♻️ Dispose of the old bulbs through a local automotive-parts or electrical-waste facility.
💰 DIY vs Shop Cost
Shop Cost: ₹800-₹1,800 (parts + labor)
DIY Cost: ₹250-₹700 (parts only)
You Save: ₹550-₹1,100 by doing it yourself!
Local labor rates in Panipat vary. This repair takes a shop approximately 0.3-0.5 hour.
🎯 Ready to get started?
HowToo makes it easy: same-day/2-day shipping on every part, plus all the tools and specialty tools you need! Check out the parts and tools sections below to add everything to your cart.