





How to Replace Ignition Coils on a 2019 GMC Sierra 1500
Step-by-step instructions with tools, parts, torque specs, and safety tips for 2019, 2020, 2021, 2022
How to Replace Ignition Coils on a 2019 GMC Sierra 1500
Step-by-step instructions with tools, parts, torque specs, and safety tips for 2019, 2020, 2021, 2022


🔧 Ignition Coils - Replacement
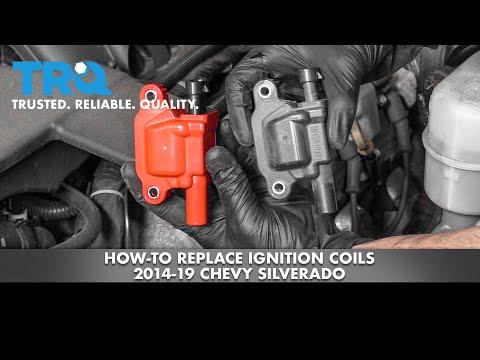
Replacing the ignition coil(s) restores spark delivery to the engine when a coil has failed, causing misfires, rough idle, poor power, or a check engine light. On your Sierra, each cylinder has its own coil, so the repair is straightforward but there is limited room on top of the engine.
Difficulty Level: Beginner | Estimated Time: 1-2 hours
⚠️ Safety & Precautions
- Let the engine cool fully before starting. Coils sit on hot valve covers.
- Turn the ignition off and remove the key fob from the vehicle area.
- Disconnect the negative battery cable before unplugging coils. This helps prevent accidental shorts.
- Do not pull on the wire harness. Use the connector tab to release each plug.
- If the engine has a misfire, avoid extended driving. A bad coil can damage the catalytic converters.
🔧 Required Tools
You'll need the following tools for this repair:
- 1/4-inch drive ratchet
- 3/8-inch drive ratchet
- 8mm socket
- 10mm socket
- 6-inch extension
- Trim clip tool
- Small flat-blade pick
- Torque wrench
- Dielectric grease
- Safety glasses
- Mechanic gloves
🔩 Required Parts
HowToo sells all the parts you need for this repair:
- Ignition coil - Qty: 1 per failed cylinder
- Ignition coil boot - Qty: 1 per failed cylinder
- Spark plug - Qty: 1 per affected cylinder if due for service
- Dielectric grease - Qty: 1 tube
📋 Before You Begin
- Park on a level surface and set the parking brake.
- Let the engine cool completely.
- Open the hood and remove any engine cover if equipped.
- Disconnect the negative battery cable before unplugging any coils.
🔨 Step-by-Step Instructions
Follow these steps in order:
Step 1: Disconnect battery power
- Use a 10mm socket to loosen the negative battery cable.
- Move the cable aside so it cannot spring back onto the terminal.
Step 2: Remove the engine cover
- If equipped, pull the cover straight up to release it from the mounts.
- If it is tight, use both hands and lift evenly.
Step 3: Access the ignition coils
- Locate the coil on the cylinder you are replacing.
- On the 6.2L V8, the coils sit on top of each valve cover.
- Work on one coil at a time.
Step 4: Disconnect the coil electrical connector
- Use a small flat-blade pick if the connector lock is stiff.
- Press the release tab and pull the connector straight off the coil.
- Do not tug on the wires.
Step 5: Remove the ignition coil
- Use a 10mm socket and ratchet to remove the coil hold-down bolt.
- Pull the coil straight up and out of the spark plug well.
- If it sticks, gently twist while lifting.
Step 6: Inspect the coil boot and spark plug
- Check the rubber boot for cracks, oil, or carbon tracking.
- If the boot is damaged, replace it.
- If the spark plug is worn, replace it now while access is open.
Step 7: Install the new ignition coil
- Apply a small amount of dielectric grease inside the coil boot.
- Push the new coil straight down onto the spark plug.
- Install the hold-down bolt by hand first, then tighten with a 10mm socket.
- Torque to 8 Nm (71 in-lbs).
Step 8: Reconnect the electrical connector
- Push the connector on until it clicks.
- Lightly tug it to make sure it is locked.
Step 9: Reinstall covers and reconnect power
- Reinstall the engine cover by pressing it into place.
- Reconnect the negative battery cable with a 10mm socket.
- Torque to 5 Nm (44 in-lbs) for the battery terminal if you are using a torque wrench.
Step 10: Repeat for any other failed coils
- Replace each bad coil one at a time using the same process.
- Keep connectors and bolts matched to their original locations.
✅ After Repair
- Start the engine and listen for smooth idle.
- Check that the check engine light is off.
- If the light stays on, scan and clear misfire codes.
- Test drive gently and confirm there is no hesitation under acceleration.
💰 DIY vs Shop Cost
Shop Cost: $180-$650 (parts + labor)
DIY Cost: $40-$220 (parts only)
You Save: $140-$430 by doing it yourself!
Shop labor rates vary but typically run $100-$150/hour. This repair takes a shop approximately 0.8-1.5 hours.
🎯 Ready to get started?
HowToo makes it easy: same-day/2-day shipping on every part, plus all the tools and specialty tools you need! Check out the parts and tools sections below to add everything to your cart.