

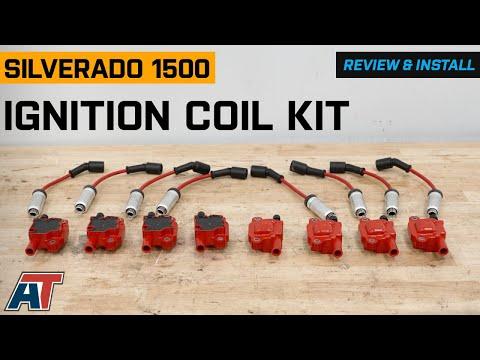







How to Replace Ignition Coils on a 2007-2024 Chevrolet Silverado 1500 6.2L (Engine: V8 5.3L)
Step-by-step DIY instructions with required tools, coil matching, torque specs, and safety tips for 2007, 2008, 2009, 2010, 2011, 2012, 2013
How to Replace Ignition Coils on a 2007-2024 Chevrolet Silverado 1500 6.2L (Engine: V8 5.3L)
Step-by-step DIY instructions with required tools, coil matching, torque specs, and safety tips for 2007, 2008, 2009, 2010, 2011, 2012, 2013


🔧 Silverado 1500 - Ignition Coil Replacement
Replacing the ignition coils on your Silverado is straightforward: disconnect each coil, remove its two mounting bolts, transfer the short spark-plug wire, and install the replacement. Replace only the diagnosed bad coil unless several have failed or you’re installing a complete matched set.
Assumption: Your 6.2L uses the factory coil-near-plug system. Match the replacement to the installed round-body or square-body coil before installation.
Difficulty Level: Beginner | Estimated Time: 30-60 minutes for one coil, 1.5-2.5 hours for all eight
⚠️ Safety & Precautions
- ⚠️ Let the engine cool completely because the exhaust manifolds sit close to the coils.
- 🔑 Keep the ignition switched off and remove the key from the work area.
- 🔋 Disconnecting the negative battery cable is recommended before unplugging ignition components.
- 🧤 Pull spark-plug wires by their boots, never by the wire itself. That’s how an easy repair becomes two repairs.
- 🔌 Do not force the electrical connector locks because heat makes them brittle.
- 🚫 Never start or crank the engine with a coil or spark-plug wire disconnected.
🔧 Required Tools
You'll need the following tools for this repair:
- 10mm socket
- 1/4-inch drive ratchet
- 3-inch 1/4-inch drive extension
- 10mm combination wrench
- Inch-pound torque wrench rated 20-200 lb-in
- Plastic trim tool
- Small nylon cleaning brush
- Low-pressure compressed-air nozzle
- Masking tape and permanent marker
- Safety glasses
- Nitrile mechanic gloves
🔩 Required Parts
HowToo sells all the parts you need for this repair:
- Vehicle-matched ignition coil - Qty: 1 per failed cylinder, up to 8
- Dielectric silicone grease - Qty: 1 small tube
- Spark-plug wire - Qty: 1 per damaged or heat-hardened wire
The available coils include both round-body and square-body designs. Compare the body, connector, and mounting bracket with the coil already on your Silverado before opening or installing the part.
📋 Before You Begin
- 🅿️ Park on level ground, shift into Park, set the parking brake, and allow the engine to cool.
- 📱 Record any radio settings you want to preserve before disconnecting the battery.
- 🔍 Identify the failed cylinder with a scan tool before replacing a single coil.
- 🏷️ If removing several coils, label each electrical connector and spark-plug wire by cylinder location.
- 📸 Photograph the wire routing before disassembly so every wire returns to its original path.
🔨 Step-by-Step Instructions
Follow these steps in order:
Step 1: Disconnect the negative battery cable
- Open the hood and locate the negative battery terminal marked with a minus symbol.
- Use a 10mm combination wrench to loosen the negative cable terminal.
- Lift the terminal from the battery and position it where it cannot spring back onto the post.
- Wait at least two minutes before disconnecting the ignition-coil connectors.
Step 2: Remove the engine appearance cover
- Check whether the oil-fill cap passes through the engine cover. If it does, remove the cap by hand first.
- Grip the cover near its mounting points and pull upward evenly to release its rubber retainers.
- Use a plastic trim tool only if a rubber retainer remains stuck. Do not pry against wiring or fuel-system components.
- Reinstall the oil-fill cap immediately to keep debris out of the engine.
Step 3: Locate the coil being replaced
- Find the ignition coils mounted along the sides of the valve covers.
- Each coil has one electrical connector and one short spark-plug wire leading toward the cylinder head.
- Use masking tape and a permanent marker to label the coil location before disconnecting anything.
- If you’re replacing one coil because of a misfire code, verify that you’re working on the diagnosed cylinder.
Step 4: Clean around the coil
- Use a small nylon cleaning brush to loosen dirt around the coil and connector.
- Wear safety glasses and use a low-pressure compressed-air nozzle to blow debris away from the area.
- Keep the air pressure low and direct debris away from your face and nearby connectors.
Step 5: Disconnect the coil electrical connector
- Release any secondary connector lock with the plastic trim tool.
- Press the connector release tab and pull the connector straight away from the coil.
- Hold the connector housing, not the wires.
- Inspect the terminals for corrosion, looseness, oil, or heat damage.
Step 6: Disconnect the spark-plug wire
- Grip the spark-plug wire by the thick rubber boot attached to the coil.
- Twist the boot slightly to break its seal, then pull it straight off the coil terminal.
- Do not pull on the cable itself.
- Inspect the boot for cracking, burned spots, swelling, or a loose internal terminal.
- A gentle twist saves old plug wires.
Step 7: Remove the old ignition coil
- Use a 10mm socket, 3-inch extension, and 1/4-inch drive ratchet to remove the two coil mounting bolts.
- Support the coil while removing the second bolt so it does not fall against the exhaust manifold.
- Lift the coil and bracket away from the valve cover.
- Keep the bolts clean because replacement coils may not include new hardware.
Step 8: Compare the replacement coil
- Place the old and new coils side by side.
- Confirm that the body shape, connector orientation, terminal count, mounting-hole spacing, bracket, and wire terminal match.
- Do not substitute a square-body coil for a round-body coil, or the reverse, unless the replacement manufacturer specifically supplies the complete conversion hardware.
- Stop if the connector or mounting bracket differs. Do not modify the factory harness.
Step 9: Install the replacement coil
- Position the new coil on the valve-cover mounting points.
- Start both bolts by hand to prevent cross-threading.
- Use the 10mm socket and 1/4-inch drive ratchet to seat the bolts lightly.
- Use the inch-pound torque wrench with the 10mm socket to tighten the bolts evenly.
- Torque the ignition-coil mounting bolts to 10 Nm (89 lb-in).
- Do not overtighten them. The small fasteners and mounting bracket are easy to damage.
Step 10: Reconnect the spark-plug wire
- Apply a very thin film of dielectric silicone grease inside the lip of the spark-plug wire boot.
- Do not pack grease into the metal electrical terminal.
- Push the boot straight onto the coil until it is fully seated.
- Route the wire exactly as it was originally positioned and keep it away from the exhaust manifold.
Step 11: Reconnect the electrical connector
- Push the coil connector straight into the new coil until the release tab clicks.
- Reengage the secondary connector lock by hand.
- Gently pull on the connector housing to verify that it is locked.
- Repeat Steps 3 through 11 if you’re replacing additional coils.
Step 12: Reinstall the engine cover
- Remove the oil-fill cap by hand if the cover fits around the filler neck.
- Align the engine cover with its rubber mounting retainers.
- Press downward directly above each retainer until the cover is secure.
- Reinstall and hand-tighten the oil-fill cap.
Step 13: Reconnect the battery
- Place the negative cable terminal fully over the battery post.
- Use the 10mm combination wrench to tighten the terminal until secure.
- Do not overtighten or twist the battery post.
- Verify that the terminal cannot rotate by hand.
✅ After Repair
- 🚗 Start the engine and let it idle while listening for smooth, even operation.
- 🔍 Check that every coil connector and spark-plug wire is fully seated.
- ⚡ If a misfire remains, scan the engine computer and record the cylinder-specific trouble code.
- 🧪 When diagnosing a single-cylinder misfire, move the suspected coil to another cylinder and check whether the misfire follows it.
- 🛑 Stop the engine if the check-engine light flashes. A flashing light indicates an active misfire that can damage the catalytic converters.
- ✅ Clear stored trouble codes only after confirming that the repair corrected the fault.
- 🛣️ Complete a short test drive, then recheck for pending misfire codes.
💰 DIY vs Shop Cost
Shop Cost: Approximately ₹8,000-₹18,000 for one coil, depending on imported-part pricing and diagnosis
DIY Cost: Approximately ₹3,000-₹8,000 for one coil and basic consumables
You Save: Approximately ₹4,000-₹10,000 by doing it yourself!
Labor rates and imported GM-part availability around Sonīpat vary considerably. Replacing all eight coils costs substantially more, but healthy original coils do not require automatic replacement.
🎯 Ready to get started?
HowToo makes it easy: same-day/2-day shipping on every part, plus all the tools and specialty tools you need! Check out the parts and tools sections below to add everything to your cart.