

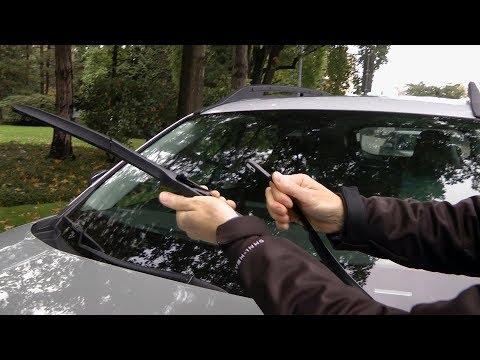





How to Replace Front Windshield Wipers on a 2013-2025 Toyota RAV4
Step-by-step guide with correct blade sizes, tools, safety tips, and testing for 2013, 2014, 2015, 2016, 2017, 2018, 2019, 2020, 2021, 2022, 2023, 2024, 2025
How to Replace Front Windshield Wipers on a 2013-2025 Toyota RAV4
Step-by-step guide with correct blade sizes, tools, safety tips, and testing for 2013, 2014, 2015, 2016, 2017, 2018, 2019, 2020, 2021, 2022, 2023, 2024, 2025


🔧 RAV4 - Front Windshield Wiper Blade Replacement
This repair replaces the two front windshield wiper blades on your RAV4. Fresh wiper blades help clear rain, dust, and road film so you can see safely through the windshield.
Difficulty Level: Beginner | Estimated Time: 5-15 minutes
⚠️ Safety & Precautions
- ⚠️ Turn the vehicle fully OFF before working near the wiper arms.
- ⚠️ Do not let a bare metal wiper arm snap back onto the windshield. It can crack the glass.
- ⚠️ Keep fingers clear of the wiper arm hinge area. The spring-loaded arm can pinch.
- ⚠️ Battery disconnect is not required for this repair.
- ⚠️ Your RAV4 Hybrid has an automatic wiper system only if equipped, so keep the wiper switch OFF before starting.
🔧 Required Tools
You'll need the following tools for this repair:
- Safety glasses
- Nitrile gloves
- Clean microfiber towel
🔩 Required Parts
HowToo sells all the parts you need for this repair:
- Front wiper blades - Driver: 26", Passenger: 16" - Qty: 2
📋 Before You Begin
- 🚗 Park your RAV4 on level ground.
- 🅿️ Shift to Park and set the parking brake.
- 🔌 Turn the power switch OFF.
- 🌧️ Make sure the wiper switch is in the OFF position.
- 🧼 Clean the lower windshield area with a clean microfiber towel so grit does not scratch the glass.
- 📌 A wiper arm is the metal spring-loaded arm that holds the replaceable rubber wiper blade against the windshield.
🔨 Step-by-Step Instructions
Follow these steps in order:
Step 1: Lift the Driver Wiper Arm
- Use your gloved hand to lift the driver-side wiper arm away from the windshield.
- Place a clean microfiber towel on the windshield under the wiper arm.
- This protects the glass if the arm slips.
- Never leave the arm bare over glass.
Step 2: Open the Blade Lock
- Use your gloved fingers to find the small locking tab on the center of the wiper blade adapter.
- Lift or press the locking tab, depending on the replacement blade design.
- A locking tab is the small plastic latch that keeps the blade attached to the hooked wiper arm.
Step 3: Remove the Driver Wiper Blade
- Use your gloved hand to slide the wiper blade downward toward the base of the wiper arm.
- Once it clears the hook, rotate the blade slightly and remove it from the arm.
- Keep one hand on the metal wiper arm at all times so it cannot spring back.
Step 4: Install the New Driver Wiper Blade
- Use your gloved hand to guide the new 26" driver-side blade onto the hook of the wiper arm.
- Slide the blade upward into the hook until it clicks or locks.
- Close the locking tab if your replacement blade has one.
- Gently tug the blade by hand to confirm it is locked in place.
- No torque spec applies because the blade locks by hand.
Step 5: Lower the Driver Wiper Arm
- Use your gloved hand to gently lower the driver-side wiper arm back onto the windshield.
- Remove the clean microfiber towel after the blade is resting on the glass.
Step 6: Lift the Passenger Wiper Arm
- Use your gloved hand to lift the passenger-side wiper arm away from the windshield.
- Place the clean microfiber towel on the windshield under the passenger wiper arm.
- Keep control of the spring-loaded arm the whole time.
Step 7: Remove the Passenger Wiper Blade
- Use your gloved fingers to release the small locking tab on the blade adapter.
- Use your gloved hand to slide the wiper blade downward toward the base of the wiper arm.
- Rotate the blade slightly and remove it from the hook.
Step 8: Install the New Passenger Wiper Blade
- Use your gloved hand to guide the new 16" passenger-side blade onto the hook of the wiper arm.
- Slide the blade upward into the hook until it clicks or locks.
- Close the locking tab if your replacement blade has one.
- Gently tug the blade by hand to confirm it is secure.
- No torque spec applies because the blade locks by hand.
Step 9: Lower the Passenger Wiper Arm
- Use your gloved hand to gently lower the passenger-side wiper arm back onto the windshield.
- Remove the clean microfiber towel once the blade is resting on the glass.
Step 10: Test the New Wiper Blades
- Use the windshield washer switch to spray washer fluid onto the windshield.
- Use the wiper switch to run the front wipers for a few sweeps.
- Watch both blades to make sure they move smoothly and do not chatter, skip, or hit the windshield trim.
- Turn the wiper switch OFF after testing.
✅ After Repair
- ✅ Confirm both blades sit flat against the windshield.
- ✅ Make sure the driver 26" blade and passenger 16" blade are not swapped.
- ✅ If streaking remains, clean the windshield with glass cleaner and a clean microfiber towel.
- ✅ If a blade chatters, check that the plastic blade cover was removed from the rubber edge.
💰 DIY vs Shop Cost
Shop Cost: $45-$95 (parts + labor)
DIY Cost: $20-$45 (parts only)
You Save: $25-$50 by doing it yourself!
Shop labor rates vary but typically run $100-$150/hour. This repair takes a shop approximately 0.1-0.3 hours.
🎯 Ready to get started?
HowToo makes it easy: same-day/2-day shipping on every part, plus all the tools and specialty tools you need! Check out the parts and tools sections below to add everything to your cart.