

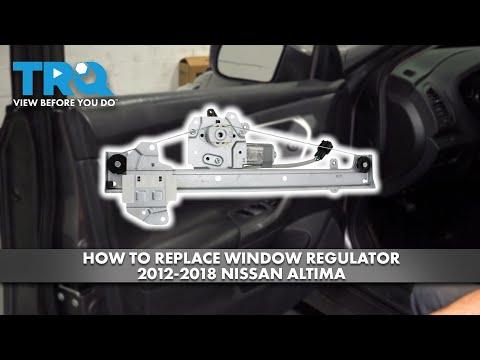







How to Replace Front Window Regulators on a 2017 Nissan Altima
Step-by-step door panel removal, regulator install, tools, parts, torque specs, and safety tips for 2013, 2014, 2015, 2016, 2017, 2018
How to Replace Front Window Regulators on a 2017 Nissan Altima
Step-by-step door panel removal, regulator install, tools, parts, torque specs, and safety tips for 2013, 2014, 2015, 2016, 2017, 2018


🔧 Altima - Front Window Regulator Replacement
The front window regulator is the cable-and-rail assembly inside the front door that moves the glass up and down. On your Altima, the regulator is accessed by removing the inner door trim panel, peeling back the vapor barrier, supporting the glass, and replacing the regulator assembly inside the door.
Difficulty Level: Beginner-Intermediate | Estimated Time: 1.5-2.5 hours per front door
⚠️ Safety & Precautions
- ⚠️ Disconnect the negative battery cable before unplugging door electrical connectors.
- ⚠️ Support the window glass before loosening the regulator; unsupported glass can drop and break.
- ⚠️ Wear gloves because the inside of the door has sharp metal edges.
- ⚠️ Do not place fingers near the regulator cables or pulleys while testing the motor.
- ⚠️ If the window is stuck down, support the glass by hand while taping it securely at the top of the door frame.
🔧 Required Tools
You'll need the following tools for this repair:
- 10mm socket
- Ratchet wrench
- 3-inch socket extension
- Phillips #2 screwdriver
- Plastic trim removal tool set
- Small flathead screwdriver
- Needle-nose pliers
- Painter’s tape
- Torque wrench inch-pound
- Work gloves
- Safety glasses
🔩 Required Parts
HowToo sells all the parts you need for this repair:
- Front driver-side window regulator with motor assembly - Qty: 1 if replacing left front
- Front passenger-side window regulator with motor assembly - Qty: 1 if replacing right front
- Door trim panel retaining clips - Qty: As needed
- Butyl sealing tape - Qty: 1 roll if vapor barrier adhesive is damaged
📋 Before You Begin
- 🚗 Park your Altima on level ground, shift to Park, and set the parking brake.
- 🔋 If the window still moves, position it so the glass mounting bolts are visible through the door access holes.
- 🔋 Turn the ignition OFF and disconnect the negative battery cable using a 10mm socket.
- 🧰 A trim removal tool is a plastic pry tool used to pop panels loose without scratching them.
- 🧰 The vapor barrier is the plastic sheet behind the door panel that keeps water from entering the cabin.
🔨 Step-by-Step Instructions
Follow these steps in order:
Step 1: Disconnect the Battery
- Use a 10mm socket and ratchet wrench to loosen the negative battery terminal clamp.
- Lift the cable off the battery post and move it aside.
- Wait at least 3 minutes before unplugging door connectors.
Step 2: Remove the Door Trim Covers
- Use a plastic trim removal tool to gently pry up the trim cover in the interior door pull area.
- Use a small flathead screwdriver only if needed, and wrap the tip with painter’s tape to prevent marks.
- Use a Phillips #2 screwdriver to remove the exposed screw.
- Tip: Pry slowly, not forcefully.
Step 3: Remove the Window Switch Panel
- Use a plastic trim removal tool to lift the power window switch panel from the armrest.
- Press the connector lock tab with your finger or a small flathead screwdriver.
- Unplug the switch connector and set the switch panel aside.
Step 4: Remove the Door Panel Screws
- Use a Phillips #2 screwdriver to remove the screws securing the door panel.
- Check the pull handle area, lower panel area, and behind small covers.
- Keep all screws together so they go back in the same locations.
Step 5: Release the Door Panel Clips
- Insert a plastic trim removal tool between the lower edge of the door panel and the metal door shell.
- Pry outward near each retaining clip until it pops free.
- Lift the door panel upward to unhook it from the top window ledge.
- Use needle-nose pliers if needed to release the interior door handle cable from the panel.
- Unplug any remaining electrical connectors by pressing their lock tabs.
Step 6: Peel Back the Vapor Barrier
- Use your hands and a plastic trim removal tool to slowly peel the vapor barrier away from the door.
- Do not tear it; it must seal again during reassembly.
- If the sticky black adhesive stretches, fold it back onto the plastic so it stays clean.
Step 7: Support the Window Glass
- Use long strips of painter’s tape from the outside of the glass, over the top of the door frame, and onto the inside of the glass.
- Apply at least 3 strips so the glass cannot slide down.
- If the glass is stuck low, carefully lift it by hand and tape it in the fully raised position.
Step 8: Disconnect the Window Motor
- Locate the window motor connector on the regulator assembly inside the door.
- Use a small flathead screwdriver to gently press the connector lock tab if your finger cannot reach it.
- Pull the connector straight off; do not pull on the wires.
Step 9: Unbolt the Glass from the Regulator
- Use a 10mm socket, 3-inch socket extension, and ratchet wrench to loosen the glass-to-regulator bolts through the access openings.
- Hold the glass steady with one hand while loosening the last bolt.
- Slide the glass fully upward by hand and secure it again with painter’s tape.
Step 10: Remove the Old Regulator
- Use a 10mm socket, 3-inch socket extension, and ratchet wrench to remove the regulator mounting bolts.
- Support the regulator with one hand as the final bolt comes out.
- Guide the regulator and motor assembly out through the large service opening in the door.
- Tip: Take a photo before removal.
Step 11: Install the New Regulator
- Guide the new regulator assembly into the door through the same opening.
- Start all mounting bolts by hand first so the threads do not cross.
- Use a 10mm socket and ratchet wrench to snug the regulator mounting bolts.
- Use a torque wrench inch-pound with a 10mm socket to tighten the regulator mounting bolts to Torque to 7.8 Nm (69 in-lbs).
Step 12: Reattach the Glass
- Remove enough painter’s tape to carefully lower the glass onto the regulator brackets.
- Make sure the glass sits straight in the front and rear window channels.
- Use a 10mm socket to start the glass bolts by hand.
- Use a torque wrench inch-pound with a 10mm socket to tighten the glass bolts to Torque to 7.8 Nm (69 in-lbs).
Step 13: Test Before Reassembly
- Plug the window motor connector in by hand until it clicks.
- Temporarily plug in the window switch panel by hand.
- Reconnect the negative battery cable using a 10mm socket.
- Turn the ignition ON and move the window down and up slowly.
- If the glass tilts, binds, or clicks, stop and realign the glass before continuing.
Step 14: Reinstall the Vapor Barrier
- Turn the ignition OFF and disconnect the negative battery cable again using a 10mm socket.
- Press the vapor barrier back onto the door by hand.
- If the adhesive does not seal, apply butyl sealing tape around the edge of the vapor barrier.
- Do not block the drain openings at the bottom of the door.
Step 15: Reinstall the Door Panel
- Reconnect the interior handle cable using your fingers or needle-nose pliers.
- Reconnect all door electrical connectors by hand until they click.
- Hook the top of the door panel over the window ledge.
- Press around the panel edges by hand to snap the clips into place.
- Use a Phillips #2 screwdriver to reinstall the door panel screws.
- Snap the switch panel and trim covers back into place by hand.
Step 16: Initialize the Auto Window Function
- Reconnect the negative battery cable using a 10mm socket.
- Turn the ignition ON.
- Use the window switch to fully close the window.
- Keep holding the switch UP for 3-5 seconds after the glass reaches the top.
- Lower the window fully, then raise it fully to confirm auto-up and auto-down work correctly.
✅ After Repair
- ✅ Test the repaired window several times from the driver master switch and the door switch.
- ✅ Confirm the glass moves smoothly without tilting or rattling.
- ✅ Check that the door lock, mirror switch, speaker, and interior handle still work.
- ✅ Spray water on the outside of the window area and check inside the door panel area for leaks.
- ✅ If auto-up does not work, repeat the window initialization step.
💰 DIY vs Shop Cost
Shop Cost: $350-$650 per front door (parts + labor)
DIY Cost: $90-$220 per front door (parts only)
You Save: $260-$430 per door by doing it yourself!
Shop labor rates vary but typically run $100-$150/hour. This repair takes a shop approximately 1.0-1.8 hours per door.
🎯 Ready to get started?
HowToo makes it easy: same-day/2-day shipping on every part, plus all the tools and specialty tools you need! Check out the parts and tools sections below to add everything to your cart.