

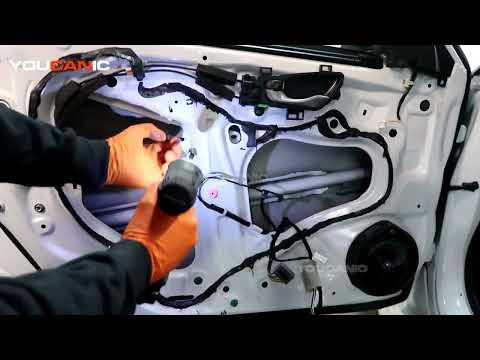







How to Replace Front Window Regulators on a 2016-2021 Honda Civic (Body: Sedan)
Step-by-step DIY guide with tools, parts, torque specs, safety tips, and testing for 2016, 2017, 2018, 2019, 2020, 2021
How to Replace Front Window Regulators on a 2016-2021 Honda Civic (Body: Sedan)
Step-by-step DIY guide with tools, parts, torque specs, safety tips, and testing for 2016, 2017, 2018, 2019, 2020, 2021


🔧 Civic - Front Window Regulator Replacement
This repair replaces the front door window regulator, which is the lift mechanism that moves the glass up and down inside the door. Your Civic uses a cable-style regulator with an electric motor, so the door panel and moisture barrier must come off to access it.
Difficulty Level: Intermediate | Estimated Time: 1.5-2.5 hours per door
⚠️ Safety & Precautions
- ⚠️ The front doors contain side-impact airbag wiring, so do not turn the ignition on while door connectors are unplugged.
- ⚠️ Disconnect the negative battery cable before unplugging door electrical connectors.
- ⚠️ Support the window glass before removing the regulator. The glass can drop and break.
- ⚠️ Wear safety glasses and gloves. Door edges and glass hardware can be sharp.
- ⚠️ Work with the door fully open and the vehicle parked on level ground.
🔧 Required Tools
You'll need the following tools for this repair:
- 10mm socket
- Ratchet handle
- 6-inch socket extension
- Phillips #2 screwdriver
- Plastic trim removal tool set
- Small flat-blade screwdriver
- Painter’s tape 2-inch width
- Panel clip removal tool
- Torque wrench inch-pound range
- Needle-nose pliers
- Shop light
- Safety glasses
- Mechanic gloves
🔩 Required Parts
HowToo sells all the parts you need for this repair:
- Front door window regulator with motor - Qty: 1 per side
- Front door panel clips - Qty: 6-10 per side
- Butyl sealant strip - Qty: 1 roll
📋 Before You Begin
- Park your Civic on level ground and set the parking brake.
- Lower the affected front window until the glass mounting bolts are visible through the service holes, if the regulator still moves.
- If the regulator is stuck, you may need to move the glass by hand after removing the door panel.
- Disconnect the negative battery cable using a 10mm socket. Wait at least 3 minutes before unplugging door connectors.
- A plastic trim tool is a non-scratching pry tool used to remove interior panels without gouging them.
- Butyl sealant is a sticky rubber-like seal used to reseal the plastic moisture barrier inside the door.
🔨 Step-by-Step Instructions
Follow these steps in order:
Step 1: Remove the Front Door Panel
- Use a small flat-blade screwdriver to gently open the small screw cover behind the inside door handle.
- Use a Phillips #2 screwdriver to remove the screw behind the inside door handle.
- Use a plastic trim removal tool to lift the power window switch panel from the armrest.
- Unplug the electrical connector from the switch panel by pressing the locking tab with your fingers or a small flat-blade screwdriver.
- Use a Phillips #2 screwdriver to remove the screw inside the armrest area.
- Use a panel clip removal tool around the lower and side edges of the door panel to pop the clips loose.
- Lift the door panel upward to unhook it from the window ledge.
- Disconnect the door handle cable using needle-nose pliers only if needed. Do not bend the cable.
- Tip: Keep screws in a cup.
Step 2: Remove the Moisture Barrier
- Use your hands and a plastic trim removal tool to carefully peel back the clear plastic moisture barrier.
- Do not tear the barrier. It keeps rainwater away from the interior trim.
- If the black sealant stretches, use a plastic trim removal tool to separate it slowly.
- Use painter’s tape 2-inch width to hold the barrier out of your way.
Step 3: Position and Secure the Window Glass
- If the window still moves, temporarily reconnect the window switch and battery, then move the glass until the glass mounting bolts line up with the door access holes.
- Turn the ignition off, disconnect the switch again, and disconnect the negative battery cable with a 10mm socket.
- Use a 10mm socket, 6-inch socket extension, and ratchet handle to loosen the two glass clamp bolts. Do not remove them fully unless necessary.
- Slide the glass fully upward by hand.
- Use painter’s tape 2-inch width over the top of the door frame to hold the glass in the fully raised position.
- Tip: Use several tape strips.
Step 4: Unplug the Window Regulator Motor
- Use a shop light to locate the window motor connector inside the door.
- Press the connector lock tab by hand. If tight, use a small flat-blade screwdriver gently.
- Pull the connector straight off. Do not pull on the wires.
Step 5: Remove the Old Regulator Assembly
- Use a 10mm socket, 6-inch socket extension, and ratchet handle to remove the regulator mounting bolts from the door shell.
- Use the same 10mm socket to remove the window motor mounting bolts if the motor is separate from the regulator assembly.
- Support the regulator with one hand while removing the final bolt.
- Guide the regulator and motor assembly out through the large door opening.
- Tip: Take a photo before removal.
Step 6: Install the New Regulator Assembly
- Feed the new regulator assembly into the door through the large opening.
- Align the regulator mounting points with the holes in the door.
- Start all bolts by hand first to avoid cross-threading.
- Use a 10mm socket, 6-inch socket extension, and ratchet handle to snug the bolts.
- Use a torque wrench inch-pound range with a 10mm socket to tighten the regulator and motor bolts to Torque to 9 Nm (80 in-lbs).
Step 7: Reattach the Window Glass
- Carefully remove the painter’s tape 2-inch width while holding the glass with one hand.
- Lower the glass by hand until it seats into the regulator glass clamps.
- Use a 10mm socket and ratchet handle to snug the glass clamp bolts.
- Use a torque wrench inch-pound range with a 10mm socket to tighten the glass clamp bolts to Torque to 8 Nm (71 in-lbs).
- Do not overtighten. Glass can crack if clamped too hard.
Step 8: Test the Window Before Reassembly
- Reconnect the window motor connector by pushing it in until it clicks.
- Reconnect the window switch connector.
- Reconnect the negative battery cable using a 10mm socket.
- Turn the ignition on and operate the window switch.
- Watch the glass travel fully up and down. It should move smoothly without tilting or binding.
- If the glass binds, turn ignition off and adjust the glass position using a 10mm socket on the glass clamp bolts.
Step 9: Initialize the Auto Window Function
- Turn the ignition on.
- Use the driver’s window switch to lower the window fully.
- Hold the switch down for 2 seconds after the glass reaches the bottom.
- Raise the window fully.
- Hold the switch up for 2 seconds after the glass reaches the top.
- Repeat for the passenger front window if that side was repaired.
Step 10: Reseal the Moisture Barrier
- Turn the ignition off.
- Use your hands to press the moisture barrier back into place.
- If the old sealant no longer sticks, apply butyl sealant strip around the original sealing path.
- Use a plastic trim removal tool to tuck the barrier neatly around wiring openings.
- Make sure the barrier is sealed all the way around to prevent water leaks.
Step 11: Reinstall the Door Panel
- Reconnect the door handle cable by hand or with needle-nose pliers if removed.
- Reconnect the window switch connector by hand until it clicks.
- Hang the door panel on the upper window ledge first.
- Align the clips with the door holes.
- Press around the edges of the panel by hand until all clips snap in.
- Use a Phillips #2 screwdriver to reinstall the armrest screw and inside handle screw.
- Snap the screw cover and switch panel back into place by hand.
Step 12: Final Tightening and Check
- Use a 10mm socket to confirm the negative battery cable is snug.
- Open and close the door slowly to confirm nothing rattles or binds.
- Operate the window from both the driver master switch and the repaired door switch.
✅ After Repair
- ✅ Confirm the auto-up and auto-down functions work after initialization.
- ✅ Check that the window seals evenly at the top weatherstrip.
- ✅ Spray the outside glass lightly with water and check inside the door area for leaks.
- ✅ Listen for clicking, grinding, or cable noise. Any noise means the regulator may not be seated correctly.
- ✅ If the battery was disconnected, reset the clock and any saved settings if needed.
💰 DIY vs Shop Cost
Shop Cost: $350-$650 per front door (parts + labor)
DIY Cost: $90-$250 per front door (parts only)
You Save: $260-$400 per door by doing it yourself!
Shop labor rates vary but typically run $100-$150/hour. This repair takes a shop approximately 1.0-1.8 hours per door.
🎯 Ready to get started?
HowToo makes it easy: same-day/2-day shipping on every part, plus all the tools and specialty tools you need! Check out the parts and tools sections below to add everything to your cart.