

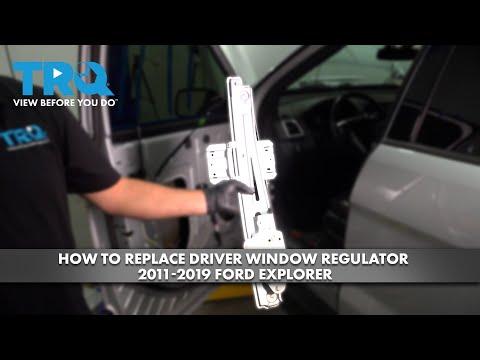





How to Replace Front Window Regulators on a 2011-2017 Ford Explorer
Step-by-step guide covering tools, parts, torque specs, safety, testing, and window initialization for 2011, 2012, 2013, 2014, 2015, 2016, 2017
How to Replace Front Window Regulators on a 2011-2017 Ford Explorer
Step-by-step guide covering tools, parts, torque specs, safety, testing, and window initialization for 2011, 2012, 2013, 2014, 2015, 2016, 2017


🔧 Explorer - Front Window Regulator Replacement
The regulator is the cable-and-track mechanism that raises and lowers the door glass. On your Explorer, the front regulator is serviced inside the door and may be replaced separately from the window motor, depending on the replacement part purchased.
Difficulty Level: Intermediate | Estimated Time: 1.5-2.5 hours per door
Assumption: These instructions apply to either front door; regulators are side-specific.
⚠️ Safety & Precautions
- ⚠️ Wear gloves because the door glass and inner sheet metal have sharp edges.
- ⚠️ Support the glass before releasing its clamps. Unsupported glass can fall and shatter.
- ⚠️ Do not switch on the ignition while door electrical connectors are unplugged.
- ⚠️ Keep hands clear of the regulator while briefly operating the window motor.
- ⚠️ Disconnect the negative battery cable after positioning the glass for removal.
- ⚠️ Do not disturb or strike the side-impact sensor or its wiring inside the door.
🔧 Required Tools
You'll need the following tools for this repair:
- 7mm socket
- 8mm socket
- 10mm socket
- 1/4-inch drive ratchet
- 1/4-inch drive 6-inch extension
- Inch-pound torque wrench rated 20-150 lb-in
- Plastic interior trim-removal tool set
- Small flat-blade screwdriver
- Plastic electrical-connector pick
- Painter's tape rated for glass
- Plastic scraper
- Butyl seam roller
- Multimeter rated 12-volt DC
- Cut-resistant mechanic gloves
- Safety glasses
🔩 Required Parts
HowToo sells all the parts you need for this repair:
- Front window regulator, correct side - Qty: 1 per affected door
- Front window regulator motor - Qty: 1 per affected door if not included or faulty
- Door moisture-barrier butyl sealing cord - Qty: 1 roll
- Front door trim-panel retaining clips - Qty: As needed
Replace both front regulators only if both have failed; the left and right regulators are not interchangeable.
📋 Before You Begin
- 🚙 Park your Explorer on level ground, shift into Park, set the parking brake, and switch off all accessories.
- 🪟 With the battery still connected, lower the affected window until the glass-clamp fasteners align with the door access openings.
- 🔋 Switch off the ignition, remove the key, disconnect the negative battery cable with a 10mm socket, and wait at least one minute.
- 📦 Compare the replacement regulator with the old unit before installation. Confirm the mounting points, electrical connector, and door side match.
- 🧰 A trim-removal tool is a plastic lever that releases interior clips without damaging the panel.
🔨 Step-by-Step Instructions
Follow these steps in order:
Step 1: Remove the switch-panel trim
- Use a plastic interior trim-removal tool to lift the window-switch panel from the armrest.
- Use a small flat-blade screwdriver or plastic electrical-connector pick to release the connector locks, then unplug the switch panel.
- Set the panel somewhere clean to prevent scratches.
Step 2: Remove the door-panel fasteners
- Use a plastic interior trim-removal tool to remove the small trim cover behind the inside door handle.
- Use a 7mm socket, extension, and ratchet to remove the exposed door-panel screws.
- Use the 7mm socket and ratchet to remove the lower and armrest-area screws.
- Keep the screws arranged by location because their lengths may differ.
Step 3: Detach the interior door panel
- Use a plastic interior trim-removal tool along the lower and side edges to release the retaining clips.
- Lift the panel straight upward to unhook it from the window ledge.
- Support the panel while unplugging the remaining electrical connectors with the plastic electrical-connector pick.
- Release the interior-handle cable from its bracket and lever by hand. Note its routing before removal.
- Photograph every connector before unplugging it.
Step 4: Remove the speaker if it blocks access
- Use a 7mm or 8mm socket and ratchet, matching the installed fasteners, to remove the front door speaker.
- Use the plastic electrical-connector pick to release the speaker connector.
- Place the speaker face-up in a dry, protected location.
Step 5: Peel back the moisture barrier
- Use a plastic scraper to separate the moisture barrier from the black butyl adhesive. Butyl is a reusable, sticky rubber sealant.
- Peel back only enough material to reach the regulator, motor, and glass clamps.
- Do not cut or tear the barrier because it keeps rainwater away from the trim panel and wiring.
Step 6: Secure the window glass
- Confirm that both glass-clamp fasteners are visible through the access openings.
- Use a 10mm socket and ratchet to loosen each clamp fastener several turns. Do not remove the fasteners from the clamps.
- Carefully raise the glass fully by hand.
- Use several long strips of painter's tape over the top of the door frame to hold the glass securely.
- Gently test the glass before placing your hands inside the door.
Step 7: Disconnect and remove the old regulator
- Use the plastic electrical-connector pick to unlock and unplug the window-motor connector.
- Use a 10mm socket, extension, and ratchet to remove the regulator mounting fasteners.
- If the motor is transferred separately, use an 8mm socket and ratchet to remove its mounting fasteners after removing the regulator.
- Support the regulator while removing the final fastener.
- Fold the regulator tracks inward and guide the assembly through the largest door opening without pulling on nearby wiring.
Step 8: Transfer the window motor if required
- Place both regulators beside each other in the same orientation.
- Use an 8mm socket and ratchet to remove the motor from the old regulator if the new regulator does not include one.
- Fit the motor squarely onto the new regulator without forcing its drive gear.
- Use the inch-pound torque wrench and 8mm socket to tighten the motor fasteners evenly to 5 Nm (44 lb-in).
Step 9: Install the replacement regulator
- Guide the replacement regulator through the large door opening with the cables facing the same direction as the original assembly.
- Start every regulator fastener by hand to prevent cross-threading.
- Use the inch-pound torque wrench and 10mm socket to tighten the regulator mounting fasteners evenly to 8 Nm (71 lb-in).
- Use the plastic electrical-connector pick as needed to release the connector lock, then plug the motor connector in until it clicks.
- Confirm that no harness is trapped behind a regulator track.
Step 10: Attach the glass to the regulator
- Hold the glass securely and remove the painter's tape by hand.
- Lower the glass carefully into both regulator clamps, keeping the glass level and fully seated.
- Use the inch-pound torque wrench and 10mm socket to tighten the glass-clamp fasteners evenly to 8 Nm (71 lb-in).
- Do not overtighten the clamps because excessive force can damage the glass.
Step 11: Test the regulator before closing the door
- Reconnect the negative battery cable with a 10mm socket and ratchet.
- Temporarily connect the window-switch panel by hand.
- Switch the ignition on and operate the glass through one complete down-and-up cycle.
- Watch through the door openings. Stop immediately if the glass tilts, binds, clicks, or pulls away from a clamp.
- Use a multimeter set to 12-volt DC only if the motor does not operate; verify power and ground at the motor connector before replacing additional parts.
- Switch off the ignition and disconnect the negative battery cable again with the 10mm socket before continuing.
Step 12: Reseal the moisture barrier
- Use the plastic scraper to remove loose or contaminated sealing material.
- Add new butyl sealing cord wherever the original seal no longer sticks.
- Press the moisture barrier firmly into the seal with a butyl seam roller.
- Seal every edge and wiring opening so water cannot reach the trim panel.
Step 13: Reinstall the speaker and door panel
- Reconnect the speaker plug by hand and position the speaker correctly.
- Use the 7mm or 8mm socket and ratchet to install its original fasteners snugly without crushing the speaker frame.
- Reconnect the interior-handle cable and all door-panel electrical connectors by hand.
- Hang the panel over the upper window ledge, align every retaining clip, and press around the edges by hand.
- Use the 7mm socket and ratchet to reinstall the door-panel screws until snug. Do not overtighten fasteners in plastic.
- Reconnect and press the switch panel and handle trim into place by hand.
Step 14: Reconnect the battery and initialize the window
- Use a 10mm socket and ratchet to reconnect the negative battery cable securely.
- Switch the ignition on.
- Lower the repaired window completely and continue holding the switch down for two seconds.
- Raise the window completely and continue holding the switch up for two seconds.
- Repeat the down-and-up cycle once if one-touch operation does not return immediately.
✅ After Repair
- ✅ Test manual and one-touch window operation from the repaired door and the driver's master switch.
- ✅ Confirm the glass moves smoothly without leaning, scraping, clicking, or slowing near the top.
- ✅ Check that the door handle, mirror controls, locks, speaker, and courtesy lamp operate normally.
- ✅ Spray water lightly along the outside glass and confirm no water reaches the interior trim panel.
- ✅ If an airbag warning lamp stays illuminated, inspect the door connectors and have the restraint system scanned. Do not probe restraint connectors with a multimeter.
💰 DIY vs Shop Cost
Shop Cost: ₹12,000-₹25,000 per door (parts + labor)
DIY Cost: ₹4,500-₹12,000 per door (parts only)
You Save: ₹7,500-₹13,000 per door by doing it yourself!
Sonīpat-area labor rates and imported-part prices vary. This repair takes a shop approximately 1.0-1.8 hours per door.
🎯 Ready to get started?
HowToo makes it easy: same-day/2-day shipping on every part, plus all the tools and specialty tools you need! Check out the parts and tools sections below to add everything to your cart.