

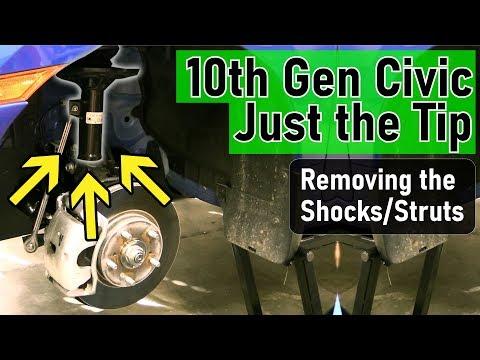







How to Replace Front Struts on a 2016-2021 Honda Civic Si (Body: Sedan)
Step-by-step adaptive damper guide with tools, parts, torque specs, and safety tips for 2016, 2017, 2018, 2019, 2020, 2021
How to Replace Front Struts on a 2016-2021 Honda Civic Si (Body: Sedan)
Step-by-step adaptive damper guide with tools, parts, torque specs, and safety tips for 2016, 2017, 2018, 2019, 2020, 2021


🔧 Civic - Front Strut Replacement
Use complete loaded strut assemblies and replace both fronts together. This is the safest beginner route because the spring, mount, and strut arrive assembled. Your Civic Si has electronically controlled adaptive dampers, so the replacements must specifically retain that function unless you’re intentionally installing a compatible cancellation system.
The front uses MacPherson struts. The rear uses separate springs and shock absorbers, so this procedure covers the actual front struts. go-parts.com)
Difficulty Level: Advanced | Estimated Time: 4-6 hours
Assumption: You’re installing complete front assemblies, not transferring compressed springs.
⚠️ Safety & Precautions
- ⚠️ Never work beneath a Civic supported only by a floor jack.
- ⚠️ Do not remove the large center shaft nut from an assembled strut. That nut retains the compressed coil spring.
- ⚠️ Support the steering knuckle so its weight cannot stretch the brake hose, axle joint, or wheel-speed sensor wire.
- ⚠️ Disconnect each adaptive damper connector by its housing. Never pull the wires.
- ⚠️ Wear eye protection when working around suspension components.
- ⚠️ Replace both front struts together to keep damping balanced.
- ⚠️ A professional four-wheel alignment is required immediately afterward.
🔧 Required Tools
You'll need the following tools for this repair:
- Hydraulic floor jack rated 2-ton minimum
- Jack stands rated 2-ton minimum
- Wheel chocks
- 19mm wheel-nut socket
- 12mm socket
- 14mm deep socket
- 17mm socket
- 19mm socket
- 3/8-inch drive ratchet
- 1/2-inch drive breaker bar
- 10-100 ft-lb torque wrench
- 10-inch adjustable wrench
- 6mm hex-bit socket
- Plastic trim removal tool
- Small flat-tip screwdriver
- Needle-nose pliers
- Rubber mallet
- 12-inch pry bar
- Paint marker
- Mechanic's gloves
- Safety glasses
🔩 Required Parts
HowToo sells all the parts you need for this repair:
- Adaptive-compatible front loaded strut assemblies - Left and right - Qty: 2
- Front strut upper flange nuts - Replace as specified - Qty: 6
- Front knuckle-to-strut pinch bolts and nuts - Replace if supplied or required - Qty: 2 sets
- Brake cleaner - Qty: 1 can
Important: The sidebar includes complete assemblies and bare struts. A bare strut requires a spring compressor and transfers the original spring and upper mount. That’s not the first-time DIY choice. Stored spring energy has a very short sense of humor.
📋 Before You Begin
- Park your Civic on firm, level pavement with the transmission in first gear.
- Apply the parking brake and place wheel chocks behind both rear tires.
- Set the adaptive damper mode to Normal, switch the ignition off, and keep the key away from the car.
- Open the hood and inspect access to all three upper mounting nuts on each side.
- Use a paint marker to mark the strut mount position against the body.
- Do not loosen the large center shaft nut.
- Compare each replacement assembly with the corresponding original before installation.
🔨 Step-by-Step Instructions
Follow these steps in order:
Step 1: Loosen the front wheel nuts
- Use the 19mm wheel-nut socket and 1/2-inch breaker bar to loosen each front wheel nut about one-quarter turn.
- Do not remove the nuts while the Civic is still on the ground.
Step 2: Raise and support the front
- Use the hydraulic floor jack at the approved front center lifting point.
- Place both jack stands beneath the reinforced front pinch-weld support points.
- Lower the Civic onto the stands and gently shake the body to confirm stability.
- A stable car is faster than a rushed car.
Step 3: Remove both front wheels
- Use the 19mm wheel-nut socket and 3/8-inch ratchet to remove the wheel nuts.
- Remove both front wheels and slide them beneath the rocker panels as secondary protection.
Step 4: Disconnect the adaptive damper wiring
- Locate the electrical connector associated with the front damper.
- Use the small flat-tip screwdriver or plastic trim tool to release its locking tab.
- Separate the connector by holding its plastic housing.
- Release the harness clips with the needle-nose pliers or plastic trim tool.
- Move the harness safely away from the strut and steering knuckle.
Step 5: Release the brake hose and sensor harness
- Use the appropriate 12mm socket or 14mm socket to remove the brake-hose bracket bolt from the strut.
- Release the wheel-speed sensor wire clips with the plastic trim tool.
- Do not open the hydraulic brake hose connection.
- Do not let either line carry the steering knuckle’s weight.
Step 6: Support the steering knuckle
- Place the hydraulic floor jack lightly beneath the lower control arm or knuckle.
- Raise it only enough to support the suspension. Do not lift the Civic off the jack stand.
Step 7: Remove the knuckle-to-strut fastener
- Use the 17mm or 19mm socket, adjustable wrench, and breaker bar to remove the lower strut pinch fastener.
- Keep track of the bolt direction and all brackets.
- Use the rubber mallet to tap out a stubborn bolt. Do not strike the threads with a steel hammer.
- The Civic Si specification for the knuckle damper pinch bolt is 79 Nm (58 ft-lbs). honcivic.automotive-manuals.com)
Step 8: Separate the strut from the knuckle
- Control the knuckle with the hydraulic floor jack.
- Use the 12-inch pry bar carefully to help release the strut from the knuckle.
- Guide the knuckle downward without pulling the axle, brake hose, or sensor wire tight.
- Keep the steering knuckle reasonably upright to protect the inner CV joint.
Step 9: Remove the upper mounting nuts
- Hold the strut from below with one hand or have a helper support it.
- Use the 14mm deep socket and 3/8-inch ratchet to remove the three upper flange nuts.
- Do not touch the center shaft nut.
- Lower the complete strut assembly through the wheel opening. Honda’s installation procedure likewise removes the three upper flange nuts while supporting the assembly. bernardiparts.com
Step 10: Compare the assemblies
- Place the old and new struts side by side.
- Confirm the left or right designation, mounting orientation, spring seating, bracket locations, overall length, and adaptive electrical connection.
- Use the paint marker to transfer any helpful orientation mark.
- Stop if the replacement cannot connect to the adaptive damper harness.
Step 11: Position the replacement strut
- Guide the replacement assembly into the tower from below.
- Align the upper studs with their holes and your paint marks.
- Install all three new upper flange nuts by hand.
- Use the 14mm deep socket and 3/8-inch ratchet to snug them evenly.
- Do not use an impact wrench on the upper mount hardware.
Step 12: Seat the strut in the knuckle
- Use the hydraulic floor jack to raise and guide the knuckle onto the lower strut.
- Align the strut’s locating feature and bolt hole exactly.
- Use the rubber mallet only if gentle persuasion is necessary.
- Insert the pinch bolt by hand. Never use its threads to force misaligned parts together.
Step 13: Tighten the lower strut fastener
- Install the nut while holding the bolt with the matching 17mm or 19mm socket and adjustable wrench.
- Use the torque wrench to tighten the knuckle damper pinch bolt to 79 Nm (58 ft-lbs). honcivic.automotive-manuals.com
- Follow any different hardware-specific instruction supplied with the replacement assembly.
Step 14: Reconnect the brackets and wiring
- Reinstall the brake-hose bracket using the appropriate 12mm socket or 14mm socket.
- Reattach every wheel-speed sensor harness clip with your fingers or the needle-nose pliers.
- Reconnect the adaptive damper connector until its lock clicks.
- Confirm that no wire can rub the tire, axle, spring, or steering knuckle.
Step 15: Tighten the upper mounting nuts
- Use the 14mm deep socket and torque wrench to tighten the three upper flange nuts evenly.
- Use the torque specification supplied with the exact replacement mount. Do not substitute the center shaft-nut specification.
- Recheck that the mount remains aligned with the original paint marks.
Step 16: Repeat on the opposite side
- Repeat Steps 4 through 15 on the second front strut.
- Keep left- and right-side assemblies separated.
- Replace front struts as a pair even if only one original unit is leaking.
Step 17: Reinstall the wheels
- Install each wheel and start all five nuts by hand.
- Use the 19mm wheel-nut socket and 3/8-inch ratchet to snug the nuts in a star pattern.
- Raise the Civic slightly with the hydraulic floor jack, remove the stands, and lower it to the ground.
- Use the 19mm wheel-nut socket and torque wrench to tighten the wheel nuts in a star pattern to 108 Nm (80 ft-lbs). civicx.com
✅ After Repair
- Switch the ignition on and check for adaptive damper, ABS, stability-control, or steering warnings.
- Turn the steering slowly from lock to lock while stationary and listen for binding or spring popping.
- Press firmly on the brake pedal before moving the Civic.
- Take a slow test drive over a smooth route. Stop immediately for clunks, pulling, rubbing, or warning lights.
- Schedule a four-wheel alignment before normal or spirited driving.
- Ask the alignment shop to inspect the front camber, toe, strut seating, brake-hose routing, and sensor-wire routing.
- Recheck the wheel-nut torque after approximately 50 miles.
💰 DIY vs Shop Cost
Shop Cost: $900-$1,800, depending heavily on adaptive damper parts and alignment
DIY Cost: $250-$1,100 for parts, hardware, and alignment
You Save: Approximately $400-$900 by doing it yourself!
Local labor rates vary. This repair takes a shop approximately 3-5 hours, plus alignment.
🎯 Ready to get started?
HowToo has loaded the matched strut, complete-assembly, and suspension options into the parts sidebar. Choose only parts specifically listed for the Si adaptive suspension unless you’re converting the complete system. HowToo makes it easy with same-day or two-day shipping on eligible parts, plus the tools and specialty equipment needed for the job.