







How to Replace Front Struts on a 2014-2020 Ford F-150 (Trim: XL)
Step-by-step loaded strut assembly guide with tools, parts, torque specs, and safety tips for 2014
How to Replace Front Struts on a 2014-2020 Ford F-150 (Trim: XL)
Step-by-step loaded strut assembly guide with tools, parts, torque specs, and safety tips for 2014


🔧 F-150 - Front Strut Assembly Replacement
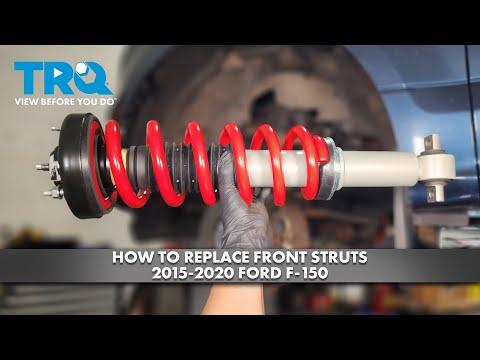
Your F-150 uses front coil-over strut assemblies. Replacing them means safely lifting the truck, removing the wheel, disconnecting the lower strut mount and upper strut nuts, then installing the new assemblies.
Difficulty Level: Intermediate | Estimated Time: 2.5-4 hours
⚠️ Safety & Precautions
- ⚠️ Always support your F-150 with jack stands before working underneath it. Never rely on a floor jack alone.
- ⚠️ Replace front strut assemblies in pairs so the truck sits and handles evenly.
- ⚠️ Do not loosen the center nut on the top of the strut assembly. That nut holds spring tension and can be dangerous.
- ⚠️ If using complete loaded strut assemblies, no spring compressor is needed. A loaded strut means the spring, mount, and shock are preassembled.
- ⚠️ Keep hands clear when lowering or raising the lower control arm. It can move suddenly.
- ⚠️ An alignment is required after strut replacement to prevent tire wear and steering pull.
🔧 Required Tools
You'll need the following tools for this repair:
- Floor jack (rated 3-ton minimum)
- Jack stands (rated 3-ton minimum)
- Wheel chocks
- Safety glasses
- Mechanic gloves
- 21mm socket
- 18mm socket
- 15mm socket
- 10mm socket
- 1/2-inch drive ratchet
- 3/8-inch drive ratchet
- 1/2-inch drive breaker bar
- Torque wrench (250 ft-lb capacity)
- Torque wrench (100 ft-lb capacity)
- 18mm wrench
- 21mm wrench
- Pry bar
- Rubber mallet
- Paint marker
- Penetrating oil
🔩 Required Parts
HowToo sells all the parts you need for this repair:
- Front loaded strut assembly - Qty: 2
- Front lower strut mounting nuts - Qty: 4
- Front upper strut mounting nuts - Qty: 6
- Wheel alignment service - Qty: 1
📋 Before You Begin
- 🅿️ Park your F-150 on flat, solid ground.
- 🧱 Place wheel chocks behind the rear wheels.
- 🔒 Shift the transmission into Park and set the parking brake.
- 🖊️ Use a paint marker to mark the position of the lower strut bolts before removal. This helps keep the alignment close enough to drive to an alignment shop.
- 💧 Spray penetrating oil on the lower strut nuts and upper strut nuts before starting.
- 📌 This procedure assumes you are installing complete loaded front strut assemblies.
🔨 Step-by-Step Instructions
Follow these steps in order:
Step 1: Loosen the Front Wheel Lug Nuts
- Use a 21mm socket and 1/2-inch drive breaker bar to loosen the front lug nuts about one turn.
- Do this while the tires are still touching the ground so the wheels do not spin.
- Do not remove them yet.
Step 2: Lift and Support the Front of the Truck
- Use a floor jack (rated 3-ton minimum) under the front frame crossmember to lift the front of your F-150.
- Place jack stands (rated 3-ton minimum) under the frame rails.
- Slowly lower the truck onto the jack stands.
- Gently shake the truck to confirm it is stable before working.
Step 3: Remove the Front Wheel
- Use the 21mm socket and 1/2-inch drive ratchet to remove the loosened lug nuts.
- Remove the wheel and set it flat under the frame as an extra safety backup.
Step 4: Support the Lower Control Arm
- Place the floor jack (rated 3-ton minimum) lightly under the lower control arm.
- The lower control arm is the large metal arm under the strut that moves up and down with the wheel.
- Raise the jack just enough to support the arm. Do not lift the truck off the jack stand.
Step 5: Remove Brake Hose and ABS Wire Brackets if Attached
- Use a 10mm socket and 3/8-inch drive ratchet to remove any brake hose or ABS wire brackets attached near the strut area.
- The ABS wire is the small electrical wire going to the wheel speed sensor.
- Move the brackets aside gently. Do not stretch the hose or wire.
Step 6: Mark the Lower Strut Mount Position
- Use a paint marker to mark the lower strut mount and bolt positions.
- This gives you a reference when installing the new strut assembly.
- This does not replace an alignment.
Step 7: Remove the Lower Strut Mount Nuts
- Use an 18mm socket, 18mm wrench, and 1/2-inch drive breaker bar to loosen the two lower strut mount nuts.
- Remove the two nuts from the lower strut studs.
- If the nuts are stuck, apply penetrating oil and let it soak for a few minutes.
Step 8: Remove the Upper Strut Mount Nuts
- Open the hood.
- Use a 15mm socket and 3/8-inch drive ratchet to remove the three upper strut mount nuts.
- Do not remove or loosen the center nut on the strut assembly.
- Hold the strut with one hand as the last nut comes off so it does not drop suddenly.
Step 9: Remove the Old Strut Assembly
- Slowly lower the floor jack (rated 3-ton minimum) under the lower control arm just enough to create space.
- Use a pry bar carefully if the lower strut studs are stuck in the lower control arm.
- Use a rubber mallet to gently tap the lower mount if needed.
- Remove the strut assembly through the wheel opening.
Step 10: Install the New Loaded Strut Assembly
- Position the new front loaded strut assembly into the wheel well.
- Guide the upper studs through the holes in the strut tower first.
- Install the three new upper nuts by hand to hold it in place.
- Do not fully tighten them yet.
Step 11: Seat the Lower Strut Mount
- Use the floor jack (rated 3-ton minimum) to slowly raise the lower control arm until the lower strut studs line up.
- Use a pry bar gently if alignment is slightly off.
- Install the two new lower strut mounting nuts by hand.
- Make sure the strut sits flat against the lower control arm.
Step 12: Tighten the Upper Strut Mount Nuts
- Use a 15mm socket and torque wrench (100 ft-lb capacity) to tighten the three upper strut mount nuts.
- Torque to 41 Nm (30 ft-lbs)
- Tighten the nuts evenly in a triangle pattern.
Step 13: Tighten the Lower Strut Mount Nuts
- Use an 18mm socket, 18mm wrench, and torque wrench (250 ft-lb capacity) to tighten the lower strut mount nuts.
- Torque to 406 Nm (300 ft-lbs)
- These are very tight fasteners. Make sure your torque wrench is rated high enough.
Step 14: Reinstall Brake Hose and ABS Wire Brackets
- Use a 10mm socket and 3/8-inch drive ratchet to reinstall any removed brake hose or ABS wire brackets.
- Torque to 10 Nm (89 in-lbs)
- Check that the hose and wire are not twisted, pinched, or stretched.
Step 15: Repeat on the Other Side
- Repeat Steps 3 through 14 on the opposite front strut assembly.
- Use the same tools and the same torque specs.
- Always replace front struts in pairs.
Step 16: Reinstall the Front Wheels
- Install the wheels by hand.
- Use the 21mm socket and 1/2-inch drive ratchet to snug the lug nuts in a star pattern.
- A star pattern means tightening across the wheel, not around in a circle.
Step 17: Lower the Truck and Torque the Lug Nuts
- Use the floor jack (rated 3-ton minimum) to lift the truck slightly off the jack stands.
- Remove the jack stands (rated 3-ton minimum).
- Lower your F-150 to the ground.
- Use a 21mm socket and torque wrench (250 ft-lb capacity) to tighten the lug nuts in a star pattern.
- Torque to 204 Nm (150 ft-lbs)
✅ After Repair
- ✅ Bounce the front of the truck lightly and listen for clunks.
- ✅ Turn the steering wheel fully left and right to make sure brake hoses and ABS wires do not stretch or rub.
- ✅ Test drive slowly at first. Listen for knocking, popping, or rubbing noises.
- ✅ Schedule a front-end alignment as soon as possible after replacing the struts.
- ✅ Recheck the lug nut torque after 50-100 miles.
💰 DIY vs Shop Cost
Shop Cost: $850-$1,400 (parts + labor + alignment)
DIY Cost: $300-$650 (parts only, alignment not included)
You Save: $400-$750 by doing it yourself!
Shop labor rates vary but typically run $100-$150/hour. This repair takes a shop approximately 2.5-4 hours.
🎯 Ready to get started?
HowToo makes it easy: same-day/2-day shipping on every part, plus all the tools and specialty tools you need! Check out the parts and tools sections below to add everything to your cart.