

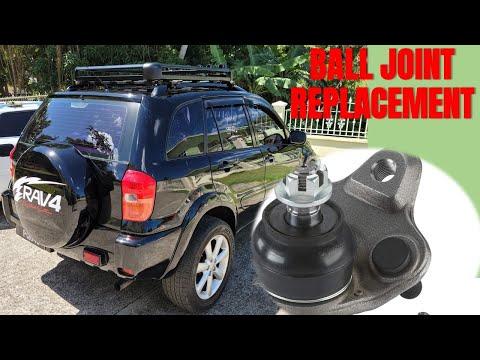





How to Replace Front Lower Ball Joints on a 2006-2018 Toyota RAV4
Step-by-step DIY instructions with required tools, parts, torque specs, and safety tips for 2006, 2007, 2008, 2009, 2010, 2011, 2012, 2013, 2014, 2015, 2016, 2017, 2018
How to Replace Front Lower Ball Joints on a 2006-2018 Toyota RAV4
Step-by-step DIY instructions with required tools, parts, torque specs, and safety tips for 2006, 2007, 2008, 2009, 2010, 2011, 2012, 2013, 2014, 2015, 2016, 2017, 2018


🔧 RAV4 - Front Lower Ball Joint Replacement
This repair replaces the front lower ball joints that connect the steering knuckles to the lower control arms. Replace both sides together because worn ball joints can cause clunking, loose steering, uneven tire wear, and unsafe wheel movement.
Difficulty Level: Intermediate | Estimated Time: 3-5 hours
⚠️ Safety & Precautions
- ⚠️ Never work beneath your RAV4 while it is supported only by a floor jack.
- ⚠️ Wear safety glasses because the tapered ball-joint stud may release suddenly.
- ⚠️ Do not touch any orange hybrid high-voltage cable or connector.
- ⚠️ Support the steering knuckle so it cannot stretch the brake hose, wheel-speed sensor wire, or drive-axle joint.
- ⚠️ Do not strike the threaded stud or aluminum steering knuckle with a steel hammer.
- ⚠️ The 12-volt battery does not need to be disconnected.
- ⚠️ Arrange a wheel alignment immediately after the repair.
🔧 Required Tools
You'll need the following tools for this repair:
- 17mm deep socket
- 19mm deep socket
- 21mm impact-rated socket
- 17mm combination wrench
- 19mm combination wrench
- 3/8-inch drive ratchet
- 1/2-inch drive ratchet
- 1/2-inch drive breaker bar
- 1/2-inch drive torque wrench rated 20-150 ft-lbs
- Front lower ball-joint separator (specialty)
- 24-inch pry bar
- 16-ounce rubber mallet
- Needle-nose pliers
- Medium wire brush
- Floor jack rated 2-ton minimum
- Jack stands rated 2-ton minimum
- Rubber wheel chocks
- Mechanic’s work light
- Safety glasses
- Mechanic’s gloves
🔩 Required Parts
HowToo sells all the parts you need for this repair:
- Front lower ball joints - Qty: 2 - Replace in pairs
- Front lower ball-joint cotter pins - Qty: 2
- Front lower ball-joint mounting hardware - Qty: 2 sets
📋 Before You Begin
- Park on firm, level ground. Select Park, apply the parking brake, and switch the hybrid system completely off.
- Place rubber wheel chocks securely behind both rear tires.
- Keep the key at least 15 feet away to prevent accidental activation of the hybrid system.
- No infotainment service mode, scan tool, electronic parking-brake mode, or hybrid battery isolation is required.
- Verify that each replacement joint includes a new castellated nut and cotter pin. A castellated nut has slots that capture the cotter pin.
🔨 Step-by-Step Instructions
Follow these steps in order:
Step 1: Loosen the Wheel Nuts
- Put on the safety glasses and mechanic’s gloves.
- Use the 21mm impact-rated socket and 1/2-inch drive breaker bar to loosen each front wheel nut approximately one-quarter turn.
- Do not remove the nuts while the tires are supporting the vehicle.
Step 2: Raise and Support the Front
- Use the 2-ton floor jack under the front-center subframe lifting point to raise your RAV4.
- Place the 2-ton jack stands beneath the reinforced left and right front support points.
- Lower the vehicle onto the stands, then gently push the body to verify that it is stable.
Step 3: Remove the Front Wheels
- Use the 21mm impact-rated socket and 1/2-inch drive ratchet to remove the wheel nuts.
- Remove both front wheels and place them flat beneath the vehicle sides as secondary protection.
Step 4: Clean and Inspect the Joint
- Use the mechanic’s work light to locate the ball joint beneath the steering knuckle.
- Use the medium wire brush to clean the stud nut, cotter pin, and three lower-control-arm mounting fasteners.
- Inspect the steering knuckle and control arm for cracks, bending, or enlarged holes. Stop and replace any damaged component.
Step 5: Loosen the Ball-Joint Stud Nut
- Use needle-nose pliers to straighten and remove the cotter pin from the castellated nut.
- Use the 19mm deep socket and 1/2-inch drive breaker bar to loosen the stud nut.
- Leave the nut threaded onto the stud by three or four turns. It will contain the joint when the taper releases.
Step 6: Separate the Stud from the Knuckle
- Fit the front lower ball-joint separator between the joint and steering knuckle. This tool applies controlled pressure to release the tapered stud.
- Use the 19mm socket and 1/2-inch drive ratchet to tighten the separator until the stud releases with a pop.
- If needed, tap the separator lightly with the 16-ounce rubber mallet while it is under tension.
- Remove the separator, then use the 19mm deep socket and 1/2-inch drive ratchet to remove the stud nut.
- Keep hands clear while releasing the taper.
Step 7: Remove the Control-Arm Fasteners
- Use the floor jack to support the steering knuckle without lifting your RAV4 from the jack stand.
- Use the 17mm deep socket and 3/8-inch drive ratchet to remove the two mounting nuts.
- Use the 17mm deep socket, 3/8-inch drive ratchet, and 17mm combination wrench to remove the mounting bolt.
- Use the 24-inch pry bar to press the lower control arm down only far enough to remove the ball joint.
- Do not pull the knuckle outward or allow it to hang from the brake hose.
Step 8: Install the New Ball Joint
- Compare the old and new joints. Their stud tapers, flange shapes, and three mounting holes must match.
- Use the medium wire brush to clean the control-arm mounting surface.
- Place the new ball joint against the underside of the control arm.
- Install the mounting bolt and two nuts by hand to prevent cross-threading.
- Use the 17mm deep socket, 17mm combination wrench, and 1/2-inch drive torque wrench to tighten the three fasteners evenly.
- Torque the ball-joint-to-control-arm fasteners to 89 Nm (66 ft-lbs).
Step 9: Attach the Joint to the Steering Knuckle
- Use the 24-inch pry bar to lower the control arm carefully while guiding the new stud through the steering-knuckle opening.
- Install the new castellated nut by hand.
- Use the 19mm deep socket and 1/2-inch drive torque wrench to tighten the nut.
- Torque the ball-joint stud nut to 103 Nm (76 ft-lbs).
- If the cotter-pin holes do not align, use the 19mm deep socket and torque wrench to tighten the nut slightly farther. Never loosen the nut for alignment.
- Use needle-nose pliers to insert a new cotter pin and bend its ends securely around the nut.
Step 10: Replace the Opposite Ball Joint
- Use the same listed tools and repeat Steps 4 through 9 on the other side.
- Support the opposite steering knuckle with the floor jack during separation.
- Apply the same torque specifications to the opposite joint.
Step 11: Reinstall the Wheels
- Install both wheels and start every wheel nut by hand.
- Use the 21mm impact-rated socket and 1/2-inch drive ratchet to snug the nuts in a crisscross pattern.
- Use the floor jack to raise your RAV4, remove the jack stands, and lower the tires onto the ground.
- Use the 21mm impact-rated socket and 1/2-inch drive torque wrench to tighten the wheel nuts in a crisscross pattern.
- Torque the wheel nuts to 103 Nm (76 ft-lbs).
✅ After Repair
- ✅ Check that both cotter pins are secure and that the brake hoses and wheel-speed sensor wires are correctly routed.
- ✅ Turn the steering wheel fully left and right while parked. Listen for binding or knocking.
- ✅ Start the hybrid system and verify that the brake, ABS, AWD, and stability-control warning lights turn off.
- ✅ Perform a slow test drive in a safe area. Stop immediately if the steering feels loose or you hear clunking.
- ✅ Have a four-wheel alignment performed before normal or high-speed driving.
- ✅ Use the 21mm impact-rated socket and torque wrench to recheck wheel-nut torque after 25-50 miles.
💰 DIY vs Shop Cost
Shop Cost: $650-$1,050 (parts + labor)
DIY Cost: $140-$320 (parts only)
You Save: $330-$910 by doing it yourself!
Shop labor rates vary but typically run $100-$150/hour. This repair takes a shop approximately 2.5-4 hours.
🎯 Ready to get started?
HowToo makes it easy: same-day/2-day shipping on every part, plus all the tools and specialty tools you need! Check out the parts and tools sections below to add everything to your cart.