

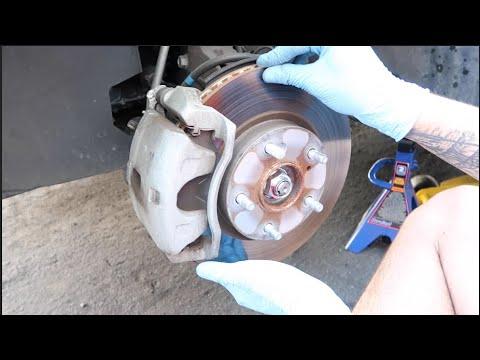






How to Replace Front Brake Pads on a 2019-2022 Honda Insight (Trim: LX)
Step-by-step DIY guide with required tools, parts, torque specs, and hybrid safety tips for 2019, 2020, 2021, 2022
How to Replace Front Brake Pads on a 2019-2022 Honda Insight (Trim: LX)
Step-by-step DIY guide with required tools, parts, torque specs, and hybrid safety tips for 2019, 2020, 2021, 2022


🔧 Insight - Front Brake Pad Replacement
This is a manageable first brake job if you lift the car safely and work one side at a time. Replace both front pad sets together, inspect the rotors, and stop if you find leaking fluid, torn boots, or a seized caliper.
Difficulty Level: Intermediate | Estimated Time: 1.5-2.5 hours
Assumption: The existing rotors are smooth, within specification, and do not cause pedal vibration.
⚠️ Safety & Precautions
- ⚠️ Turn the Insight completely OFF and keep the key fob at least 10 feet away.
- ⚠️ Never work beneath a vehicle supported only by a floor jack. Use jack stands on solid, level ground.
- ⚠️ Do not touch orange high-voltage cables or hybrid components. No high-voltage disconnection is required for this job.
- ⚠️ Do not let the caliper hang from its rubber brake hose. Support it with a caliper hanger.
- ⚠️ Do not press the brake pedal while a caliper is removed.
- ⚠️ Use brake cleaner instead of compressed air. Brake dust should not become airborne.
- ⚠️ The 12-volt battery does not normally need to be disconnected.
🔧 Required Tools
You'll need the following tools for this repair:
- 2-ton floor jack
- 2-ton jack stands, pair
- Wheel chocks, pair
- 19mm socket
- 12mm socket
- 3/8-inch drive ratchet
- 1/2-inch drive breaker bar
- 20-100 ft-lb torque wrench
- 6-inch C-clamp or disc-brake piston compressor (specialty)
- Small flat-blade screwdriver
- Small nylon or brass wire brush
- Brake caliper hanger
- Brake-fluid suction syringe (specialty)
- Shop towels
- Nitrile gloves
- Safety glasses
🔩 Required Parts
HowToo sells all the parts you need for this repair:
- Front ceramic brake pad set - Qty: 1, replaces both sides
- Front brake pad hardware kit - Qty: 1, if not included with the pads
- Silicone brake caliper grease - Qty: 1
- Brake parts cleaner - Qty: 1 can
- Honda-compatible DOT 3 brake fluid - Qty: 1 small bottle, only if topping up is necessary
- Front brake rotors - Qty: 2, only if worn, grooved, heat-damaged, or below minimum thickness
The matching front pads, rotors, and hardware are showing in the parts sidebar. Honda specifies DOT 3 brake fluid for the Insight. techinfo.honda.com
📋 Before You Begin
- 📋 Park on level pavement, select Park, engage the parking brake, and switch the vehicle OFF.
- 📋 Place wheel chocks firmly behind both rear tires.
- 📋 Open the hood and inspect the brake-fluid level. If it is near MAX, remove a small amount with the brake-fluid suction syringe.
- 📋 Loosen each front wheel nut about one-quarter turn using the 19mm socket and breaker bar.
- 📋 No infotainment service mode or electronic parking-brake retraction is required for the front brakes.
🔨 Step-by-Step Instructions
Follow these steps in order:
Step 1: Lift and support the front
- Use the 2-ton floor jack at the approved front-center lifting point.
- Position the 2-ton jack stands beneath the left and right front pinch-weld support points.
- Lower the Insight gently onto the stands, then give the body a cautious push to confirm stability.
- Use the 19mm socket and ratchet to remove both front wheels.
Step 2: Inspect the first brake assembly
- Turn the steering wheel so the caliper faces outward and is easier to reach.
- Check the brake hose, caliper boots, rotor, and surrounding area for wet brake fluid.
- Inspect the rotor for deep grooves, blue heat spots, cracks, or a pronounced outer lip.
- Stop the repair if brake fluid is leaking or the rotor is cracked.
Step 3: Pivot the caliper upward
- Use the 12mm socket and ratchet to remove the lower caliper slide-pin bolt.
- Pivot the caliper upward carefully. Honda's pad procedure uses this hinged position and warns that the pad spring can move out of place. 2carpros.com
- Use the brake caliper hanger if the caliper will not stay securely raised.
- Do not twist, kink, or stretch the brake hose.
Step 4: Remove the old pads and clips
- Pull the inner and outer pads from the caliper bracket by hand.
- Use the small flat-blade screwdriver only if a pad is stuck. Do not gouge the rotor.
- Note the position of the upper and lower stainless clips before removing them. They are not necessarily interchangeable.
- Use the nylon or brass wire brush and brake parts cleaner to clean the bracket surfaces beneath the clips.
- Photograph the hardware before removing it.
Step 5: Inspect the caliper slide pins
- Move both slide pins in and out by hand. They should move smoothly without sticking.
- If servicing them, remove one pin at a time, wipe it with shop towels, and apply a thin coat of silicone brake caliper grease.
- Reinstall each pin in its original position and seat its rubber boot completely.
- Replace damaged boots or corroded pins. A seized slide pin will quickly ruin the new pads.
Step 6: Compress the caliper piston
- Place the old inner pad against the piston to distribute pressure evenly.
- Use the 6-inch C-clamp or disc-brake piston compressor to push the piston straight inward.
- Compress it slowly while watching the brake-fluid reservoir. Remove excess fluid with the suction syringe before it overflows.
- Stop if the piston binds, tilts, or requires excessive force. That points to a damaged or seized caliper.
Step 7: Install the new hardware and pads
- Press the new stainless hardware clips firmly into the correct upper and lower positions.
- Apply a paper-thin film of silicone brake caliper grease where the pad ears slide against the clips.
- Keep all grease away from the pad friction material and both rotor faces.
- Install the inner and outer pads by hand. They should slide without being forced.
Step 8: Reinstall the caliper
- Swing the caliper carefully over the new pads without disturbing the pad spring.
- Make sure the slide-pin boot is not twisted or trapped beneath the caliper.
- Start the lower slide-pin bolt by hand to prevent cross-threading.
- Use the 12mm socket and torque wrench to tighten the slide-pin bolt to 34 Nm (25 ft-lbs). howtoo.com
- Check that the brake hose follows its natural route and does not rub the wheel or suspension.
Step 9: Repeat on the opposite side
- Repeat Steps 2 through 8 on the other front wheel.
- Compare the old inner and outer pads. Major uneven wear indicates a sticking slide pin, piston, or pad in the bracket.
- Always replace front pads on both sides. Brakes don't appreciate half a haircut.
Step 10: Reinstall the wheels
- Use shop towels to clean dirt from the wheel and hub mounting surfaces.
- Install each wheel and start all wheel nuts by hand.
- Use the 19mm socket and ratchet to snug the nuts in a star pattern.
- Raise the vehicle slightly with the 2-ton floor jack, remove the stands, and lower it fully.
- Use the 19mm socket and torque wrench to tighten the wheel nuts in a star pattern to 108 Nm (80 ft-lbs). ownersmanuals2.com
✅ After Repair
- ✅ Before selecting Drive, press the brake pedal repeatedly until it feels firm. The first few presses may travel close to the floor.
- ✅ Check the brake-fluid reservoir and adjust it between MIN and MAX using DOT 3 fluid.
- ✅ Start the Insight and confirm that the red brake warning stays off after releasing the parking brake.
- ✅ Test the brakes at walking speed before entering traffic.
- ✅ Make several gentle-to-moderate stops, allowing cooling time between them. Follow any bedding instructions supplied by the pad manufacturer.
- ✅ Avoid panic stops unless necessary during the first 150-200 miles.
- ✅ Recheck for unusual heat, pulling, grinding, fluid leaks, or a soft pedal after the test drive.
💰 DIY vs Shop Cost
Shop Cost: $180-$350 (parts + labor)
DIY Cost: $45-$100 (parts only, assuming the rotors remain serviceable)
You Save: $100-$250 by doing it yourself!
Local Haryana labor pricing may be lower. A professional pad-only replacement generally takes approximately 1-1.5 hours.
🎯 Ready to get started?
HowToo makes it easy: same-day/2-day shipping on every part, plus all the tools and specialty tools you need! Check out the parts and tools sections below to add everything to your cart.