

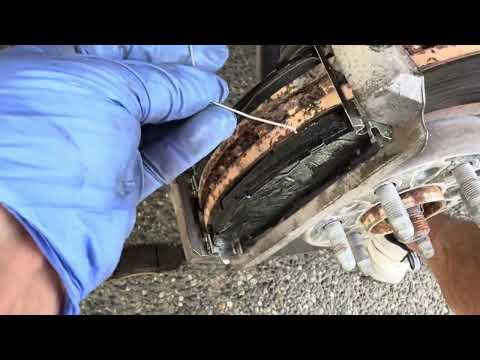







How to Replace Front Brake Pads on a 2018-2019 Chevrolet Traverse (Trim: L)
Step-by-step DIY instructions with tools, parts, torque specs, and safety tips for 2018, 2019
How to Replace Front Brake Pads on a 2018-2019 Chevrolet Traverse (Trim: L)
Step-by-step DIY instructions with tools, parts, torque specs, and safety tips for 2018, 2019


🔧 Traverse - Front Brake Pad Replacement
This is a manageable intermediate DIY job, and the front brakes don’t require electronic parking-brake service mode. You’ll remove each front caliper, compress its piston, replace the pads and hardware, then carefully reassemble everything. Sonīpat’s heat and dust make clean hardware and freely moving slide pins especially important.
Difficulty Level: Intermediate | Estimated Time: 1.5-2.5 hours
Assumption: The rotors are smooth, within specification, and free of deep grooves, cracks, or brake-pedal pulsation.
⚠️ Safety & Precautions
- 🛑 Support your Traverse with jack stands. Never work beneath a vehicle supported only by a jack.
- 🌡️ Let the brakes cool completely before beginning.
- 🚫 Don’t press the brake pedal while either caliper is removed.
- 🪝 Never let a caliper hang from its rubber brake hose.
- 🧴 Brake fluid damages paint. Wipe spills immediately and rinse with water.
- 😷 Don’t use compressed air on brake dust. Clean it with brake cleaner.
- 🔋 Battery disconnection isn’t required for this front-pad replacement.
- ⚠️ If a hose, bleeder screw, or hydraulic fitting is opened, the brakes must be properly bled before driving.
🔧 Required Tools
You'll need the following tools for this repair:
- 21mm or 22mm lug-nut socket
- Front caliper guide-pin socket or hex-bit socket matched before removal
- 3/8-inch drive ratchet
- 1/2-inch drive breaker bar
- 3/8-inch drive torque wrench rated 10-80 Nm
- 1/2-inch drive torque wrench rated 40-220 Nm
- 6-inch C-clamp or disc-brake piston compressor (specialty)
- Small flat-blade screwdriver
- Nylon or brass brake-cleaning brush
- Brake caliper hanger or mechanic’s wire
- Clean fluid syringe or suction pump
- Drain pan
- Floor jack rated 3-ton minimum
- Jack stands rated 3-ton minimum
- Wheel chocks
- Nitrile gloves
- Safety glasses
- Dust mask
🔩 Required Parts
HowToo sells all the parts you need for this repair:
- Front ceramic brake pad set - Qty: 1, replace both front sides
- Front brake pad hardware kit - Qty: 1, if not included with pads
- Silicone-based brake caliper grease - Qty: 1
- Brake parts cleaner - Qty: 1-2 cans
- DOT 3 brake fluid - Qty: 1 small sealed container, only if top-off is needed
The matching front brake aisle is open in the parts sidebar. Replace the pads as an axle set, never one wheel at a time.
📋 Before You Begin
- 🅿️ Park on firm, level ground. Shift into Park and apply the parking brake.
- 🧱 Place wheel chocks securely behind both rear tires.
- 🧴 Check the brake-fluid reservoir. If it’s at MAX, use a clean fluid syringe to remove a small amount into the drain pan before compressing the pistons.
- 🔩 Use the lug-nut socket and breaker bar to loosen each front lug nut about one-half turn.
- 📱 No infotainment menu, scan-tool command, or electronic parking-brake retraction is needed for the front pads.
- 🔍 Work on one side at a time. The assembled side becomes your reference if a clip’s position is unclear.
🔨 Step-by-Step Instructions
Follow these steps in order:
Step 1: Lift and secure the front
- Use the 3-ton floor jack at the designated front lifting point.
- Place the 3-ton jack stands beneath the designated front support points.
- Lower the vehicle onto the stands and gently push the body to confirm stability.
- Use the lug-nut socket and ratchet to remove the front wheel.
Step 2: Inspect the brake assembly
- Use the safety glasses and visually inspect the rotor for cracks, blue heat spots, heavy grooves, or a pronounced outer ridge.
- Check the caliper and hose for wet brake-fluid residue.
- Compare inner and outer pad wear. A major difference can indicate seized hardware or a sticking caliper.
- If the rotor is badly damaged or the steering wheel shakes during braking, stop and plan on replacing both front rotors.
Step 3: Create clearance for the new pads
- Turn the steering wheel to point the caliper outward for easier access.
- Use the small flat-blade screwdriver between the old outer pad and rotor to move the caliper outward slightly.
- Apply only gentle pressure. Don’t gouge the rotor or tear the piston boot.
Step 4: Remove and support the caliper
- Confirm the fastener style, then use the matching caliper guide-pin socket or hex-bit socket with the 3/8-inch ratchet to remove both guide-pin bolts.
- Lift the caliper from the bracket. Use the small flat-blade screwdriver only for gentle assistance if it sticks.
- Support it from the suspension with the caliper hanger.
- Don’t twist, stretch, or kink the brake hose. Brake hoses dislike being used as coat hangers.
Step 5: Remove the old pads and hardware
- Pull the inner and outer pads from the bracket by hand.
- Use the small flat-blade screwdriver to remove the stainless abutment clips. These are the clips supporting the pad ends.
- Note the position of any wear indicator before discarding the old pads.
Step 6: Clean and inspect the bracket
- Place the drain pan below the brake assembly.
- Use brake parts cleaner and the nylon or brass brush to clean the bracket surfaces beneath the clips.
- Remove rust buildup without grinding metal away.
- Check that the new clips sit completely flat. Raised clips can make a new pad bind.
- Clean pad lands prevent most comeback noises.
Step 7: Check and lubricate the slide pins
- Pull each slide pin from its rubber boot by hand, one at a time.
- Wipe it clean and inspect it for rust, pitting, bending, or dried grease.
- Confirm each rubber boot is intact and firmly seated.
- Apply a thin coating of silicone-based caliper grease and reinstall the pin.
- Don’t use petroleum grease or anti-seize inside the rubber boots.
Step 8: Compress the caliper piston
- Place an old brake pad flat against the piston.
- Use the 6-inch C-clamp or piston compressor to press the piston slowly and evenly into the caliper.
- Watch the reservoir as the piston moves. Use the clean fluid syringe if the fluid approaches the top.
- Stop if the piston won’t move smoothly or the rubber boot folds, tears, or leaks.
- A piston requiring extreme force can indicate a failing caliper or restricted hose.
Step 9: Install the new hardware and pads
- Press the new hardware clips fully into the clean bracket by hand.
- Apply an extremely thin film of silicone-based caliper grease where the pad ears contact the clips.
- Keep grease completely off the rotor and pad friction material.
- Install the inner and outer pads in the same orientation as the originals.
- Move each pad by hand. It should slide without being hammered or forced.
Step 10: Reinstall the caliper
- Lower the caliper over the new pads without twisting the hose.
- Start both guide-pin bolts by hand to prevent cross-threading.
- Use the matching caliper socket and 3/8-inch torque wrench to tighten the front guide-pin bolts to 35 Nm (26 ft-lbs). chevy-specs.com)
- Don’t remove the large caliper-bracket bolts during a pads-only service.
Step 11: Repeat on the opposite side
- Use the same tools and repeat Steps 2 through 10 on the other front wheel.
- Compare the removed pads from both sides. Uneven left-to-right wear deserves further caliper and hose inspection.
Step 12: Reinstall and torque the wheels
- Install each wheel and start every lug nut by hand.
- Use the lug-nut socket and ratchet to snug the nuts in a star pattern.
- Use the 3-ton floor jack to remove the stands and lower the vehicle.
- Use the 1/2-inch torque wrench and correct lug-nut socket to tighten in a star pattern to 190 Nm (140 ft-lbs). howtoo.com)
✅ After Repair
- 🦶 With the engine off, slowly press the brake pedal repeatedly until it becomes firm. Don’t move your Traverse before doing this.
- 🧴 Check the reservoir and adjust it to the proper level with fresh DOT 3 fluid only if needed.
- 🔍 Check around both calipers for leaks and verify that no tools remain near the wheels.
- 🚙 Start the engine and confirm the pedal remains firm before selecting Drive.
- 🛣️ Perform several low-speed stops in a safe, traffic-free area.
- 🔥 Follow the pad manufacturer’s bedding procedure. If none is supplied, make 8-10 moderate stops from approximately 30 mph to 5 mph, allowing cooling time between stops.
- 🚫 Avoid holding the brake pedal firmly while stopped immediately after bedding.
- 🔧 Recheck wheel torque after approximately 50-100 miles.
- ⚠️ Stop driving if the pedal is soft, the vehicle pulls strongly, fluid leaks, or metal grinding continues.
💰 DIY vs Shop Cost
Shop Cost: $250-$450 equivalent (parts + labor)
DIY Cost: $40-$120 equivalent (parts only)
You Save: Approximately $150-$330 by doing it yourself!
Labor rates vary by market. This repair takes a shop approximately 1.0-1.5 hours.
🎯 Ready to get started?
HowToo makes it easy: same-day/2-day shipping on every part, plus all the tools and specialty tools you need! Check out the parts and tools sections below to add everything to your cart.