








How to Replace Front Brake Pads on a 2013-2019 Ford Escape (Engine: Inline 4 2.5L)
Step-by-step DIY instructions with required tools, parts, torque specs, and safety tips for 2013, 2014, 2015, 2016, 2017, 2018, 2019
How to Replace Front Brake Pads on a 2013-2019 Ford Escape (Engine: Inline 4 2.5L)
Step-by-step DIY instructions with required tools, parts, torque specs, and safety tips for 2013, 2014, 2015, 2016, 2017, 2018, 2019


🔧 Escape - Front Brake Pad Replacement
This is a manageable first brake job if you can lift your Escape safely. You’ll replace both front pad sets together, clean and lubricate the contact points, then properly seat the new pads. The brake parts aisle is open beside this guide.
Difficulty Level: Intermediate | Estimated Time: 1.5-2.5 hours
Assumption: The front rotors and calipers are reusable and aren’t damaged, leaking, or severely worn.
⚠️ Safety & Precautions
- ⚠️ Work on level, solid ground and support the Escape with jack stands. Never rely on the floor jack alone.
- 🛑 Replace the pads on both front wheels, even if one side looks better.
- 🧤 Brake dust is harmful. Wear safety glasses and gloves, and never blow dust away with compressed air.
- 🔗 Hang the removed caliper securely. Never let it hang from its rubber brake hose.
- 🧼 Keep grease, brake cleaner, and dirty hands away from the pad friction surfaces and rotors.
- 🚫 Don’t press the brake pedal while either front caliper is removed.
- 🔋 Battery disconnection isn’t required for this front brake-pad replacement.
- 📞 Stop and get professional help if a caliper leaks, a piston won’t compress, or a guide pin is seized.
🔧 Required Tools
You'll need the following tools for this repair:
- 21mm deep socket
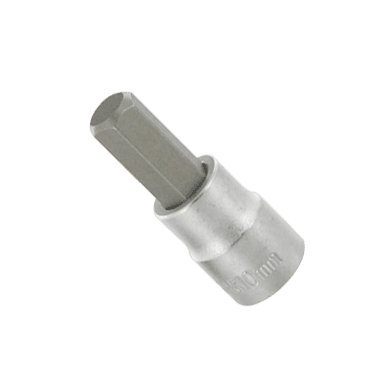
- 7mm hex-bit socket
- 3/8-inch drive ratchet
- 1/2-inch drive breaker bar
- 3/8-inch drive torque wrench rated 10-80 ft-lbs
- 1/2-inch drive torque wrench rated 20-150 ft-lbs
- Brake caliper piston compressor (specialty)
- Small flat-blade screwdriver
- Small nylon brake-cleaning brush
- Brake caliper hanger hook
- Floor jack rated 2-ton minimum
- Jack stands rated 2-ton minimum
- Wheel chocks
- Disposable nitrile gloves
- Safety glasses
A brake caliper piston compressor is a hand tool that slowly pushes the piston back into the caliper.
🔩 Required Parts
HowToo sells all the parts you need for this repair:
- Front brake pad set - Qty: 1 set for both front wheels
- Front disc brake hardware kit - Qty: 1
- Silicone brake caliper grease - Qty: 1 tube
- Non-chlorinated brake parts cleaner - Qty: 1 can
- DOT 4 brake fluid - Qty: 1 small sealed container, only if topping off is required
Don’t order pads by shape alone. The sidebar is already filtered for your Escape, but compare the new pads and hardware with the removed parts before installation.
📋 Before You Begin
- 🅿️ Park on level pavement, shift into Park, apply the parking brake, and switch off the ignition.
- 🧱 Place wheel chocks firmly behind both rear tires.
- 🌡️ Let the brakes cool completely before touching the calipers or rotors.
- 🧴 Open the hood and inspect the brake-fluid reservoir. If it’s at the maximum line, remove a small amount with a clean fluid syringe before compressing the pistons.
- 🚫 Don’t leave the reservoir cap completely open. Set it loosely in place to keep dirt and moisture out.
- 📱 No infotainment service mode or scan tool is required for the front brakes.
🔨 Step-by-Step Instructions
Follow these steps in order:
Step 1: Loosen the front wheel nuts
- Use the 21mm deep socket and 1/2-inch drive breaker bar to loosen each front lug nut about one-quarter turn.
- Leave the wheels on the ground while loosening them. Don’t remove the nuts yet.
Step 2: Lift and support the front end
- Use the floor jack rated 2-ton minimum at an approved front lifting point.
- Place the jack stands rated 2-ton minimum beneath the reinforced front support points.
- Lower the Escape gently onto the stands, then give the body a light push to confirm it’s stable.
- Use the 21mm deep socket and ratchet to remove the lug nuts and both front wheels.
Step 3: Inspect the brake assembly
- Turn the steering wheel so the caliper on your working side faces outward.
- Use the safety glasses and inspect the rotor for deep grooves, heavy rust scaling, cracks, or blue heat spots.
- Check for wet brake fluid around the caliper, bleeder screw, and rubber hose.
- Compare the inner and outer pad thickness. A major difference can indicate a sticking guide pin or caliper.
- Fix uneven wear before fitting fresh pads.
Step 4: Remove the caliper retaining spring
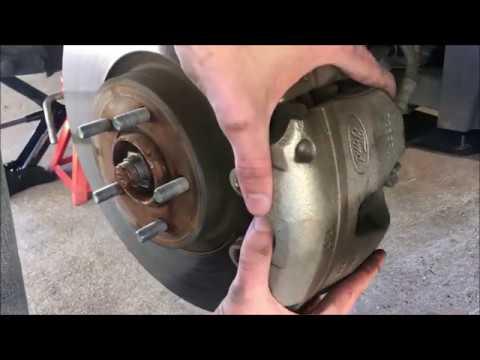
- Use the small flat-blade screwdriver to carefully release the metal spring clip from the outside face of the caliper.
- Hold the spring while releasing it so it doesn’t fly away.
- Note its installed orientation or take a photograph before removal.
Step 5: Remove the caliper guide pins
- Remove the protective caps from the two guide-pin openings behind the caliper.
- Use the 7mm hex-bit socket and 3/8-inch drive ratchet to remove the upper and lower guide pins.
- A guide pin is the smooth pin that lets the caliper slide evenly as the brakes are applied.
- Don’t use an undersized hex bit. A rounded guide pin turns a pleasant brake job into archaeology.
Step 6: Remove and support the caliper
- Use the small flat-blade screwdriver only at the pad edge to gently create enough clearance to lift the caliper away.
- Remove the caliper from the rotor without twisting or pulling its rubber hose.
- Support it from the suspension spring with the brake caliper hanger hook.
- Never operate the brake pedal with the caliper removed.
Step 7: Remove the old brake pads
- Pull the outer pad from the bracket by hand.
- Pull the inner pad and its retaining spring out of the caliper piston.
- Compare the removed pads. Tapered or badly uneven wear means the guide pins or caliper need further attention.
Step 8: Inspect and clean the guide pins
- Wipe each guide pin clean using a lint-free shop towel.
- Inspect the rubber boots for splits and the pins for rust, pitting, or bending.
- Apply a thin coating of silicone brake caliper grease to clean guide-pin surfaces.
- Don’t use petroleum grease or anti-seize inside the rubber guide-pin boots.
- Replace damaged boots or corroded pins before reassembly.
Step 9: Compress the caliper piston
- Place the old inner pad flat against the piston.
- Use the brake caliper piston compressor to push the piston slowly and evenly into the caliper.
- Watch the brake-fluid reservoir while compressing it. Stop before the fluid overflows.
- The front piston pushes straight inward. It doesn’t need to be rotated.
- If the piston binds or requires extreme force, stop. Don’t force a sticking caliper back into service.
Step 10: Clean the pad contact areas
- Use the non-chlorinated brake parts cleaner and small nylon brake-cleaning brush to clean the areas where the pads contact the bracket.
- Clean loose dirt from the caliper without damaging the piston boot or guide-pin boots.
- Allow all cleaned surfaces to dry completely.
- Don’t sand or grind the rotor while performing a pad-only replacement.
Step 11: Prepare and install the new pads
- Compare the new pads with the old ones before installation.
- Fit the new pad hardware in the same positions as the removed hardware.
- Apply a very thin film of silicone brake caliper grease only where the pad backing plates contact the caliper or hardware.
- Keep grease off the rotor and the flat friction surfaces of the pads.
- Press the inner pad retaining spring securely into the caliper piston, then position the outer pad correctly.
Step 12: Reinstall the caliper
- Remove the caliper from the brake caliper hanger hook and place it squarely over the new pads.
- Make sure the rubber brake hose isn’t twisted.
- Start both guide pins by hand to prevent cross-threading.
- Use the 7mm hex-bit socket and 3/8-inch drive torque wrench to tighten the guide pins to 28 Nm (21 ft-lbs). scribd.com
- Reinstall both guide-pin protective caps.
Step 13: Reinstall the caliper spring
- Position the spring clip exactly as it was removed.
- Use the small flat-blade screwdriver to guide it into the caliper mounting points.
- Confirm that both ends are fully seated and the spring lies securely against the caliper.
Step 14: Repeat on the opposite side
- Repeat Steps 3 through 13 on the other front wheel.
- Don’t reuse a badly damaged guide pin, torn boot, or contaminated pad.
Step 15: Reinstall the wheels
- Clean loose dirt and corrosion from the wheel-to-hub contact surfaces using the small nylon brake-cleaning brush.
- Install each wheel and start all five lug nuts by hand.
- Use the 21mm deep socket and ratchet to snug the nuts in a star pattern.
- Raise the Escape slightly with the floor jack rated 2-ton minimum, remove the stands, and lower the tires onto the ground.
- Use the 21mm deep socket and 1/2-inch drive torque wrench to tighten the lug nuts in a star pattern to 135 Nm (100 ft-lbs). carmanualsonline.info
✅ After Repair
- 🦶 Before starting the engine, press the brake pedal slowly several times until it becomes firm. This moves the pistons and pads into operating position.
- 🧴 Check the brake-fluid level. Adjust it between the minimum and maximum marks using fresh DOT 4 brake fluid only if necessary.
- 🔍 Inspect around both calipers and hoses for fluid leaks.
- 🚗 Start the engine and confirm that the pedal remains firm. Don’t drive if it sinks, feels unusually soft, or a brake warning stays illuminated.
- 🧪 Test the brakes at walking speed in a clear, private area before entering traffic.
- 🌡️ Bed the pads using the pad manufacturer’s instructions. If none are supplied, make several moderate stops from approximately 30 mph to 5 mph, allowing short cooling periods without coming to a complete stop.
- 🚫 Avoid panic stops and holding the hot brakes at a complete stop during the first 200 miles unless safety requires it.
- 🔧 Recheck the wheel lug-nut torque after approximately 100 miles. Ford specifies 135 Nm (100 ft-lbs). carmanualsonline.info
💰 DIY vs Shop Cost
Shop Cost: $250-$450 for pads, inspection, and labor
DIY Cost: $35-$100 for pads, hardware, cleaner, and grease
You Save: Approximately $150-$350 by doing it yourself!
Local labor pricing in Sonīpat may differ considerably. A professional typically books about 1-1.5 labor hours for a front pad service, excluding rotor or caliper repairs.
🎯 Ready to get started?
HowToo makes it easy: same-day/2-day shipping on every part, plus all the tools and specialty tools you need! Check out the parts and tools sections below to add everything to your cart.
