

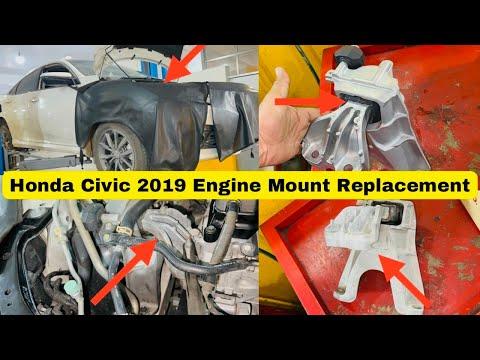



How to Replace Engine Mounts on a 2019 Honda Civic
Step-by-step DIY guide with tools, parts, torque specs, and safety tips
How to Replace Engine Mounts on a 2019 Honda Civic
Step-by-step DIY guide with tools, parts, torque specs, and safety tips


🔧 Civic - Engine Mount Replacement
Replacing the engine mounts on your Civic involves safely supporting the engine, removing the worn mount assembly, and installing the new mount without stressing the drivetrain. Engine mounts hold the engine in position and reduce vibration, so worn mounts can cause clunks, harsh vibration, or movement during acceleration.
Assumption: This covers the main upper engine mount on the passenger side, which is the most common DIY engine mount replacement on your Civic.
Difficulty Level: Intermediate | Estimated Time: 2-3 hours
⚠️ Safety & Precautions
- ⚠️ Support the engine before removing the mount. Never let the engine hang by hoses, wiring, or the transmission.
- ⚠️ Use a wood block between the jack and oil pan. This spreads the load and helps prevent oil pan damage.
- ⚠️ Work on a cool engine. Turbo and exhaust parts can stay very hot after driving.
- ⚠️ Disconnect the negative battery cable if your hands or tools will be near the starter wiring or main power cables.
- ⚠️ Do not place any body part under an unsupported engine or vehicle.
🔧 Required Tools
You'll need the following tools for this repair:
- 10mm socket
- 12mm socket
- 14mm socket
- 17mm socket
- 19mm socket
- 3/8-inch drive ratchet
- 1/2-inch drive ratchet
- 1/2-inch drive breaker bar
- 3-inch socket extension
- 6-inch socket extension
- Torque wrench rated 10-150 ft-lbs
- Flat-blade screwdriver
- Trim clip removal tool
- Floor jack rated 2-ton minimum
- Jack stands rated 2-ton minimum
- Wood block 2x6-inch minimum
- Wheel chocks
- Mechanic gloves
- Safety glasses
🔩 Required Parts
HowToo sells all the parts you need for this repair:
- Passenger-side engine mount assembly - Qty: 1
- Engine mount bracket bolts - Qty: As needed
- Engine mount through-bolt - Qty: 1 if damaged or corroded
- Plastic splash shield clips - Qty: As needed
📋 Before You Begin
- 🅿️ Park your Civic on level ground and set the parking brake.
- 🧊 Let the engine cool completely before working near the turbo side of the engine bay.
- 🛞 Place wheel chocks behind the rear wheels.
- 🔋 If disconnecting the battery, use a 10mm socket to remove the negative battery terminal first.
- 📌 A “through-bolt” is the long bolt that passes through the rubber mount and bracket.
- 📌 A “torque wrench” clicks or signals when a bolt is tightened to the correct tightness.
🔨 Step-by-Step Instructions
Follow these steps in order:
Step 1: Raise and Secure the Vehicle
- Use wheel chocks behind the rear wheels.
- Use the floor jack rated 2-ton minimum to lift the front of your Civic at the front center jacking point.
- Place jack stands rated 2-ton minimum under the front side pinch welds.
- Lower the vehicle gently onto the jack stands.
- Shake lightly to confirm stability.
Step 2: Remove the Lower Splash Shield if Needed
- Put on safety glasses and mechanic gloves.
- Use the trim clip removal tool to remove plastic clips from the lower splash shield.
- Use a 10mm socket to remove any splash shield bolts.
- Set the shield and clips aside in order.
Step 3: Support the Engine
- Place the wood block 2x6-inch minimum on the floor jack saddle.
- Position the jack and wood block under the engine oil pan.
- Use the floor jack to lift very gently until the wood block just contacts the oil pan.
- Do not lift the vehicle off the jack stands.
- Only support the engine, don’t raise it.
Step 4: Remove Nearby Covers or Brackets
- Use a 10mm socket to remove any small brackets or covers blocking access to the passenger-side engine mount.
- Use a flat-blade screwdriver to release any plastic wire retainers attached near the mount.
- Move wiring gently aside without pulling on connectors.
Step 5: Loosen the Engine Mount Through-Bolt
- Use a 17mm socket and 1/2-inch drive breaker bar to loosen the engine mount through-bolt.
- If the bolt feels loaded or pinched, use the floor jack to raise or lower the engine slightly until the bolt turns easier.
- Remove the through-bolt with the 17mm socket and 1/2-inch drive ratchet.
Step 6: Remove the Mount-to-Body Fasteners
- Use a 14mm socket or 17mm socket, depending on bolt location, to remove the mount-to-body bolts.
- Use a 6-inch socket extension if access is tight.
- Keep one hand on the mount as the last bolt comes out.
Step 7: Remove the Mount Bracket Fasteners
- Use a 14mm socket and 3-inch socket extension to remove the mount bracket bolts from the engine-side bracket if required for clearance.
- Use the floor jack to shift the engine height slightly if a bolt is tight from engine weight.
- Remove the old mount assembly from the engine bay.
Step 8: Compare the Old and New Mount
- Place the old and new passenger-side engine mount assemblies side by side.
- Confirm the bolt holes, bracket shape, and rubber mount orientation match.
- Check that locating pins or tabs line up the same way.
Step 9: Install the New Engine Mount
- Set the new passenger-side engine mount assembly into position by hand.
- Start all bolts by hand first to prevent cross-threading.
- Use a 14mm socket or 17mm socket to snug the mount-to-body bolts, but do not fully tighten yet.
- Use a 17mm socket to slide in and hand-start the through-bolt.
- Hand-start every bolt first.
Step 10: Align the Engine and Tighten the Mount
- Use the floor jack to slightly raise or lower the engine until the mount sits naturally without forcing the bolts.
- Use the torque wrench rated 10-150 ft-lbs with the correct socket to tighten the mount-to-body bolts to Torque to 64 Nm (47 ft-lbs).
- Use the torque wrench rated 10-150 ft-lbs and 17mm socket to tighten the through-bolt to Torque to 93 Nm (69 ft-lbs).
- Use the torque wrench rated 10-150 ft-lbs and 14mm socket to tighten engine-side bracket bolts, if removed, to Torque to 64 Nm (47 ft-lbs).
Step 11: Reinstall Brackets, Wiring, and Covers
- Use a 10mm socket to reinstall any small brackets or covers removed earlier.
- Use the flat-blade screwdriver to gently guide wiring clips back into their retainers.
- Make sure no wires, hoses, or vacuum lines are trapped under the mount.
Step 12: Remove Engine Support
- Slowly lower the floor jack until the engine weight is fully on the new mount.
- Remove the wood block and floor jack from under the vehicle.
- Inspect the mount one more time with safety glasses on.
Step 13: Reinstall the Lower Splash Shield
- Raise the splash shield into place by hand.
- Use the trim clip removal tool to reinstall plastic clips.
- Use a 10mm socket to reinstall splash shield bolts and tighten them snugly.
- Do not overtighten plastic shield fasteners.
Step 14: Lower the Vehicle
- Use the floor jack rated 2-ton minimum to raise the vehicle slightly off the jack stands.
- Remove the jack stands rated 2-ton minimum.
- Lower your Civic slowly to the ground.
- Remove the rear wheel chocks.
✅ After Repair
- ✅ Start the engine and let it idle while watching for abnormal movement.
- ✅ With the clutch fully pressed, shift gently from neutral into first and reverse while stopped.
- ✅ Listen for clunks, rattles, or vibration that were not present before.
- ✅ Take a short, gentle test drive and avoid hard launches until you confirm everything feels normal.
- ✅ Recheck accessible mount bolts after the test drive with the torque wrench if anything feels loose.
💰 DIY vs Shop Cost
Shop Cost: $450-$850 (parts + labor)
DIY Cost: $120-$350 (parts only)
You Save: $300-$500 by doing it yourself!
Shop labor rates vary but typically run $100-$150/hour. This repair takes a shop approximately 1.5-2.5 hours.
🎯 Ready to get started?
HowToo makes it easy: same-day/2-day shipping on every part, plus all the tools and specialty tools you need! Check out the parts and tools sections below to add everything to your cart.