

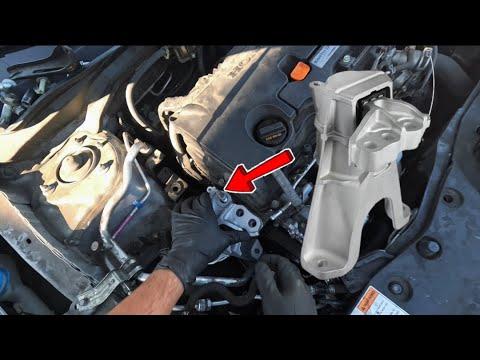







How to Replace Engine Mounts on a 2017-2021 Honda Civic Si 1.5L (Engine: Inline 4 1.5L | Body: Sedan)
Step-by-step manual-transmission guide with tools, parts, torque specs, and safety tips for 2017, 2018, 2019, 2020, 2021
How to Replace Engine Mounts on a 2017-2021 Honda Civic Si 1.5L (Engine: Inline 4 1.5L | Body: Sedan)
Step-by-step manual-transmission guide with tools, parts, torque specs, and safety tips for 2017, 2018, 2019, 2020, 2021


🔧 Civic - Engine Mount Replacement
This is an advanced DIY job if you're replacing all three mounts. Your Civic uses a right-side engine mount, a left-side manual-transmission mount, and a lower rear torque rod. Replace them one at a time while the engine and transmission remain supported. The correct mount listings are now showing in the parts sidebar. hondapartsnow.com
Difficulty Level: Advanced | Estimated Time: 5-8 hours
Assumption: These instructions cover the original engine, six-speed manual transmission, and stock mounting system.
⚠️ Safety & Precautions
- ⚠️ Never remove more than one mount at a time. The remaining mounts aren't designed to carry the unsupported powertrain.
- ⚠️ Support the engine with a transmission jack and a broad wood block beneath the oil pan. The wood spreads the load and protects the aluminum pan.
- ⚠️ The jack supports the engine. It does not support the vehicle. Place the Civic securely on four jack stands.
- ⚠️ Raise or lower the engine only enough to remove pressure from the mount. Excess movement can strain hoses, wiring, axles, and the exhaust.
- ⚠️ Honda specifies new mounting bolts and nuts for the primary mount fasteners. Do not reuse hardware identified as single-use. honcivic.automotive-manuals.com
- ⚠️ Disconnect the negative battery terminal before removing the battery tray or working near the positive terminal.
🔧 Required Tools
You'll need the following tools for this repair:
- Metric socket set (10-19mm)
- Metric combination wrench set (10-19mm)
- 3/8-inch drive ratchet
- 1/2-inch drive breaker bar (24-inch minimum)
- 1/2-inch drive torque wrench (30-150 Nm range)
- 3/8-inch drive torque wrench (10-80 Nm range)
- 3-inch socket extension
- 6-inch socket extension
- 12-inch socket extension
- Universal socket joint (3/8-inch drive)
- Trim-clip removal tool
- Flat-blade screwdriver (6-inch)
- Floor jack (rated 2-ton minimum)
- Transmission jack (rated 1,000-pound minimum)
- Jack stands (rated 2-ton minimum)
- Wheel chocks (rubber)
- Wood support block (25mm thick minimum)
- Paint marker (oil-resistant)
- Mechanic gloves (cut-resistant)
- Safety glasses (ANSI Z87.1)
🔩 Required Parts
HowToo sells all the parts you need for this repair:
- Right-side hydraulic engine mount - Qty: 1
- Left-side manual-transmission mount - Qty: 1
- Lower rear engine torque rod - Qty: 1
- Engine mount replacement bolt and nut set - Qty: 1
- Transmission mount replacement bolt and nut set - Qty: 1
- Torque rod replacement bolts - Qty: 1 set
The factory layout confirms separate engine-side, manual-transmission, and lower torque-rod mounts for the Si. Match each sidebar listing carefully because the manual-transmission pieces aren't interchangeable with CVT mounts. hondapartsnow.com
📋 Before You Begin
- Park on solid, level ground. Select first gear, apply the parking brake, and chock both rear wheels.
- Open the hood and let the engine cool completely.
- Use a 10mm socket to loosen the negative battery-terminal nut. Disconnect and isolate the cable.
- Raise the front with a floor jack. Position jack stands under the approved side support points.
- Raise the rear and support it so the Civic sits level on four stands.
- Use a trim-clip removal tool and 10mm socket to remove the lower engine undercover.
- Place the wood block on the transmission jack. Position it beneath the oil pan without covering the drain plug or pressing against an edge.
- Raise the jack until it just contacts the pan. Do not lift the vehicle from the stands.
🔨 Step-by-Step Instructions
Follow these steps in order:
Step 1: Inspect and identify the failed mount
- Use a work light to inspect the right mount for torn rubber, separation, or leaked hydraulic fluid.
- Inspect the left transmission mount beneath the battery area for splitting or sagging.
- Inspect the lower rear torque rod from underneath for cracked rubber or excessive movement.
- Mark the installed position of each bracket with a paint marker before loosening anything.
- Photos before disassembly save headaches later.
Step 2: Remove the lower rear torque rod
- Confirm the transmission jack and wood block are lightly supporting the engine.
- Use the appropriate metric socket, breaker bar, and extension to loosen the torque-rod bolts from underneath.
- Adjust the transmission jack a few millimetres if a bolt binds. A correctly supported engine lets the bolt slide out without hammering.
- Remove the torque rod. Remove its bracket only if the replacement or access requires it.
- Install the new torque rod with its UP marking facing upward. Honda specifically calls for this orientation. lemon.dogeware.me
- Start every new bolt by hand. Leave the bolts slightly loose until the mount-settling step.
Step 3: Replace the right-side engine mount
- From above, use a 10mm socket and flat-blade screwdriver to remove the intake duct and any covers blocking the mount.
- Check that no hose, wiring loom, or ground cable will be stretched when the engine moves.
- Use the appropriate metric socket and breaker bar to loosen the mount-to-body fasteners.
- Use the appropriate metric socket to remove the engine-side bracket fasteners.
- Raise or lower the transmission jack only enough to unload the mount.
- Remove the old mount and compare its shape, stud locations, and bracket surfaces with the replacement.
- Position the new mount. Start the body fasteners and bracket fasteners by hand.
- Leave all fasteners finger-tight so the mount can settle naturally.
- Never pull misaligned holes together with bolts.
Step 4: Replace the left transmission mount
- Use a 10mm socket to disconnect and remove the battery hold-down, battery terminals, and battery.
- Use a 10mm socket and trim-clip removal tool to remove the battery tray and attached harness retainers.
- Move the transmission jack and wood block to support the transmission case at a broad reinforced area.
- Do not place the jack beneath a drain plug, thin rib, wiring bracket, or shift mechanism.
- Use the appropriate metric socket and breaker bar to loosen the transmission-mount bolts and bracket fasteners.
- Raise or lower the jack slightly until the fasteners move freely.
- Remove the old mount. Keep brackets correctly oriented.
- Install the manual-transmission mount and new hardware. Start every fastener by hand, but do not fully tighten it yet.
- Reinstall the battery tray loosely if it does not obstruct final torque access.
Step 5: Settle and align the mounts
- Confirm that all three mounts are installed and their main fasteners remain slightly loose.
- Slowly lower the transmission jack until the engine's normal weight rests on the mounts.
- Keep the jack touching the support block as a safety backup, but do not lift the engine.
- Gently rock the engine by hand at a solid bracket. Do not pull on hoses, intake pipes, or wiring.
- Check that each mount sits naturally without twisted rubber or forced alignment.
- This settling step matters. Tightening a mount while the engine is jacked out of position can create vibration. Nobody wants to finish a five-hour repair and build a new buzz into the dashboard.
Step 6: Torque the right-side engine mount
- Use the correct metric socket and 3/8-inch torque wrench on the 12mm-thread side-mount bolts: Torque to 49 Nm (36 ft-lbs).
- Use the correct metric socket and 1/2-inch torque wrench on the 14mm-thread side-mount bolts: Torque to 93 Nm (69 ft-lbs).
- Use the correct metric socket and 1/2-inch torque wrench on the side-mount nut: Torque to 93 Nm (69 ft-lbs).
- Use the correct metric socket and torque wrench on the side-mount bracket bolts: Torque to 54 Nm (40 ft-lbs).
- These measurements refer to fastener thread diameter, not socket size. Honda specifies new bolts and a new nut in these positions. honcivic.automotive-manuals.com
Step 7: Torque the transmission mount
- Use the correct metric socket and torque wrench on the transmission-mount bolts: Torque to 74 Nm (55 ft-lbs).
- Use the correct metric socket and torque wrench on the transmission-mount bracket bolts: Torque to 78 Nm (58 ft-lbs).
- Use the correct metric socket and torque wrench on the transmission-mount bracket nuts: Torque to 78 Nm (58 ft-lbs).
- Honda identifies these bolts and nuts as replacement hardware. honcivic.automotive-manuals.com
Step 8: Torque the lower rear torque rod
- Use the correct metric socket and 1/2-inch torque wrench on the torque-rod bolts: Torque to 93 Nm (69 ft-lbs).
- If its bracket was removed, use the correct metric socket and torque wrench on the bracket bolts: Torque to 93 Nm (69 ft-lbs).
- Honda specifies new bolts for these connections. honcivic.automotive-manuals.com
Step 9: Reassemble the upper components
- Use a 10mm socket to reinstall the battery tray and reconnect all harness clips.
- Install the battery, positive cable, negative cable, and hold-down using a 10mm socket.
- Use a 10mm socket and flat-blade screwdriver to reinstall the intake duct and covers.
- Verify that no tools remain in the engine compartment.
Step 10: Reinstall the undercover
- Use a trim-clip removal tool and 10mm socket to reinstall the lower engine undercover.
- Replace damaged clips rather than forcing them back into place.
- Remove the transmission jack and wood block.
- Lower the Civic carefully with the floor jack after removing all four jack stands.
✅ After Repair
- With the transmission in neutral and the parking brake applied, start the engine without touching the accelerator.
- Watch the engine during startup. A small movement is normal; a hard jump or clunk is not.
- Let it idle with the air conditioning off, then on. Check for abnormal vibration in the steering wheel, pedals, and seat.
- Press and release the clutch several times. Confirm no wiring, hoses, or intake parts contact the engine.
- Take a short, gentle test drive. Check acceleration, deceleration, shifting, and reverse for clunks.
- Stop immediately if you hear metal contact, feel severe vibration, or notice the shifter moving excessively.
- After the test drive, inspect every mount and confirm the fastener paint marks have not moved.
💰 DIY vs Shop Cost
Shop Cost: $900-$1,700 USD for all mounts, hardware, and labor
DIY Cost: $200-$550 USD for mounts and replacement hardware
You Save: Approximately $500-$1,150 USD by doing it yourself!
Labor pricing varies significantly by region. Replacing only the accessible lower torque rod costs considerably less than replacing all three mounts.
🎯 Ready to get started?
HowToo has opened the matching engine-mount, torque-rod, kit, and hardware aisles for your Civic. Buy the manual-transmission fitment and new fasteners together. Same-day and 2-day shipping options are available on qualifying parts, plus the support and torque tools needed for the job.