

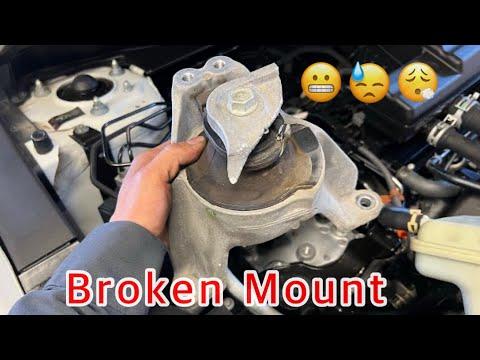






How to Replace Engine Mounts on a 2017-2019 Honda CR-V 2.4L AWD (Engine: Inline 4 2.4L)
Step-by-step guide covering tools, parts, torque specs, alignment, and safety tips for 2017, 2018, 2019
How to Replace Engine Mounts on a 2017-2019 Honda CR-V 2.4L AWD (Engine: Inline 4 2.4L)
Step-by-step guide covering tools, parts, torque specs, alignment, and safety tips for 2017, 2018, 2019


🔧 CR-V - Engine Mount Replacement
Your CR-V uses an upper passenger-side engine mount, an upper driver-side transmission mount, and lower torque mounts that control powertrain movement. Replace only one mount at a time while the engine and transmission are safely supported so they cannot shift.
Difficulty Level: Advanced | Estimated Time: 4-6 hours
Assumption: This procedure covers replacement of the complete mount set on the stock 2.4L AWD powertrain.
⚠️ Safety & Precautions
- ⚠️ Support the powertrain with an engine support bar before loosening any mount.
- ⚠️ Never work beneath a vehicle supported only by a floor jack.
- ⚠️ Do not place a jack directly against the aluminum oil pan or CVT case.
- ⚠️ Replace one mount at a time. Removing several mounts can allow the powertrain to fall or damage hoses, wiring, and AWD components.
- ⚠️ Disconnect the negative battery cable before removing the battery tray near the transmission mount.
- ⚠️ Allow the engine and exhaust system to cool completely.
- ⚠️ Mount fasteners must be started by hand before tightening. Never pull a misaligned engine into position by tightening a bolt.
🔧 Required Tools
You'll need the following tools for this repair:
- Engine support bar rated 1,000 lb minimum (specialty)
- Floor jack rated 2-ton minimum
- Jack stands rated 2-ton minimum
- Wheel chocks
- Wood block approximately 12 x 6 x 1 inches
- 1/2-inch-drive torque wrench rated 20-150 ft-lbs
- 3/8-inch-drive torque wrench rated 7-75 ft-lbs
- 1/2-inch-drive breaker bar
- 3/8-inch-drive ratchet
- 10mm socket
- 12mm socket
- 14mm socket
- 17mm socket
- 19mm socket
- 10mm combination wrench
- 14mm combination wrench
- 17mm combination wrench
- 6-inch socket extension
- 12-inch socket extension
- Universal socket joint
- Flat-blade trim-clip tool
- Plastic pry tool
- Paint marker
- Mechanic’s gloves
- Safety glasses
🔩 Required Parts
HowToo sells all the parts you need for this repair:
- Passenger-side upper engine mount - Qty: 1
- Driver-side upper transmission mount - Qty: 1
- Front lower torque mount - Qty: 1
- Rear lower torque mount - Qty: 1
- Engine-mount self-locking nuts - Qty: As required
- Transmission-mount self-locking nuts - Qty: As required
- Underbody shield clips - Qty: As required
Use mount assemblies matched specifically to the 2.4L AWD configuration. The 1.5L turbo mounts are different.
📋 Before You Begin
- 📋 Park your CR-V on firm, level ground. Select Park and apply the parking brake.
- 📋 Open the hood, remove the key from the vehicle, and wait at least three minutes before disconnecting the battery.
- 📋 Place wheel chocks securely against the rear tires.
- 📋 An engine support bar spans the body structure above the engine and holds the powertrain with an adjustable chain.
- 📋 Photograph each mount, bracket, wiring clip, and hose before disassembly.
- 📋 Mark each mount’s original position with a paint marker. This helps prevent vibration caused by poor alignment.
🔨 Step-by-Step Instructions
Follow these steps in order:
Step 1: Disconnect the Battery
- Use a 10mm wrench to loosen the negative battery terminal.
- Lift the terminal off and position it where it cannot touch the battery post.
- Use a 10mm socket to remove the battery hold-down and positive terminal.
- Lift out the battery with both hands. Keep it upright.
Step 2: Raise and Secure the Vehicle
- Use the floor jack at the reinforced front-center jacking point to raise your CR-V.
- Place the jack stands beneath the reinforced side support points.
- Lower the vehicle gently onto the stands and give it a careful stability check.
- Leave the floor jack positioned as a backup without carrying vehicle weight.
Step 3: Remove the Lower Shield
- Wear safety glasses before working below the vehicle.
- Use the flat-blade trim-clip tool to release the plastic retainers.
- Use a 10mm socket to remove the shield bolts.
- Lower the shield and keep its fasteners organized by location.
Step 4: Install the Engine Support Bar
- Position the engine support bar across the manufacturer-approved upper body ledges.
- Connect its chain to the factory engine lifting eye.
- Turn the support bar adjuster by hand until the chain is snug.
- Place the wood block on the floor jack saddle beneath a strong powertrain bracket as a light backup. Do not press against the oil pan or CVT case.
- Raise the jack only until it contacts the support point. Do not lift the vehicle from its stands.
Step 5: Replace the Passenger-Side Upper Engine Mount
- Use a 10mm socket and plastic pry tool to move any intake duct or reservoir bracket blocking the passenger-side mount.
- Use a paint marker to outline the mount and bracket positions.
- Use a 17mm socket, breaker bar, and extension to loosen the mount-to-engine bracket fasteners.
- Use a 17mm socket to loosen the mount-to-body fasteners.
- Adjust the engine support bar slightly until the bolts slide out without binding.
- Remove the mount and compare its stud locations and height with the replacement.
- Set the new mount on the body and install every fastener by hand.
- Use the engine support bar adjuster to align the center fastener. Do not lever against the rubber mount.
- Use the torque wrench and 17mm socket to tighten M12 mount fasteners to 64 Nm (47 ft-lbs).
- Use the torque wrench and 14mm socket to tighten M10 mount fasteners to 44 Nm (33 ft-lbs).
- Start all fasteners before tightening any one.
Step 6: Replace the Driver-Side Transmission Mount
- Use a 10mm socket to remove the battery tray bolts and wiring retainers.
- Lift out the battery tray to expose the transmission mount.
- Use a paint marker to outline the transmission mount and bracket.
- Position the wood-blocked floor jack beneath a reinforced transmission support bracket and apply only light support.
- Use a 17mm socket, extension, and breaker bar to loosen the mount fasteners.
- Adjust the floor jack only a few millimeters until the fasteners move freely.
- Remove the old mount without pulling on nearby wiring or CVT hoses.
- Install the new mount and thread all nuts and bolts by hand.
- Use the torque wrench and 17mm socket to tighten M12 mount fasteners to 64 Nm (47 ft-lbs).
- Use the torque wrench and 14mm socket to tighten M10 mount fasteners to 44 Nm (33 ft-lbs).
- Use a 10mm socket to reinstall the battery tray bolts and tighten them to 12 Nm (9 ft-lbs).
Step 7: Replace the Front Lower Torque Mount
- Work beneath the vehicle only after confirming both jack stands are secure.
- Use the engine support bar and wood-blocked floor jack to keep the powertrain neutral, without lifting it.
- Use a 17mm socket and breaker bar to remove the front torque-mount through-bolt and body fasteners.
- Remove the mount and compare its offset and installation direction with the replacement.
- Install all fasteners by hand. Adjust the support bar slightly if the through-bolt does not slide through freely.
- Use the torque wrench and 17mm socket to tighten the M12 through-bolt and M12 bracket fasteners to 64 Nm (47 ft-lbs).
Step 8: Replace the Rear Lower Torque Mount
- Locate the rear torque mount between the powertrain and rear portion of the front subframe.
- Use a 17mm socket, universal joint, and extension to loosen its through-bolt and bracket fasteners.
- Adjust the engine support bar slightly to remove tension, then withdraw the bolts.
- Remove the mount while protecting the exhaust, steering components, and AWD propeller shaft.
- Install the replacement in the same direction and start every fastener by hand.
- Use the torque wrench and 17mm socket to tighten M12 through-bolts and bracket fasteners to 64 Nm (47 ft-lbs).
- If a supplied fastener has a different diameter or strength marking, stop and use the fastener-specific Honda service specification.
Step 9: Settle and Inspect the Mounts
- Check that each locating tab is seated and no mount rubber is twisted.
- Confirm that wiring, hoses, and ground cables are returned to their original clips.
- Slowly release the floor jack while watching each mount.
- Release the engine support bar gradually, then remove it.
- Use the torque wrench to recheck every accessible mount fastener at its specified torque.
Step 10: Reassemble the Vehicle
- Use the flat-blade trim-clip tool and 10mm socket to reinstall the lower shield and clips.
- Use the torque wrench and 10mm socket to tighten the shield bolts to 9 Nm (80 in-lbs).
- Install the battery, hold-down, and positive terminal using a 10mm socket.
- Install the negative terminal last using a 10mm wrench.
- Use the torque wrench to tighten each battery terminal nut to 5.4 Nm (48 in-lbs).
- Raise your CR-V with the floor jack, remove the jack stands, and lower it carefully.
✅ After Repair
- ✅ With the hood open, start the engine and let it idle. Keep hands and tools away from belts and fans.
- ✅ Listen for clunks and inspect for unusual engine movement or vibration.
- ✅ Hold the brake firmly and shift slowly through Reverse, Neutral, and Drive. Pause three seconds in each position.
- ✅ A small idle change after battery disconnection is normal while the engine computer relearns.
- ✅ Set the clock and restore saved audio settings if needed.
- ✅ Drive gently for 10-15 minutes, then inspect the mounts and underbody shield again.
- ✅ If vibration is worse, stop driving and check mount alignment, fastener seating, and exhaust clearance.
💰 DIY vs Shop Cost
Shop Cost: ₹55,000-₹95,000 (parts + labor)
DIY Cost: ₹28,000-₹60,000 (parts only)
You Save: ₹20,000-₹40,000 by doing it yourself!
Sonīpat-area labor and imported U.S.-spec part prices vary. This repair takes a shop approximately 4-6 hours.
🎯 Ready to get started?
HowToo makes it easy: same-day/2-day shipping on every part, plus all the tools and specialty tools you need! Check out the parts and tools sections below to add everything to your cart.