


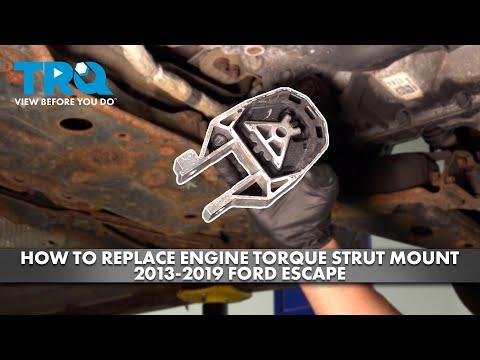




How to Replace Engine Mounts on a 2013-2019 Ford Escape (Engine: Inline 4 2.0L)
Step-by-step guide for all three mounts with tools, torque specs, and safety tips for 2013, 2014, 2015, 2016, 2017, 2018, 2019
How to Replace Engine Mounts on a 2013-2019 Ford Escape (Engine: Inline 4 2.0L)
Step-by-step guide for all three mounts with tools, torque specs, and safety tips for 2013, 2014, 2015, 2016, 2017, 2018, 2019


🔧 Escape - Engine Mount Replacement
This is an advanced DIY job, especially if you’re replacing all three mounts. Your Escape uses a right-side hydraulic mount, a transmission-side mount, and a lower torque strut that controls engine rocking. Replace them one at a time so the powertrain always remains supported.
Assumption: These instructions cover the complete three-mount job. If only one mount has failed, follow the steps for that mount.
Difficulty Level: Advanced | Estimated Time: 5-8 hours
⚠️ Safety & Precautions
- ⚠️ Never work under the Escape while it’s supported only by a floor jack.
- ⚠️ Support the engine with a wide wood block between the jack and oil pan.
- ⚠️ Apply only enough jack pressure to hold the engine. Lifting hard can crack the aluminum oil pan.
- ⚠️ Remove only one mount at a time. Removing multiple mounts can let the powertrain shift unexpectedly.
- ⚠️ Disconnect the negative battery cable before removing the battery and transmission-side mount.
- ⚠️ Keep hands clear while raising or lowering the engine to align bolt holes.
- ⚠️ Don’t start the engine while any mount is loose or removed.
🔧 Required Tools
You'll need the following tools for this repair:
- 7mm socket
- 8mm socket
- 10mm socket
- 13mm socket
- 15mm deep socket
- 18mm deep socket
- 15mm combination wrench
- 18mm combination wrench
- Torx T20 socket
- Torx T25 socket
- 3/8-inch drive ratchet
- 1/2-inch drive breaker bar
- 3/8-inch drive extension set
- 1/2-inch drive extension set
- Trim-clip removal tool
- Battery terminal puller (specialty)
- Torque wrench (10-100 ft-lbs range)
- Floor jack (rated 2-ton minimum)
- Jack stands (rated 2-ton minimum)
- Wood block (approximately 12 x 6 x 1 inches)
- Wheel chocks
- Work light
- Mechanic gloves
- Safety glasses
🔩 Required Parts
HowToo sells all the parts you need for this repair:
- Right hydraulic engine mount - Qty: 1
- Transmission-side engine mount - Qty: 1
- Rear lower engine torque strut mount - Qty: 1
- Engine mount kit - Qty: 1 if replacing all mounts
- Replacement mount fasteners - Qty: As required
The matching engine mounts and complete mount kits are now displayed in the parts sidebar. Compare the new mounts with the originals before installation. The brackets, sleeves, and bolt holes must match exactly.
📋 Before You Begin
- Park on firm, level ground and move the transmission to Park.
- Engage the parking brake and place wheel chocks behind both rear wheels.
- Open the hood and let the engine cool completely.
- Take pictures of the air-intake, battery, cowl, and mount locations before disassembly.
- Disconnect the negative battery cable with a 10mm socket.
- Raise the front at the approved center lifting point and place jack stands beneath the side support points.
- Give the vehicle a firm push before getting underneath. It shouldn’t move on the stands.
- Replace one mount completely before loosening the next one. Mount alignment gets ugly fast when all three are loose.
🔨 Step-by-Step Instructions
Follow these steps in order:
Step 1: Remove the Lower Splash Shield
- Use the 7mm socket, 8mm socket, and trim-clip removal tool to remove the lower shield fasteners.
- Support the shield with one hand as you remove its final fasteners.
- Set the shield and fasteners aside in installation order.
Step 2: Support the Powertrain
- Place the wood block across a broad, flat area at the front of the oil pan.
- Center the floor jack beneath the wood block.
- Raise the jack slowly until the wood contacts the pan and carries a small amount of engine weight.
- Watch the engine while raising it. Stop as soon as movement appears.
- Support it, don’t lift the vehicle.
Step 3: Replace the Lower Torque Strut
- Locate the lower rear torque strut between the powertrain and subframe. A torque strut is the short mount that limits front-to-back engine movement.
- Use the 15mm socket, 15mm wrench, extensions, and breaker bar to loosen its mounting bolts.
- Remove the bolts and slide the old torque strut out of its brackets.
- Inspect both brackets for cracking, elongated holes, or contact marks.
- Position the new torque strut in the same orientation as the old one.
- Start every bolt by hand before using the ratchet.
- Use the floor jack to move the engine only a few millimeters if the holes don’t align.
- Use the torque wrench to tighten the torque-strut fasteners to 71 Nm (52 ft-lbs). This value is documented for the 2013-2019 Escape torque-strut procedure. youtube.com
Step 4: Access the Right Hydraulic Mount
- Lower the Escape’s coolant reservoir by releasing its retainers. Don’t disconnect its hoses unless necessary.
- Use the 8mm socket or 10mm socket on any reservoir bracket fasteners fitted to your Escape.
- Move the reservoir aside without stretching or sharply bending the hoses.
- Confirm that the floor jack and wood block are still supporting the engine.
Step 5: Remove the Right Hydraulic Mount
- Use the 18mm deep socket and breaker bar to loosen the three upper mount nuts.
- Use the 15mm deep socket and extensions to loosen the two lower mount bolts.
- Remove the nuts and bolts while watching for powertrain movement.
- Raise or lower the floor jack slightly until the mount can be lifted out without prying against hoses or wiring.
- Check the old hydraulic mount for split rubber, sagging, or oily fluid leakage.
Step 6: Install the Right Hydraulic Mount
- Compare the locating pins, bracket angle, studs, and bolt holes on both mounts.
- Lower the new mount into position without forcing it.
- Start the lower bolts and upper nuts by hand. Each fastener should turn several full rotations easily.
- Use the floor jack to center the engine until the mount sits flat against both mating surfaces.
- Use the torque wrench to tighten the two lower 15mm mount bolts to 89 Nm (66 ft-lbs).
- Use the torque wrench to tighten the three 18mm upper nuts to 80 Nm (59 ft-lbs). These values are published for this Escape mount layout, but Ford service data should take priority if the replacement mount supplies different instructions. howtoescape-rahrena.com
- Reinstall the coolant reservoir and tighten its small bracket fasteners snugly with the appropriate 8mm socket or 10mm socket.
Step 7: Remove the Cowl and Air Cleaner
- Use the Torx T20 socket, Torx T25 socket, and trim-clip removal tool to release the cowl panels and related retainers.
- Use the 7mm socket or 8mm socket to loosen the air-intake clamp.
- Disconnect the air-sensor electrical connector by pressing its locking tab.
- Remove the intake tube, air-filter housing, and battery-area covers.
- Mark the resting positions of the wiper arms before removing them if cowl clearance requires wiper removal.
Step 8: Remove the Battery and Battery Tray
- Verify that the negative battery cable is disconnected.
- Use the 10mm socket to disconnect the positive battery cable.
- Use the 10mm socket or 13mm socket to remove the battery hold-down.
- Lift the battery straight upward using both hands.
- Use the 10mm socket and extensions to remove the battery-tray fasteners.
- Move wiring retainers aside with the trim-clip removal tool, then remove the tray.
Step 9: Support the Transmission
- Move the floor jack and wood block under a flat, reinforced section of the transmission case.
- Don’t place the jack against the transmission pan, drain plug, wiring, or cooler lines.
- Raise the jack only until it supports the transmission’s weight.
- Confirm that no hoses, cables, or wiring are pulled tight.
Step 10: Replace the Transmission-Side Mount
- Use the 15mm deep socket, 18mm deep socket, extensions, and breaker bar to loosen the mount-to-body and mount-to-bracket fasteners.
- Remove the center or bracket fasteners only after the transmission is fully supported.
- Adjust the floor jack slightly until each bolt slides out without binding.
- Remove the old mount and compare its height, sleeve width, and bolt-hole spacing with the replacement.
- Position the new mount and start all fasteners by hand.
- Use the floor jack to align the mount naturally. Never use the bolts to pull a misaligned mount into place.
- Use the torque wrench to tighten the transmission-mount bracket nuts to 47 Nm (35 ft-lbs). go-parts.com
- Important: Ford uses different fastener locations and tightening values within this mount assembly. Don’t guess on an unlisted center or body bolt. Use the torque value supplied with the matched mount or current Ford service information for that exact fastener.
Step 11: Neutralize the Mounts
- Confirm that all mounts are installed and every fastener is started.
- Keep the vehicle raised and the engine off.
- Loosen the lower torque-strut bolts approximately one turn with the 15mm socket.
- Lower the supporting jack gradually so the powertrain rests naturally on its mounts.
- Move the engine gently by hand to release any trapped tension.
- Retighten the torque-strut fasteners with the torque wrench to 71 Nm (52 ft-lbs).
- This neutralization step helps prevent a new vibration caused by tightening the mounts while the engine is twisted. Ford service procedures specifically call for loosening the roll restrictor and allowing the mounts to settle. fordescape4.com
Step 12: Reassemble the Engine Compartment
- Reinstall the battery tray with the 10mm socket.
- Reinstall the battery and hold-down with the 10mm socket or 13mm socket.
- Reconnect the positive battery cable first, then the negative cable, using the 10mm socket.
- Reinstall the air-filter housing, intake tube, sensor connector, cowl panels, and wiper arms.
- Use the 7mm socket, 8mm socket, and Torx sockets to secure the intake and cowl hardware.
- Reinstall the lower splash shield with the 7mm socket, 8mm socket, and trim clips.
- Remove all tools, the floor jack, and the jack stands before starting the engine.
✅ After Repair
- Start the engine in Park and let it idle with the air conditioning switched off.
- Listen for metal contact, knocking, hissing, or an intake-air leak.
- Hold the brake firmly and shift slowly through Reverse, Neutral, and Drive.
- Watch for excessive engine movement or a heavy clunk during each shift.
- Switch on the air conditioning and check for unusual steering-wheel or dashboard vibration.
- Take a short, low-speed test drive and listen during gentle acceleration and deceleration.
- Recheck the work area for loose fasteners, pinched wiring, displaced hoses, or fluid leakage.
- If vibration becomes worse, stop and check mount orientation and neutralization before driving farther.
💰 DIY vs Shop Cost
Shop Cost: $700-$1,400, approximately ₹58,000-₹116,000 depending on parts and local labor
DIY Cost: $100-$300, approximately ₹8,000-₹25,000 for the mounts
You Save: $400-$1,100 by doing it yourself!
Labor prices vary widely in Sonīpat, and imported Escape parts may affect the final price. A complete mount replacement commonly takes a professional approximately 4-6 hours.
🎯 Ready to get started?
HowToo makes it easy: same-day/2-day shipping on every part, plus all the tools and specialty tools you need! Check out the parts and tools sections below to add everything to your cart.
