

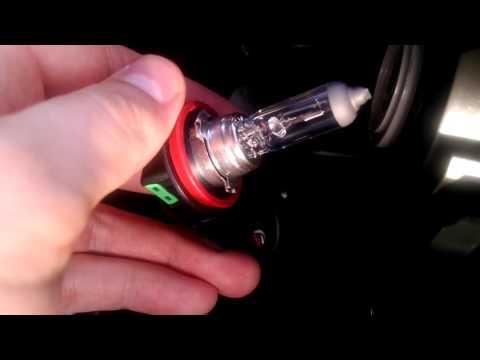







How to Replace Both Headlight Bulbs on a 2014 Toyota Highlander (Low & High Beam)
Step-by-step bulb swap guide with H11/9005 part numbers, tools list, safety tips, and testing checklist for 2010, 2011, 2012, 2013, 2014, 2015, 2016, 2017, 2018, 2019
How to Replace Both Headlight Bulbs on a 2014 Toyota Highlander (Low & High Beam)
Step-by-step bulb swap guide with H11/9005 part numbers, tools list, safety tips, and testing checklist for 2010, 2011, 2012, 2013, 2014, 2015, 2016, 2017, 2018, 2019


🔧 Highlander - Headlight Bulb Replacement (Both Sides)
This job replaces the bulbs inside your headlight housings so you can see clearly at night and stay safe/legal. On your Highlander, the bulbs are accessed from behind the headlight assembly under the hood—no bumper removal needed for the common bulb types.
Difficulty Level: Beginner | Estimated Time: 0.5-1.0 hours
⚠️ Safety & Precautions
- ⚠️ Turn the lights OFF and let bulbs cool 10+ minutes; they get extremely hot.
- ⚠️ Wear nitrile gloves; skin oil on halogen glass can shorten bulb life.
- ⚠️ Do not touch the new bulb’s glass. If you do, clean with isopropyl alcohol and a lint-free towel.
- ⚠️ Keep ignition OFF; avoid moving fans/belts under the hood.
- 🔋 Battery disconnect is not required for this bulb swap.
🔧 Required Tools
You'll need the following tools for this repair:
- Nitrile gloves
- Safety glasses
- Flashlight
- Trim clip removal tool
- Small flathead screwdriver
- Isopropyl alcohol
- Lint-free shop towels
🔩 Required Parts
HowToo sells all the parts you need for this repair:
- Low beam headlight bulb (H11 halogen) - Qty: 2
- High beam headlight bulb (9005 halogen) - Qty: 2
📋 Before You Begin
- Park on level ground, shift to Park, and set the parking brake.
- Open the hood and use a flashlight to identify the rear covers/connectors on each headlight housing.
- Replace bulbs in pairs for matching color.
🔨 Step-by-Step Instructions
Follow these steps in order:
Assumption: “Headlight bulbs” means the main halogen low beams (H11). High beams are also listed below (9005) in case that’s what you meant.
Step 1: Turn everything off and cool the bulbs
- Turn the headlight switch OFF and remove the key/fob from the vehicle.
- Wait at least 10 minutes for the bulbs to cool.
- Put on nitrile gloves and safety glasses.
Step 2: Access the back of the driver-side headlight
- Use a flashlight to locate the bulb sockets on the back of the headlight assembly.
- If a plastic air guide/cover blocks your hand, use a trim clip removal tool (or small flathead screwdriver) to pop the clips up and move the piece aside.
- A “trim clip” is a plastic fastener that holds panels in place; it pops out instead of unscrewing.
Step 3: Replace the low beam bulb (H11) on the driver side
- Find the low beam socket (typically the larger/center rear area of the housing).
- Press the electrical connector tab and pull the connector straight off the bulb using your gloved hand.
- Rotate the bulb counterclockwise about 1/4 turn, then pull it straight out.
- Install the new H11 bulb into the housing and rotate clockwise to lock.
- Reconnect the electrical connector until it clicks.
Step 4: Replace the high beam bulb (9005) on the driver side (if needed)
- Locate the high beam socket (often closer to the inboard side of the housing).
- Use your gloved hand to press the connector tab and pull the connector off.
- Twist the bulb counterclockwise about 1/4 turn and remove it.
- Install the new 9005 bulb, twist clockwise to lock, and reconnect the connector.
Step 5: Repeat the same bulb replacement on the passenger side
- Use the flashlight to identify the matching low beam (H11) and high beam (9005) positions.
- Repeat the same unplug → twist out → twist in → plug in steps.
- Take a photo before removal for reference.
Step 6: If you accidentally touched the glass, clean it
- Moisten a lint-free shop towel with isopropyl alcohol.
- Wipe the bulb glass, then let it air dry before turning lights on.
Step 7: Reinstall any covers or clips you removed
- Reposition any air guides/covers.
- Push trim clips back in by hand; use the trim clip removal tool only if needed to align them.
✅ After Repair
- Turn headlights ON and verify both low beams work.
- Switch to high beams and verify both high beams work.
- Walk around the front and confirm both sides match in brightness and color.
- If a bulb doesn’t light: turn lights OFF, re-check the connector is fully clicked and the bulb is fully locked.
💰 DIY vs Shop Cost
Shop Cost: $120-$260 (parts + labor)
DIY Cost: $30-$120 (parts only, depends on bulb brand/type)
You Save: $90-$140 by doing it yourself!
Shop labor rates vary but typically run $100-$150/hour. This repair takes a shop approximately 0.5-1.0 hours.
🎯 Ready to get started?
HowToo makes it easy: same-day/2-day shipping on every part, plus all the tools and specialty tools you need! Check out the parts and tools sections below to add everything to your cart.