

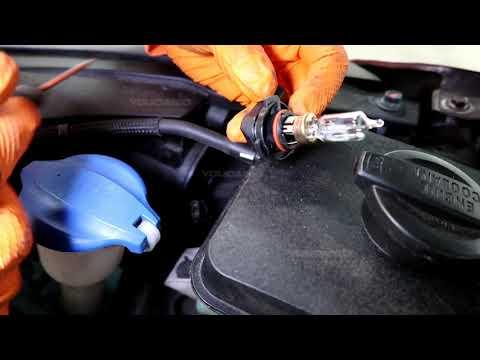






How to Replace Both Headlight Bulbs on a 2014-2019 Kia Optima (Trim: LX)
Step-by-step H7 low-beam bulb replacement with required tools, parts, and safety tips for 2014, 2015, 2016, 2017, 2018, 2019
How to Replace Both Headlight Bulbs on a 2014-2019 Kia Optima (Trim: LX)
Step-by-step H7 low-beam bulb replacement with required tools, parts, and safety tips for 2014, 2015, 2016, 2017, 2018, 2019


🔧 Optima - Low-Beam Headlight Bulb Replacement
This procedure replaces both left and right low-beam halogen bulbs. The Optima LX uses separate bulbs for low and high beams; these instructions assume you are replacing the two standard H7 low-beam bulbs.
Difficulty Level: Beginner | Estimated Time: 20-40 minutes
⚠️ Safety & Precautions
- ⚠️ Turn the headlights off and allow the bulbs to cool completely.
- 🧤 Never touch the glass portion of a halogen bulb. Skin oil can create a hot spot and shorten its life.
- 🔑 Keep the ignition switched off and remove the key from the vehicle.
- 🔋 Battery disconnection is not required for this repair.
- 💡 Use standard 55-watt bulbs. Higher-wattage bulbs can damage the headlamp wiring or housing.
🔧 Required Tools
You'll need the following tools for this repair:
- Nitrile gloves
- Safety glasses
- Clean microfiber cloth
- Flashlight rated 100 lumens or higher
🔩 Required Parts
HowToo sells all the parts you need for this repair:
- H7 12-volt 55-watt halogen low-beam headlight bulbs - Qty: 2, replace in pairs
📋 Before You Begin
- 🚗 Park your Optima on level ground, shift into Park, and apply the parking brake.
- 🔑 Switch off the ignition, headlights, and all exterior lights.
- 🌡️ Wait at least 10 minutes if the headlights were recently operating.
- 📦 Compare the new bulbs with the original bulbs before installation. The base and electrical terminals must match.
- 🧤 Put on clean nitrile gloves before opening the bulb packages.
🔨 Step-by-Step Instructions
Follow these steps in order:
Step 1: Open and Secure the Hood
- Pull the hood-release handle below the driver-side dashboard.
- Release the secondary latch beneath the front edge of the hood.
- Raise the hood and secure it with the hood support rod.
- Use the 100-lumen flashlight to locate the round low-beam access cover behind each headlamp assembly.
Step 2: Remove the First Dust Cover
- Start on the side with the easiest hand access.
- Use your gloved hand to rotate the round low-beam dust cover counterclockwise.
- Pull the cover straight away from the headlamp housing.
- Use the clean microfiber cloth to place the cover on a clean surface with its sealing side facing upward.
- Do one side at a time.
Step 3: Disconnect the Bulb
- Use the 100-lumen flashlight to identify the electrical connector and retaining wire behind the bulb.
- Pull the electrical connector straight off the bulb terminals using your gloved fingers.
- Do not pull on the wires themselves.
Step 4: Release the Retaining Wire
- The retaining wire is the thin metal spring that holds the bulb in position.
- Using your gloved fingertip, press the wire inward and move it sideways to release it from its hook.
- Swing the retaining wire away from the bulb without bending it.
- Use the 100-lumen flashlight to note how the bulb’s locating tab sits in the housing.
Step 5: Remove the Old Bulb
- Use your gloved fingers to hold the metal base of the bulb.
- Pull the bulb straight out without twisting or forcing it.
- Place the old bulb on the clean microfiber cloth.
Step 6: Install the New Bulb
- Open one new H7 bulb package while wearing nitrile gloves.
- Hold the bulb only by its metal base.
- Align the bulb’s locating tab with the matching recess in the headlamp housing.
- Seat the bulb completely flat. If it rocks or sits crooked, remove and realign it.
- If the glass is accidentally touched, clean it with a fresh, lint-free cloth and isopropyl alcohol before installation.
- Never force the bulb into place.
Step 7: Secure and Connect the Bulb
- Use your gloved fingertip to swing the retaining wire over the bulb base.
- Press the wire inward and move it beneath its retaining hook.
- Use the 100-lumen flashlight to verify that the bulb is seated evenly and securely.
- Push the electrical connector fully onto the bulb terminals.
Step 8: Reinstall the Dust Cover
- Inspect the cover seal using the 100-lumen flashlight. It must be clean and correctly seated.
- Position the cover over the opening.
- Use your gloved hand to rotate it clockwise until it is firmly locked.
- Do not leave the cover loose; moisture entering the housing can cause condensation and bulb failure.
Step 9: Replace the Bulb on the Other Side
- Repeat Steps 2 through 8 on the opposite headlamp.
- Use the clean microfiber cloth to keep the removed cover and bulb away from dirt.
- Confirm that both dust covers are fully locked when finished.
Step 10: Test Both Headlights
- Remove all tools and the microfiber cloth from the engine compartment.
- Switch the ignition to ON and turn on the low-beam headlights.
- Use the 100-lumen flashlight only if needed to inspect the rear covers for correct installation.
- Confirm that both bulbs illuminate steadily without flickering.
- Lower and securely close the hood.
✅ After Repair
- ✅ Park approximately 7.5 metres from a flat wall after dark and compare both beam patterns.
- 💡 Both light cutoffs should appear similar. A sharply tilted or scattered pattern usually means a bulb is not seated flat.
- 🔍 Check the headlamp housings for condensation after the next drive. Condensation may indicate a loose dust cover.
- ♻️ Dispose of the old halogen bulbs through a local automotive-parts or household-waste facility.
- 🛠️ Headlamp aiming should not change during a correctly performed bulb replacement. Do not adjust the aiming screws unless the lamps were misaligned beforehand.
💰 DIY vs Shop Cost
Shop Cost: ₹2,000-₹5,000 (parts + labor)
DIY Cost: ₹900-₹3,000 (parts only)
You Save: Approximately ₹1,100-₹2,000 by doing it yourself!
Local labor rates around Sonīpat commonly run ₹500-₹1,500 per hour. This repair takes a shop approximately 0.3-0.6 hours.
🎯 Ready to get started?
HowToo makes it easy: same-day/2-day shipping on every part, plus all the tools and specialty tools you need! Check out the parts and tools sections below to add everything to your cart.