

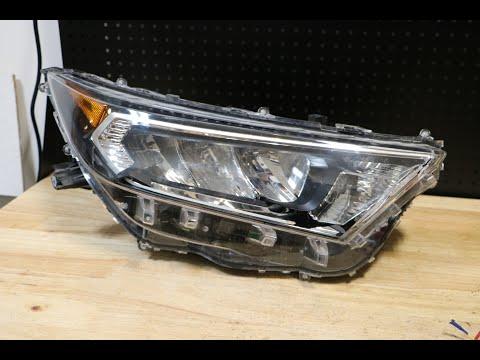







How to Replace Both Headlight Assemblies on a 2019-2022 Toyota RAV4 Hybrid (Trim: Hybrid LE)
Step-by-step LED headlamp replacement guide with tools, parts, torque specs, and safety tips for 2019, 2020, 2021, 2022
How to Replace Both Headlight Assemblies on a 2019-2022 Toyota RAV4 Hybrid (Trim: Hybrid LE)
Step-by-step LED headlamp replacement guide with tools, parts, torque specs, and safety tips for 2019, 2020, 2021, 2022


🔧 RAV4 - Headlight Bulb Replacement
This repair replaces both front headlight bulbs on your RAV4. The Hybrid LE uses LED headlight assemblies from the factory, so the “bulb” is not serviced separately like an older halogen bulb; if a low/high beam LED has failed, the correct repair is replacing the affected headlamp assembly.
Difficulty Level: Intermediate | Estimated Time: 1.5-2.5 hours
⚠️ Safety & Precautions
- ⚠️ Your RAV4 is a hybrid. Do not touch orange high-voltage cables or hybrid system components.
- ⚠️ Turn the vehicle fully OFF and keep the key fob away from the vehicle before working.
- ⚠️ LED headlamp assemblies can be damaged by static electricity. Avoid touching electrical pins.
- ⚠️ The front bumper cover must be loosened/removed for headlamp access. Protect painted edges with painter’s tape.
- ⚠️ Battery disconnect is recommended. Disconnect the 12V negative terminal only; do not service the high-voltage battery.
🔧 Required Tools
You'll need the following tools for this repair:
- 10mm socket
- Ratchet handle
- 6-inch extension
- Phillips screwdriver #2
- Flat trim clip remover
- Plastic pry tool set
- Torque wrench 5-25 Nm
- Painter’s tape 1-inch
- Microfiber towel
- Nitrile gloves
- Safety glasses
🔩 Required Parts
HowToo sells all the parts you need for this repair:
- Left front LED headlamp assembly - Qty: 1
- Right front LED headlamp assembly - Qty: 1
- Front bumper cover retaining clips - Qty: 6-10
📋 Before You Begin
- Park your RAV4 on level ground, shift to Park, and set the parking brake.
- Turn the headlights OFF and power the vehicle OFF completely.
- Open the hood and let the front lamps cool if they were recently used.
- Use painter’s tape on the bumper-to-fender edges and around the headlamp corners to prevent scratches.
- Disconnect the 12V battery negative terminal using a 10mm socket. The 12V battery is in the rear cargo area on this model.
- A trim clip remover is a flat fork-shaped tool that lifts plastic push clips without breaking them.
🔨 Step-by-Step Instructions
Follow these steps in order:
Step 1: Disconnect the 12V Battery
- Open the rear cargo area and lift the cargo floor panel.
- Use a 10mm socket and ratchet handle to loosen the negative battery terminal clamp.
- Move the negative cable aside so it cannot spring back onto the battery post.
- Black cable equals negative.
Step 2: Protect the Painted Edges
- Apply 1-inch painter’s tape along the top edge of the bumper cover, the fender-to-bumper seams, and around both headlamp corners.
- Place a microfiber towel over nearby painted areas when using tools close to the bumper.
Step 3: Remove the Upper Radiator Cover Clips
- Open the hood.
- Use a flat trim clip remover to lift the center pins of the plastic clips along the upper radiator cover.
- Remove the clips and set them aside in order.
- Lift off the upper plastic cover.
- Clips break easily in cold weather.
Step 4: Remove Upper Bumper Fasteners
- Use a 10mm socket with ratchet handle to remove the upper bumper bolts near the hood latch area.
- Use a flat trim clip remover to remove any remaining upper push clips.
Step 5: Remove Fender-Liner Fasteners
- Turn the steering wheel left to access the right-side wheel opening, then right to access the left-side wheel opening.
- Use a Phillips screwdriver #2 to remove the screws at the front edge of each wheel liner.
- Use a flat trim clip remover to remove the wheel-liner clips near the bumper corner.
- Gently pull each wheel liner back just enough to access the bumper corner retainers.
Step 6: Remove Lower Bumper Fasteners
- Lay down safely in front of the vehicle.
- Use a 10mm socket to remove the lower bumper bolts.
- Use a flat trim clip remover to remove the lower push clips.
- Keep all lower fasteners separate from the upper fasteners.
Step 7: Release the Bumper Cover Corners
- Use a plastic pry tool at the bumper-to-fender seam.
- Pull the bumper corner outward with steady hand pressure to release the side clips.
- Repeat on the other side.
- Do not yank the bumper cover; wiring may still be attached.
- Slow pressure beats force.
Step 8: Move the Bumper Cover Forward
- With a helper if possible, pull the bumper cover straight forward.
- If your RAV4 has fog-light or sensor wiring, disconnect the connectors by pressing the lock tabs with your fingers or a plastic pry tool.
- Set the bumper cover on a soft surface or move it forward only enough to access the headlamp bolts.
Step 9: Remove the Left Headlamp Assembly
- Use a 10mm socket, 6-inch extension, and ratchet handle to remove the headlamp mounting bolts.
- Support the lamp with one hand while removing the last bolt.
- Slide the lamp forward carefully.
- Press the connector lock tabs and unplug the headlamp wiring connectors.
Step 10: Install the New Left Headlamp Assembly
- Plug in the electrical connectors until each one clicks.
- Position the new left headlamp assembly into the body opening.
- Start all mounting bolts by hand to avoid cross-threading.
- Use a 10mm socket and torque wrench 5-25 Nm to tighten the headlamp bolts to Torque to 5.4 Nm (48 in-lbs).
Step 11: Remove and Install the Right Headlamp Assembly
- Use a 10mm socket, 6-inch extension, and ratchet handle to remove the right headlamp mounting bolts.
- Slide the lamp forward and unplug the wiring connectors.
- Connect the new right headlamp assembly wiring until the connectors click.
- Install the headlamp assembly and start all bolts by hand.
- Use a 10mm socket and torque wrench 5-25 Nm to tighten the headlamp bolts to Torque to 5.4 Nm (48 in-lbs).
Step 12: Test the Headlights Before Reassembly
- Reconnect the 12V negative battery terminal temporarily using a 10mm socket.
- Power the vehicle to IG-ON without READY mode if possible.
- Turn on low beams and high beams using the headlight stalk.
- Check both side marker/position lights if included in the assembly.
- Turn the vehicle OFF again before final reassembly.
Step 13: Reinstall the Bumper Cover
- Guide the bumper cover straight onto the front of the vehicle.
- Reconnect any fog-light or sensor wiring connectors by hand until they click.
- Press both bumper corners into the side retainers by hand.
- Make sure the bumper gaps are even at both fenders and below both headlamps.
Step 14: Reinstall Upper, Lower, and Wheel-Liner Fasteners
- Use a 10mm socket to reinstall the lower bumper bolts.
- Use a flat trim clip remover or your fingers to reinstall lower push clips.
- Use a Phillips screwdriver #2 to reinstall wheel-liner screws.
- Use a 10mm socket to reinstall upper bumper bolts.
- Tighten bumper bolts snugly to Torque to 5.0 Nm (44 in-lbs) where applicable.
Step 15: Reinstall the Upper Radiator Cover
- Set the plastic upper radiator cover back in place.
- Push the plastic clips into their holes by hand.
- Press each center pin down until it sits flush.
Step 16: Final Battery Connection
- Use a 10mm socket to tighten the 12V negative battery terminal clamp.
- Do not overtighten the terminal; it only needs to be secure and unable to twist by hand.
✅ After Repair
- ✅ Turn on the headlights and confirm both low beams and high beams work.
- ✅ Check that the bumper cover sits evenly at both fenders and below both lamps.
- ✅ Verify the hood opens and closes normally.
- ✅ If the headlamp aim looks too high, too low, or uneven, have the aim checked on a flat wall or with a headlamp aimer.
- ✅ After reconnecting the 12V battery, the auto window functions may need reinitialization by fully lowering and raising each window while holding the switch briefly at the end stops.
💰 DIY vs Shop Cost
Shop Cost: $1,200-$2,000+ (parts + labor)
DIY Cost: $800-$1,500+ (parts only)
You Save: $300-$600 by doing it yourself!
Shop labor rates vary but typically run $100-$150/hour. This repair takes a shop approximately 1.5-2.5 hours.
🎯 Ready to get started?
HowToo makes it easy: same-day/2-day shipping on every part, plus all the tools and specialty tools you need! Check out the parts and tools sections below to add everything to your cart.