

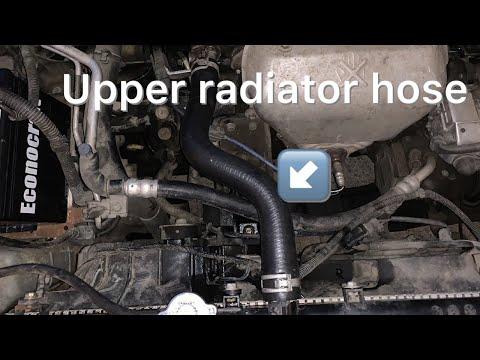







How to Replace a Radiator Hose on a 2019 Honda Accord
Step-by-step coolant hose repair guide with tools, parts, bleeding tips, and safety checks
How to Replace a Radiator Hose on a 2019 Honda Accord
Step-by-step coolant hose repair guide with tools, parts, bleeding tips, and safety checks


🔧 Accord - Radiator Hose Replacement
Replacing a radiator hose on your Accord means draining some coolant, removing the old hose, installing the new hose, then refilling and bleeding the cooling system. A leaking, swollen, cracked, soft, or collapsed hose should be replaced before it causes overheating.
Assumption: This guide covers the upper or lower radiator hose; the steps note the difference where it matters.
Difficulty Level: Beginner-Intermediate | Estimated Time: 1-2 hours
⚠️ Safety & Precautions
- ⚠️ Never open the radiator cap or coolant reservoir cap when the engine is hot.
- ⚠️ Coolant can cause burns and is poisonous to people and animals.
- ⚠️ Keep coolant away from painted surfaces and clean spills immediately.
- ⚠️ Do not touch orange high-voltage hybrid cables or hybrid components.
- ⚠️ Battery disconnect is not normally required for radiator hose replacement.
- ⚠️ If raising the front of your Accord, support it only with jack stands, never just a floor jack.
🔧 Required Tools
You'll need the following tools for this repair:
- 10mm socket
- 3/8-inch drive ratchet
- 3/8-inch drive extension 6-inch
- Phillips #2 screwdriver
- Flat-blade screwdriver 6-inch
- Hose clamp pliers 45-degree (specialty)
- Coolant drain pan 2-gallon minimum
- Coolant funnel kit spill-free (specialty)
- Floor jack rated 2-ton minimum
- Jack stands rated 2-ton minimum
- Wheel chocks
- Shop towels
- Shop light
- Safety glasses
- Nitrile gloves
🔩 Required Parts
HowToo sells all the parts you need for this repair:
- Upper radiator hose - Qty: 1
- Lower radiator hose - Qty: 1
- Radiator hose clamps - Qty: 2 per hose
- Honda-compatible premixed coolant - Qty: 1-2 gallons
📋 Before You Begin
- Park your Accord on level ground and set the parking brake.
- Let the engine cool completely, ideally for several hours.
- Place wheel chocks behind the rear wheels.
- If replacing the lower radiator hose, use a floor jack rated 2-ton minimum to lift the front and place it securely on jack stands rated 2-ton minimum.
- A hose clamp is the metal spring or screw band that squeezes the hose tight so coolant cannot leak.
- A spill-free funnel is a funnel that locks to the filler neck and helps remove air from the cooling system.
🔨 Step-by-Step Instructions
Follow these steps in order:
Step 1: Remove Access Covers If Needed
- Use a 10mm socket with a 3/8-inch drive ratchet to remove any small splash shield bolts blocking the lower hose area.
- Use a Phillips #2 screwdriver or flat-blade screwdriver 6-inch to remove any plastic clips if equipped.
- Set all fasteners aside in order so they go back in the same places.
Step 2: Remove the Coolant Cap
- Confirm the engine is fully cool by touching near the upper radiator hose with nitrile gloves.
- Use your hand to slowly loosen the coolant reservoir or radiator cap.
- If you hear pressure escaping, stop and wait longer before removing it fully.
Step 3: Drain Some Coolant
- Place the coolant drain pan 2-gallon minimum under the radiator drain area.
- Use your hand or flat-blade screwdriver 6-inch to open the radiator drain petcock if accessible.
- If the drain petcock is hard to reach, drain coolant by loosening the lower hose clamp in the next step very slowly.
- Drain enough coolant so the level is below the hose you are replacing.
- Go slow. Coolant spills spread fast.
Step 4: Release the Hose Clamps
- Use hose clamp pliers 45-degree to squeeze the spring clamp tabs together.
- Slide each clamp several inches away from the hose end.
- If screw-style clamps are installed, use a flat-blade screwdriver 6-inch or 10mm socket to loosen them.
- Do not cut the hose unless you are sure the replacement hose matches.
Step 5: Remove the Old Radiator Hose
- Use your hand to twist the hose gently at each end to break it loose.
- If it is stuck, use the flat-blade screwdriver 6-inch to carefully lift the hose edge only.
- Do not gouge the radiator neck or engine fitting.
- Pull the hose off and aim it into the coolant drain pan 2-gallon minimum.
Step 6: Clean and Inspect the Hose Connections
- Use shop towels to wipe the radiator neck and engine-side fitting clean.
- Use the shop light to inspect for cracks, corrosion, old rubber pieces, or damaged plastic.
- If the radiator neck is cracked or soft, do not install the hose until the damaged part is replaced.
Step 7: Install the New Hose
- Slide the radiator hose clamps onto the new radiator hose first.
- Use your hands to push the new hose fully onto both fittings.
- Make sure the hose is not twisted and follows the same path as the original hose.
- A twisted hose can rub and fail.
Step 8: Position the Hose Clamps
- Use hose clamp pliers 45-degree to move spring clamps back over the raised bead on each fitting.
- If using screw-style clamps, tighten with a flat-blade screwdriver 6-inch or 10mm socket until snug.
- Do not overtighten screw-style clamps on plastic radiator fittings.
- The clamp should sit straight, not angled.
Step 9: Close the Drain and Refill Coolant
- Use your hand or flat-blade screwdriver 6-inch to close the radiator drain petcock if opened.
- Install the coolant funnel kit spill-free at the coolant fill point.
- Pour Honda-compatible premixed coolant slowly into the funnel until the system stays full.
- Fill the coolant reservoir to the MAX line.
Step 10: Bleed Air From the Cooling System
- Leave the coolant funnel kit spill-free installed.
- Start your Accord and set the climate control to warm.
- Let the engine idle while watching the funnel level.
- Add Honda-compatible premixed coolant as the level drops.
- Wait until the radiator fan cycles on and warm air comes from the vents.
- Use the shop light to check the new hose ends for leaks while the engine runs.
Step 11: Finish Reassembly
- Turn your Accord OFF and let it cool.
- Use the coolant funnel kit spill-free stopper to remove the funnel without spilling.
- Reinstall the coolant cap by hand until fully seated.
- Use a 10mm socket with a 3/8-inch drive ratchet to reinstall splash shield bolts if removed.
- Use a Phillips #2 screwdriver or flat-blade screwdriver 6-inch to reinstall plastic clips if removed.
✅ After Repair
- Check the coolant reservoir level after the engine fully cools.
- Add Honda-compatible premixed coolant to the MAX line if needed.
- Drive your Accord gently for 10-15 minutes while watching the temperature gauge or warning lights.
- Park, let it cool, then recheck for leaks at both hose ends.
- Dispose of old coolant properly at a recycling or service facility; do not pour it on the ground.
💰 DIY vs Shop Cost
Shop Cost: $180-$400 parts + labor
DIY Cost: $35-$120 parts only
You Save: $145-$280 by doing it yourself!
Shop labor rates vary but typically run $100-$150/hour. This repair takes a shop approximately 1-2 hours.
🎯 Ready to get started?
HowToo makes it easy: same-day/2-day shipping on every part, plus all the tools and specialty tools you need! Check out the parts and tools sections below to add everything to your cart.