







How to Change the Oil and Oil Filter in a 2011-2017 Toyota Highlander (Engine: Inline 4 2.7L)
Step-by-step DIY guide with tools, 0W-20 capacity, torque specs, and reset instructions for 2011, 2012, 2013, 2014, 2015, 2016, 2017
How to Change the Oil and Oil Filter in a 2011-2017 Toyota Highlander (Engine: Inline 4 2.7L)
Step-by-step DIY guide with tools, 0W-20 capacity, torque specs, and reset instructions for 2011, 2012, 2013, 2014, 2015, 2016, 2017


🔧 Highlander - Engine Oil and Oil Filter Change
Your Highlander uses a cartridge-style oil filter, meaning the replaceable filter element sits inside a reusable housing. Drain the old oil, replace the cartridge and sealing rings, refill with SAE 0W-20 full-synthetic oil, and reset the maintenance reminder.
Difficulty Level: Beginner | Estimated Time: 45-60 minutes
⚠️ Safety & Precautions
- ⚠️ Work on level, solid ground and never crawl beneath a vehicle supported only by a jack.
- ⚠️ Allow the exhaust system to cool enough that it cannot burn you, but keep the oil slightly warm so it drains well.
- ⚠️ Wear gloves and safety glasses because used engine oil can irritate skin and splash unexpectedly.
- ⚠️ Keep the engine off while underneath your Highlander.
- ⚠️ Do not overtighten the plastic oil-filter housing; it can crack and cause rapid oil loss.
- ⚠️ Battery disconnection is not required.
🔧 Required Tools
You'll need the following tools for this repair:
- 14mm socket
- 10mm socket
- 3/8-inch-drive ratchet
- 3/8-inch-drive 6-inch extension
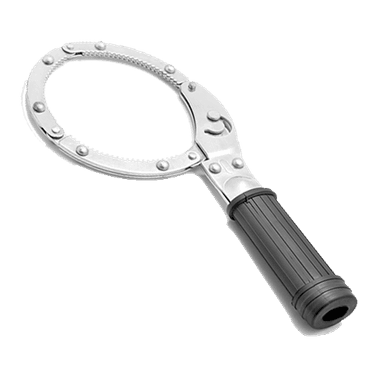
- 64mm 14-flute cartridge oil-filter wrench (specialty)
- Toyota-style oil-filter drain adapter (specialty)
- 3/8-inch-drive torque wrench rated 10-80 Nm
- Oil drain pan rated 8-quart minimum
- Automotive funnel with 1-inch outlet
- Floor jack rated 2-ton minimum
- Jack stands rated 2-ton minimum
- Wheel chocks rated 2-ton minimum
- Nitrile mechanic gloves
- ANSI Z87.1 safety glasses
🔩 Required Parts
HowToo sells all the parts you need for this repair:
- SAE 0W-20 full-synthetic engine oil - Qty: 5 US quarts
- Cartridge engine oil filter kit with housing O-ring and drain-cap O-ring - Qty: 1
- Engine oil drain-plug crush washer - Qty: 1
- Absorbent shop towels - Qty: 1 pack
Refill specification: Approximately 4.6 US quarts (4.4 liters) with filter replacement. Always make the final level decision using the dipstick.
📋 Before You Begin
- 📍 Park your Highlander on level pavement, shift into Park, apply the parking brake, and chock both rear wheels.
- 🌡️ Run the engine for three to five minutes, then shut it off and wait several minutes. The oil should be warm, not dangerously hot.
- 🧴 Open the hood and loosen the engine-oil filler cap. Pull the dipstick slightly upward to help the crankcase drain.
- ♻️ Prepare a sealed container for the used oil. Take it to an authorized oil recycler or service facility; never pour it onto the ground or into a drain.
🔨 Step-by-Step Instructions
Follow these steps in order:
Step 1: Raise and Secure the Front
- Place the 2-ton wheel chocks firmly against the front and rear faces of both rear tires.
- Use the 2-ton floor jack at the reinforced front-center lifting point on the front subframe.
- Position the 2-ton jack stands beneath the reinforced side support points, then lower your Highlander onto them.
- Gently push the vehicle to confirm it is stable before going underneath.
- Never trust a hydraulic jack by itself.
Step 2: Open the Lower Access Area
- Put on the nitrile mechanic gloves and ANSI Z87.1 safety glasses.
- If the lower splash shield blocks access, use the 10mm socket, 3/8-inch-drive extension, and 3/8-inch-drive ratchet to remove its fasteners.
- Set the shield and fasteners aside in installation order.
Step 3: Drain the Engine Oil
- Place the 8-quart oil drain pan beneath the oil-pan drain plug. Position it slightly toward the rear because the first stream can travel several inches.
- Use the 14mm socket and 3/8-inch-drive ratchet to loosen the drain plug counterclockwise.
- Finish removing the plug by hand while pressing it inward, then pull it away quickly.
- Let the oil drain until it slows to an occasional drip, usually 10-15 minutes.
- Remove the old crush washer and install a new drain-plug crush washer.
- Thread the plug in by hand first. Use the 14mm socket and 3/8-inch-drive torque wrench to torque to 40 Nm (30 ft-lbs).
Step 4: Drain the Oil-Filter Housing
- Move the 8-quart oil drain pan beneath the cartridge-filter housing.
- Use the square drive of the 3/8-inch-drive ratchet to remove the small center drain cap from the filter housing.
- Remove the old small O-ring from the cap using your gloved fingers. Do not scratch its sealing groove.
- Push the Toyota-style oil-filter drain adapter straight into the housing opening and let the trapped oil drain completely.
- Remove the adapter. Lubricate the new small O-ring with clean 0W-20 oil and place it in the drain cap’s proper groove.
- Use the 3/8-inch-drive torque wrench to torque the filter-housing drain cap to 13 Nm (10 ft-lbs).
Step 5: Replace the Filter Cartridge
- Fit the 64mm 14-flute cartridge oil-filter wrench fully onto the filter housing.
- Use the 3/8-inch-drive ratchet and 3/8-inch-drive extension to turn the housing counterclockwise.
- Lower the housing carefully because it may still contain oil.
- Pull the old filter cartridge straight out and remove the large housing O-ring using your gloved fingers.
- Clean the housing with absorbent shop towels. Do not use sharp tools on the sealing surfaces.
- Lubricate the new large O-ring with clean 0W-20 oil and install it in the designated housing groove, not against the threaded edge.
- Press the new cartridge fully into the housing.
- Thread the housing into the engine by hand. If it does not turn easily, back it out and start again.
- Use the 64mm 14-flute cartridge oil-filter wrench and 3/8-inch-drive torque wrench to torque the filter housing to 25 Nm (18 ft-lbs).
- The O-ring seals it; extra tightening does not.
Step 6: Reinstall the Lower Shield
- Use the 10mm socket, 3/8-inch-drive extension, and 3/8-inch-drive ratchet to reinstall any removed splash-shield fasteners.
- Snug the small shield fasteners evenly without crushing the plastic.
- Use the absorbent shop towels to wipe oil from the drain-plug and filter-housing areas so fresh leaks will be easy to identify.
Step 7: Lower the Vehicle
- Use the 2-ton floor jack to raise your Highlander slightly off the 2-ton jack stands.
- Remove both stands and lower the vehicle slowly onto level ground.
- Leave the 2-ton wheel chocks installed until the work is complete.
Step 8: Add New Engine Oil
- Place the automotive funnel with 1-inch outlet in the oil-filler opening.
- Add approximately 4.3 US quarts of SAE 0W-20 full-synthetic engine oil, then reinstall the filler cap.
- Start the engine and let it idle for about 30 seconds. The oil-pressure warning light should turn off within a few seconds.
- Shut the engine off immediately if the oil-pressure light remains on.
- Turn the engine off and wait five minutes on level ground.
- Remove the dipstick, wipe it with an absorbent shop towel, insert it fully, and remove it again.
- Add oil gradually through the automotive funnel until the level is near the upper dipstick mark. Total capacity is approximately 4.6 US quarts (4.4 liters) with the filter.
- Do not overfill above the upper mark.
Step 9: Reset the Maintenance Reminder
- Switch the ignition on without starting the engine, then use the instrument-panel trip button to display Trip A.
- Switch the ignition off.
- Press and hold the trip-reset button.
- While holding the button, switch the ignition back on without starting the engine.
- Continue holding until the display’s countdown finishes and the maintenance data resets, then release the button.
- Start the engine and confirm the maintenance reminder no longer appears.
✅ After Repair
- ✅ Run the engine for one to two minutes while looking underneath for leaks at the drain plug and filter housing.
- ✅ Shut the engine off, wait five minutes, and verify the dipstick level again on level ground.
- ✅ Confirm the oil filler cap and dipstick are fully seated.
- ✅ Recheck the oil level and inspect for leaks after the first drive.
- ✅ Record the date, mileage, oil viscosity, and filter replacement.
- ✅ Dispose of the used oil and filter through an authorized recycling facility in Panipat.
💰 DIY vs Shop Cost
Shop Cost: ₹4,500-₹8,000 (parts + labor)
DIY Cost: ₹3,000-₹5,500 (parts only)
You Save: ₹1,500-₹3,000 by doing it yourself!
Panipat labor rates and imported US-market filter prices vary. This repair takes a shop approximately 0.5-1.0 hour.
🎯 Ready to get started?
HowToo makes it easy: same-day/2-day shipping on every part, plus all the tools and specialty tools you need! Check out the parts and tools sections below to add everything to your cart.