








How to Change the Engine Oil and Filter on a 2012-2022 Honda Insight (Trim: LX | Engine: Inline 4 1.5L)
Step-by-step DIY guide with 0W-20 capacity, tools, torque specs, safety tips, and Maintenance Minder reset for 2012, 2013, 2014
How to Change the Engine Oil and Filter on a 2012-2022 Honda Insight (Trim: LX | Engine: Inline 4 1.5L)
Step-by-step DIY guide with 0W-20 capacity, tools, torque specs, safety tips, and Maintenance Minder reset for 2012, 2013, 2014


🔧 Insight - Engine Oil & Oil Filter Change
This is a very manageable first DIY service. You’ll warm the engine, safely raise your Insight, drain the old oil, replace the filter and drain-plug washer, then refill it with 0W-20 engine oil.
Honda specifies 3.5 US quarts (3.3 L) with the filter and a drain-bolt torque of 40 N·m (30 ft-lbs). carmanualsonline.info
Difficulty Level: Beginner | Estimated Time: 1-1.5 hours
⚠️ Safety & Precautions
- ⚠️ Turn the power system completely off before going underneath. Your Insight’s gasoline engine can start automatically when the hybrid battery charge is low.
- 🛑 Keep the smart key away from the car while you’re underneath it.
- 🔥 Warm oil drains better, but hot oil and exhaust parts can burn you. Let the car cool for about 10 minutes after warming it.
- 🔒 Use ramps or properly placed jack stands. Never work under a car supported only by a floor jack.
- 🧤 Wear gloves and safety glasses. Used engine oil is a skin irritant.
- 🔋 Do not disconnect or touch orange high-voltage cables or connectors. No battery disconnection is required.
🔧 Required Tools
You'll need the following tools for this repair:
- 17mm socket
- 3/8-inch drive ratchet
- 3/8-inch drive torque wrench rated to 40 N·m
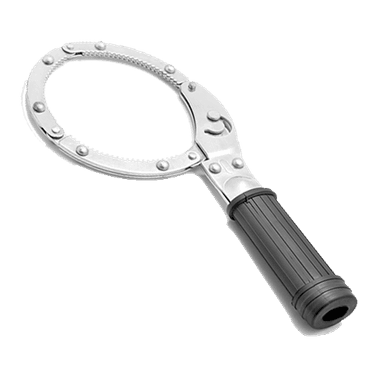
- 65mm oil filter cap wrench (specialty)
- Phillips-head screwdriver No. 2
- Medium flat-blade screwdriver
- Automotive ramps rated 2-ton minimum
- Wheel chocks
- Oil drain pan rated 8-quart minimum
- Long-neck oil funnel
- Oil measuring jug marked in liters
- Shop rags
- Nitrile mechanic gloves
- Safety glasses
🔩 Required Parts
HowToo sells all the parts you need for this repair:
- API-certified SAE 0W-20 full-synthetic engine oil - Qty: 4 US quarts or 4 liters
- Engine oil filter - Qty: 1
- Oil drain-plug crush washer - Qty: 1
Use a fresh crush washer every time. Saving one tiny washer isn’t worth gambling with an aluminum oil pan.
📋 Before You Begin
- 🚗 Park on level ground and run the engine until it reaches normal operating temperature.
- 🅿️ Select Park, apply the parking brake, and turn the power system completely off.
- 🔑 Move the smart key several feet away from the vehicle.
- 🧱 Place the ramps straight ahead of the front wheels and put wheel chocks behind both rear wheels.
- 📏 Confirm that your drain pan can hold at least 8 quarts.
- 🧴 Keep approximately 3.5 quarts or 3.3 liters ready, but don’t blindly empty four full quarts into the engine.
🔨 Step-by-Step Instructions
Follow these steps in order:
Step 1: Raise and secure the front of the car
- Drive slowly onto the 2-ton automotive ramps, center both front tires, select Park, and apply the parking brake.
- Place the wheel chocks firmly behind the rear tires.
- Push the car gently by hand to confirm it cannot roll.
Step 2: Open the hood and remove the oil cap
- Open the hood and locate the engine-oil fill cap.
- Remove the cap by hand. This lets air enter while the old oil drains.
- Set the cap over the hood-latch opening as a reminder not to close the hood before refilling.
Step 3: Remove the lower access cover
- Put on your safety glasses and nitrile mechanic gloves.
- Use the Phillips-head screwdriver No. 2 and medium flat-blade screwdriver to release the screws and quarter-turn fasteners securing the underbody access cover.
- Support the cover with one hand while releasing the final fastener.
- Place the fasteners together so none disappear across the driveway.
Step 4: Drain the old engine oil
- Position the 8-quart oil drain pan beneath and slightly behind the oil-pan drain bolt.
- Use the 17mm socket and 3/8-inch drive ratchet to loosen the drain bolt counterclockwise.
- Finish removing the bolt by hand while pressing it gently toward the oil pan, then pull it away quickly.
- Allow the oil to drain until it slows to an occasional drip, usually 5-10 minutes.
- Remove and discard the old crush washer from the drain bolt.
- Warm oil travels farther than expected.
Step 5: Replace the oil filter
- Move the 8-quart oil drain pan under the oil filter.
- Use the 65mm oil filter cap wrench and 3/8-inch drive ratchet to loosen the filter counterclockwise.
- A cap wrench fits over the end of the filter and gives the ratchet enough grip to loosen it.
- Spin the filter off by hand and lower it with the open end facing upward.
- Use a shop rag to wipe the engine’s filter-sealing surface clean.
- Confirm the old rubber gasket came off with the filter. Two stacked gaskets will cause a major leak.
- Apply a thin film of fresh 0W-20 engine oil to the new filter’s rubber gasket.
- Thread the new filter on by hand until the gasket touches the engine, then tighten it according to the filter manufacturer’s instructions. Do not use the wrench unless those instructions specifically require it.
Step 6: Install the drain bolt
- Fit one new oil drain-plug crush washer onto the cleaned drain bolt.
- Thread the bolt into the oil pan completely by hand. Stop if it doesn’t turn easily because cross-threading can damage the aluminum pan.
- Use the 3/8-inch drive torque wrench with the 17mm socket and torque to 40 N·m (30 ft-lbs). carmanualsonline.info)
- Wipe the drain-bolt and filter areas with a clean shop rag so new leakage will be easy to spot.
Step 7: Refill the engine
- Insert the long-neck oil funnel into the oil-fill opening.
- Use the oil measuring jug to add approximately 3.3 L (3.5 US quarts) of SAE 0W-20 oil. This is Honda’s stated capacity when replacing the filter. carmanualsonline.info)
- Remove the funnel and reinstall the oil-fill cap securely by hand.
- Wipe away any spilled oil with a shop rag.
Step 8: Start the power system and check for leaks
- Confirm that no tools or containers remain in the engine bay or underneath the car.
- Sit in the driver’s seat, hold the brake pedal, and press the POWER button until the READY indicator illuminates.
- If the gasoline engine doesn’t immediately run, that can be normal for the hybrid system.
- When the engine runs, watch the oil-pressure warning. It should switch off within five seconds. If it stays on, turn the power system off immediately and recheck your work. carmanualsonline.info
- Let the engine run for a few minutes, then turn the power system completely off.
- Use a flashlight and visually check the oil filter and drain bolt for leaks. Do not crawl underneath while the vehicle is running.
Step 9: Check the final oil level
- Wait three minutes after switching the power system off, as Honda specifies. carmanualsonline.info
- Remove the dipstick, wipe it with a clean shop rag, insert it fully, and remove it again.
- The oil should be between the upper and lower marks, ideally near the upper mark without exceeding it.
- If low, use the long-neck oil funnel and add oil in small 100-200 ml amounts, checking the dipstick after each addition.
Step 10: Reinstall the lower cover
- Use the Phillips-head screwdriver No. 2 and medium flat-blade screwdriver to reinstall the underbody cover and all its fasteners.
- Make sure the cover’s forward edge is properly tucked into place and doesn’t hang below the car.
- Remove the wheel chocks and carefully reverse the vehicle off the ramps with a helper watching if available.
Step 11: Reset the Maintenance Minder
- Turn the power mode ON without making the car READY.
- Use the steering-wheel controls and follow Home > Wrench symbol > Maintenance Minder. Honda identifies the Home button and left selector wheel as the controls for this screen. owners.honda.com
- Press and hold the left selector wheel for approximately 10 seconds until reset mode appears.
- Roll the wheel to select All Due Items if you completed every displayed service, or select only the oil-related item.
- Press the selector wheel to complete the reset. Don’t reset other due services unless you actually performed them. carmanualsonline.info)
✅ After Repair
- ✅ Check the dipstick again after the first short drive with the car parked level.
- 🔍 Inspect beneath the engine for fresh drips after several hours and again the next morning.
- 🛢️ Pour the used oil into the empty oil bottles and take it with the old filter to an authorized recycling or collection facility.
- 📅 Follow the Maintenance Minder for the next service. Honda also calls for an oil change at least yearly if no reminder appears within 12 months. owners.honda.com
💰 DIY vs Shop Cost
Shop Cost: ₹4,000-₹8,000, depending on oil brand and local labor
DIY Cost: ₹2,500-₹5,000 for oil, filter, and crush washer
You Save: Approximately ₹1,500-₹3,000 by doing it yourself!
Local labor and imported-part prices vary. This repair takes a shop approximately 0.5-1 hour.
🎯 Ready to get started?
HowToo makes it easy: same-day/2-day shipping on every part, plus all the tools and specialty tools you need! Check out the parts and tools sections below to add everything to your cart.