








How to Change Oil and Filter on a 2013-2022 Ford Escape 2.0L EcoBoost (Trim: SE | Engine: Inline 4 2.0L)
Step-by-step DIY guide with tools, parts, torque specs, safety tips, and oil-life reset for 2013, 2014, 2015, 2016, 2017, 2018, 2019
How to Change Oil and Filter on a 2013-2022 Ford Escape 2.0L EcoBoost (Trim: SE | Engine: Inline 4 2.0L)
Step-by-step DIY guide with tools, parts, torque specs, safety tips, and oil-life reset for 2013, 2014, 2015, 2016, 2017, 2018, 2019


🔧 Escape - Engine Oil and Oil Filter Replacement
Changing the oil removes contaminants and restores lubrication inside your Escape’s 2.0L EcoBoost engine. Replace the filter at the same time, then reset the Intelligent Oil-Life Monitor.
Difficulty Level: Beginner | Estimated Time: 45-75 minutes
⚠️ Safety & Precautions
- ⚠️ Work on level, solid ground and never crawl under a vehicle supported only by a jack.
- 🔥 Let the engine cool until the oil is warm—not hot—to prevent burns.
- 🧤 Wear safety glasses and nitrile gloves because used engine oil can irritate skin.
- 🚫 Keep oil away from the turbocharger, exhaust, belts, and electrical connectors.
- 🔋 Battery disconnection is not required for this service.
- ♻️ Collect all used oil and take it with the old filter to an authorized recycling facility.
🔧 Required Tools
You'll need the following tools for this repair:
- 15mm six-point socket
- Torx T30 bit socket
- 3/8-inch drive ratchet
- 3/8-inch drive torque wrench rated 10-80 ft-lbs
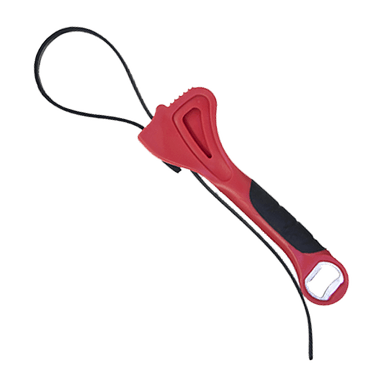
- Universal strap-type oil filter wrench
- Automotive trim-clip removal tool
- Oil drain pan with 8-quart minimum capacity
- Long-neck automotive funnel
- Engine oil dipstick reading cloth
- Wheel chocks
- Low-profile floor jack rated 2-ton minimum
- Jack stands rated 2-ton minimum
- Safety glasses
- Nitrile mechanic gloves
🔩 Required Parts
HowToo sells all the parts you need for this repair:
- SAE 5W-30 full-synthetic engine oil meeting Ford WSS-M2C946-A or newer superseding specification - Qty: 6 US quarts
- Engine oil filter equivalent to Motorcraft FL-910S - Qty: 1
- Oil drain-plug sealing washer - Qty: 1
- Absorbent shop towels - Qty: 1 pack
📋 Before You Begin
- 🅿️ Park your Escape on level, solid ground. Select Park and apply the parking brake.
- 🧱 Place wheel chocks firmly behind both rear tires.
- 🌡️ Run the engine for three to five minutes, then switch it off and wait five minutes.
- 📖 Verify that the new oil container displays SAE 5W-30 and the applicable Ford specification.
- 📏 The refill capacity is approximately 5.7 US quarts (5.4 liters) with a new filter. Final level must always be confirmed with the dipstick.
🔨 Step-by-Step Instructions
Follow these steps in order:
Step 1: Open the Hood
- Pull the hood-release handle below the driver’s side dashboard.
- Release the secondary latch at the front of the hood and raise the hood securely.
- Use an engine oil dipstick reading cloth to clean around the oil filler cap and dipstick.
- Remove the oil filler cap by hand. This allows the old oil to drain more freely.
Step 2: Raise and Support the Front
- Use the low-profile 2-ton floor jack at the specified front lifting point.
- Position the 2-ton jack stands beneath the designated reinforced support points on both sides.
- Lower the vehicle slowly onto the stands with the floor jack.
- Push the vehicle gently to confirm it is stable before going underneath.
- A jack stand is a rigid support that safely holds the vehicle after lifting.
Step 3: Remove the Lower Engine Shield
- Place the 8-quart oil drain pan under the engine area.
- Use the Torx T30 bit socket and 3/8-inch ratchet to remove the shield screws, where equipped.
- Use the automotive trim-clip removal tool to release any plastic retainers without breaking them.
- Support the shield while removing its final fastener, then lower it carefully.
- Arrange fasteners in their installed positions.
Step 4: Drain the Old Engine Oil
- Position the 8-quart oil drain pan directly below and slightly behind the oil-pan drain plug.
- Use the 15mm six-point socket and 3/8-inch ratchet to loosen the drain plug counterclockwise.
- Finish removing the plug carefully while wearing nitrile mechanic gloves.
- Allow the oil to drain until it slows to an occasional drip, usually five to ten minutes.
- Clean the drain plug with the engine oil dipstick reading cloth and install a new sealing washer.
Step 5: Reinstall the Drain Plug
- Thread the drain plug into the oil pan by hand until fully seated. It should turn easily and must not be forced.
- Use the 15mm six-point socket and 3/8-inch drive torque wrench to tighten the plug to 27 Nm (20 ft-lbs).
- Wipe the area with an absorbent shop towel so fresh leakage will be easy to identify.
- Stop if the plug will not thread smoothly.
Step 6: Remove the Old Oil Filter
- Move the 8-quart oil drain pan beneath the oil filter.
- Use the universal strap-type oil filter wrench to loosen the filter counterclockwise.
- Turn the filter by hand once it is loose, keeping it upright to limit spills.
- Confirm the old rubber filter gasket came off with the filter. A gasket left on the engine can cause a major leak.
- Use an absorbent shop towel to clean the filter mounting surface without introducing debris into the opening.
Step 7: Install the New Oil Filter
- Use a gloved fingertip to spread a thin film of fresh 5W-30 oil over the new filter’s rubber gasket.
- Thread the new filter clockwise by hand until its gasket first contacts the mounting surface.
- Tighten the filter by hand an additional 3/4 turn after gasket contact.
- Do not use the universal strap-type oil filter wrench to tighten the new filter.
- Hand-tight is enough for a spin-on filter.
Step 8: Reinstall the Lower Engine Shield
- Lift the shield into position by hand and start every fastener before tightening any one fastener fully.
- Use the automotive trim-clip removal tool handle to press reusable plastic retainers securely into place.
- Use the Torx T30 bit socket and 3/8-inch ratchet to tighten the shield screws snugly without crushing the shield.
Step 9: Lower the Vehicle
- Use the low-profile 2-ton floor jack to raise the vehicle slightly off the jack stands.
- Remove both 2-ton jack stands, then lower the vehicle slowly to the ground.
- Leave the wheel chocks installed until the service is complete.
Step 10: Refill the Engine
- Place the long-neck automotive funnel in the oil filler opening.
- Pour in approximately 5.2 US quarts (4.9 liters) of the specified 5W-30 oil, reserving the remainder for final adjustment.
- Remove the funnel, install the oil filler cap, and seat the dipstick fully.
Step 11: Run the Engine and Check for Leaks
- Start the engine and allow it to idle for approximately 30 seconds. The oil-pressure warning light should go out within a few seconds.
- Switch the engine off immediately if the oil-pressure warning remains illuminated or if a major leak appears.
- Use the safety glasses and a flashlight-free visual inspection from outside the vehicle to check beneath the filter and drain-plug areas.
- Do not crawl under the Escape after it has been lowered.
Step 12: Set the Final Oil Level
- Switch off the engine and wait at least five minutes on level ground.
- Pull out the dipstick and wipe it clean with the engine oil dipstick reading cloth.
- Insert the dipstick fully, remove it again, and read the oil level.
- Use the long-neck automotive funnel to add oil in small amounts until the level is at or just below the upper mark.
- Do not exceed the upper mark. Total capacity is approximately 5.7 US quarts (5.4 liters).
- Install the dipstick and oil filler cap securely.
Step 13: Reset the Intelligent Oil-Life Monitor
- Sit in the driver’s seat and make sure the transmission remains in Park.
- Switch the ignition on without starting the engine. For push-button ignition, press the start button without pressing the brake pedal.
- Press the accelerator and brake pedals fully at the same time.
- Hold both pedals down for approximately 25 seconds until the instrument display confirms the oil reset is complete.
- Release both pedals and switch the ignition off.
✅ After Repair
- ✅ Start the engine and confirm the oil-pressure warning light turns off normally.
- 🔍 Check the ground and the visible lower-engine area for fresh oil after the engine has idled.
- 📏 Recheck the dipstick after a short drive and at least five minutes of settling time.
- 🧾 Record the date and odometer reading for future maintenance.
- ♻️ Transfer the used oil into a sealed container and recycle it with the old filter at an authorized collection facility.
- ⚠️ If the drain plug or filter continues leaking, shut off the engine and correct the leak before driving.
💰 DIY vs Shop Cost
Shop Cost: ₹6,000-₹10,000 (parts + labor)
DIY Cost: ₹3,500-₹6,500 (parts only)
You Save: ₹2,500-₹4,000 by doing it yourself!
Labor rates around Sonīpat vary. This repair takes a shop approximately 0.5-0.8 hour.
🎯 Ready to get started?
HowToo makes it easy: same-day/2-day shipping on every part, plus all the tools and specialty tools you need! Check out the parts and tools sections below to add everything to your cart.