








How to Change Engine Oil and Filter on a 2001-2012 Subaru Outback 2.5L (Engine: Flat 4 2.5L)
Step-by-step DIY guide with 0W-20 oil capacity, tools, parts, torque specs, and safety tips for 2001, 2002, 2003, 2004, 2005, 2006, 2007, 2008, 2009, 2010, 2011, 2012
How to Change Engine Oil and Filter on a 2001-2012 Subaru Outback 2.5L (Engine: Flat 4 2.5L)
Step-by-step DIY guide with 0W-20 oil capacity, tools, parts, torque specs, and safety tips for 2001, 2002, 2003, 2004, 2005, 2006, 2007, 2008, 2009, 2010, 2011, 2012


🔧 Outback - Engine Oil & Oil Filter Change
This repair replaces the old engine oil and oil filter in your Outback’s 2.5L flat-4 engine. Fresh oil protects the engine from wear, helps cooling, and keeps the timing and valve components properly lubricated.
Difficulty Level: Beginner | Estimated Time: 45-75 minutes
⚠️ Safety & Precautions
- ⚠️ Work on a level surface so the oil drains correctly and the vehicle stays stable.
- ⚠️ Let the engine cool until warm, not hot. Hot oil can burn skin.
- ⚠️ Always support the Outback with jack stands if lifting it. Never rely on a jack alone.
- ⚠️ Wear safety glasses and nitrile gloves to protect your eyes and skin from used oil.
- ⚠️ Used engine oil is toxic. Keep it off your skin and recycle it properly.
- ⚠️ Battery disconnect is not required for this oil change.
🔧 Required Tools
You'll need the following tools for this repair:
- 17mm socket
- 3/8-inch drive ratchet
- 3/8-inch drive torque wrench
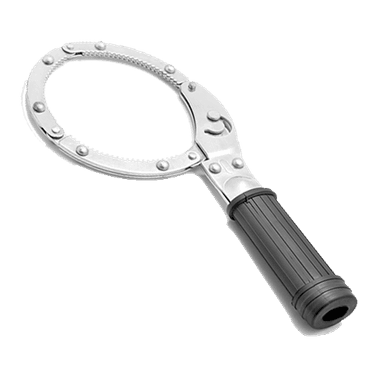
- Oil filter wrench 65mm 14-flute
- Drain pan 8-quart minimum
- Funnel
- Floor jack rated 2-ton minimum
- Jack stands rated 2-ton minimum
- Wheel chocks
- Nitrile gloves
- Safety glasses
- Shop towels
🔩 Required Parts
HowToo sells all the parts you need for this repair:
- Engine oil 0W-20 full synthetic - Qty: 4.8 quarts
- Engine oil filter - Qty: 1
- Oil drain plug crush washer - Qty: 1
📋 Before You Begin
- Park your Outback on level ground and set the parking brake.
- Place wheel chocks behind the rear wheels to stop the vehicle from rolling.
- Run the engine for 2-3 minutes, then shut it off. Warm oil drains faster.
- If lifting the front, use a floor jack and support the vehicle with jack stands at the proper front support points.
- A crush washer is a soft sealing washer that compresses once to prevent leaks. Replace it every oil change.
- A torque wrench tightens bolts to a measured amount so they are not too loose or too tight.
🔨 Step-by-Step Instructions
Follow these steps in order:
Step 1: Open the Hood and Remove the Oil Fill Cap
- Use your hand to open the hood and secure it with the hood prop.
- Use your hand to remove the engine oil fill cap on top of the engine.
- Pull the dipstick up slightly by hand. This helps air enter so the oil drains smoothly.
- Tip: Set the cap where you cannot forget it.
Step 2: Raise and Support the Front of the Vehicle
- Use wheel chocks behind the rear wheels.
- Use the floor jack rated 2-ton minimum to raise the front of the Outback high enough to access the oil drain plug.
- Use jack stands rated 2-ton minimum to support both sides securely.
- Gently shake the vehicle by hand before going underneath. It should not move.
Step 3: Position the Drain Pan
- Put on nitrile gloves and safety glasses.
- Use the drain pan 8-quart minimum and place it under the engine oil drain plug.
- The drain plug is on the bottom of the engine oil pan.
- Move the pan slightly toward the rear because oil may shoot outward at first.
Step 4: Remove the Oil Drain Plug
- Use a 17mm socket and 3/8-inch drive ratchet to loosen the oil drain plug counterclockwise.
- Finish removing the plug by hand while pushing inward slightly. This helps avoid dropping it into the drain pan.
- Let the old oil drain until it slows to an occasional drip.
- Use shop towels to wipe oil from the drain plug area.
Step 5: Replace the Crush Washer and Reinstall the Drain Plug
- Use your hand to remove the old crush washer from the drain plug.
- Install the new oil drain plug crush washer by hand.
- Thread the drain plug into the oil pan by hand first. This prevents cross-threading, which means damaging the threads by starting the plug crooked.
- Use the 17mm socket and 3/8-inch drive torque wrench to tighten the drain plug to Torque to 44 Nm (32.5 ft-lbs).
- Tip: Start all threads by hand.
Step 6: Remove the Old Oil Filter
- Move the drain pan under the oil filter area.
- Use the 65mm 14-flute oil filter wrench and 3/8-inch drive ratchet to loosen the oil filter counterclockwise.
- Once loose, use your hand to spin the oil filter off slowly.
- Keep the open end upward as you remove it to reduce spills.
- Use shop towels to wipe the filter mounting surface clean.
- Make sure the old rubber gasket came off with the old filter. A gasket is the rubber sealing ring on the filter.
Step 7: Install the New Oil Filter
- Use your gloved finger to apply a thin film of fresh 0W-20 oil to the new oil filter gasket.
- Use your hand to thread the new oil filter onto the engine until the gasket first touches the mounting surface.
- Use your hand to tighten the filter about 3/4 turn more after gasket contact.
- If using the torque wrench with the 65mm 14-flute oil filter wrench, tighten to Torque to 14 Nm (10 ft-lbs).
- Tip: Do not overtighten the filter.
Step 8: Lower the Vehicle
- Use the floor jack rated 2-ton minimum to raise the front slightly off the jack stands.
- Remove the jack stands by hand.
- Use the floor jack to lower the Outback slowly onto level ground.
Step 9: Add New Engine Oil
- Use a funnel in the oil fill opening.
- Pour in about 4.5 quarts of 0W-20 full synthetic engine oil first.
- Use shop towels to wipe spills right away.
- Reinstall the oil fill cap by hand.
Step 10: Start the Engine and Check for Leaks
- Start the engine and let it idle for 30-60 seconds.
- Use a flashlight if needed and look under the engine for leaks at the drain plug and oil filter.
- Shut the engine off and wait 5 minutes so oil drains back into the pan.
Step 11: Check and Set the Final Oil Level
- Use your hand to pull the dipstick out.
- Use shop towels to wipe the dipstick clean.
- Reinsert the dipstick fully, then pull it out again to read the oil level.
- Add small amounts of 0W-20 oil through the funnel until the level is near the full mark.
- Total refill is typically about 4.8 quarts with filter, but always use the dipstick as the final check.
Step 12: Reset the Maintenance Reminder
- Use the steering wheel controls to access the center display settings if your Outback has the maintenance reminder enabled.
- Select Maintenance > Engine Oil > Reset if that menu is present.
- If your display does not show this menu, record the mileage manually and place a reminder sticker in the windshield area.
✅ After Repair
- ✅ Recheck the oil level after the first short drive and top off only if needed.
- ✅ Look under the vehicle again for any fresh oil drips.
- ✅ Recycle the used oil and oil filter at an approved recycling center or auto parts store.
- ✅ For normal service, repeat oil changes at the Subaru-recommended interval for your driving conditions.
- ✅ If the oil pressure warning light stays on after startup, shut the engine off immediately and recheck the oil level and filter installation.
💰 DIY vs Shop Cost
Shop Cost: $90-$150 (parts + labor)
DIY Cost: $40-$75 (parts only)
You Save: $50-$75 by doing it yourself!
Shop labor rates vary but typically run $100-$150/hour. This repair takes a shop approximately 0.4-0.7 hours.
🎯 Ready to get started?
HowToo makes it easy: same-day/2-day shipping on every part, plus all the tools and specialty tools you need! Check out the parts and tools sections below to add everything to your cart.