









How to Change CVT Transmission Fluid on a 2019 Nissan Altima
Step-by-step drain-and-refill guide with NS-3 fluid, tools, torque specs, and safety tips
How to Change CVT Transmission Fluid on a 2019 Nissan Altima
Step-by-step drain-and-refill guide with NS-3 fluid, tools, torque specs, and safety tips


🔧 Altima - CVT Fluid Drain and Refill
Do a controlled drain and refill, not a machine flush. Your Altima’s turbocharged CVT requires Nissan CVT Fluid NS-3 or an explicitly NS-3-equivalent fluid; ordinary automatic-transmission fluid can damage it. Nissan lists fluid inspection every 7,500 miles or 12 months and replacement at 60,000 miles under severe service for this configuration. nissanusa.com)
Difficulty Level: Intermediate | Estimated Time: 2-3 hours
Assumption: These instructions cover a routine drain and refill without removing the transmission pan or filter.
⚠️ Safety & Precautions
- ⚠️ Support your Altima perfectly level on four jack stands. Fluid level will be wrong if the car is tilted.
- 🛑 Never work under a vehicle supported only by a floor jack.
- 🌡️ CVT fluid can cause serious burns. Let an overheated transmission cool before starting.
- 🧴 Use only fresh NS-3-compatible CVT fluid from sealed containers. Do not mix it with NS-2, regular ATF, additives, or manual-transmission oil. owners.nissanusa.com
- 🔩 Loosen the fill plug before draining. If the fill plug cannot be opened, stop before emptying the CVT.
- 🚫 Do not power-flush the CVT or pour cleaners into it.
- 🔋 Battery disconnection is not required.
🔧 Required Tools
You'll need the following tools for this repair:
- Floor jack rated 2-ton minimum
- Four jack stands rated 2-ton minimum
- Wheel chocks
- Metric socket set from 8mm to 19mm
- 3/8-inch drive ratchet
- 3/8-inch drive torque wrench rated 5-80 ft-lbs
- Plastic trim-clip removal tool
- OBD-II scan tool with CVT fluid-temperature data (specialty)
- CVT fluid transfer pump with threaded adapter (specialty)
- Drain pan rated 10-quart minimum
- Graduated measuring container rated 5-quart minimum
- Digital level
- Digital thermometer
- Safety glasses
- Nitrile chemical-resistant gloves
- Shop light
🔩 Required Parts
HowToo sells all the parts you need for this repair:
- Nissan NS-3-compatible CVT fluid - Qty: 5 quarts
- CVT drain-plug sealing washer - Qty: 1
- CVT level-plug sealing washer - Qty: 1
- Brake cleaner - Qty: 1 can
- Absorbent shop towels - Qty: 1 pack
The matching transmission-fluid aisle is open in the parts sidebar. Check the bottle label for an explicit Nissan NS-3 compatibility statement. “Universal ATF” without that statement doesn’t make the cut. Nobody wants to buy a CVT twice.
📋 Before You Begin
- 📍 Park on level pavement, apply the parking brake, and chock the rear wheels.
- 🚗 Take a short, gentle drive to warm the fluid slightly. Do not begin with the transmission extremely hot.
- 📊 Connect the OBD-II scan tool and confirm that it can display CVT fluid temperature before draining anything.
- 🧰 Raise the entire vehicle and place it level on four jack stands.
- 📐 Use the digital level on a flat rocker-panel or underbody reference surface to confirm the car is level front-to-rear and side-to-side.
- 🧪 Keep each container clean. Dirt introduced through the fill opening can damage the valve body.
🔨 Step-by-Step Instructions
Follow these steps in order:
Step 1: Remove the lower splash shield
- Use the metric socket set and plastic trim-clip removal tool to remove the fasteners securing the lower engine cover.
- Arrange the fasteners in removal order so each one returns to its original location.
- Photograph the shield before removing clips.
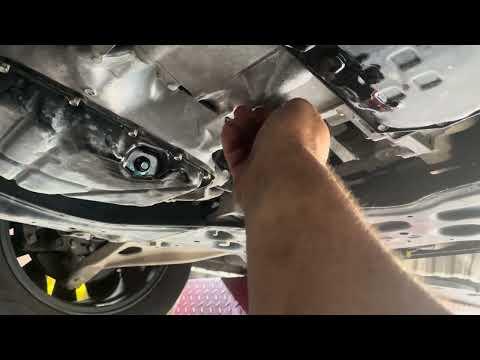
Step 2: Identify the CVT service plugs
- Use the shop light to identify the CVT drain plug, level or overflow plug, and fill opening.
- The level plug controls the final fluid height. It is not the same fastener as the main drain plug.
- Clean around each opening with brake cleaner and shop towels.
- Do not remove a plug unless you have positively identified it as a CVT service plug.
Step 3: Confirm the fill opening can be opened
- Use the correctly fitting socket from the metric socket set to loosen the CVT fill plug.
- Do not drain the transmission until this plug moves normally and can be reinstalled.
- Inspect the plug and opening for damaged threads.
Step 4: Drain and measure the old fluid
- Position the 10-quart drain pan beneath the CVT drain plug.
- Use the correctly fitting socket and 3/8-inch ratchet to remove the drain plug slowly.
- Allow the fluid to drain until it falls to an occasional drip.
- Transfer the drained fluid into the graduated measuring container and record the exact amount.
- Inspect the fluid. Fine gray residue is common, but metallic flakes, chunks, a strong burnt smell, or milky fluid call for diagnosis before refilling.
Step 5: Reinstall the drain plug
- Remove the old sealing washer and install a new drain-plug sealing washer.
- Clean the plug and sealing surface with brake cleaner and shop towels.
- Start the drain plug by hand to prevent cross-threading.
- Use the 3/8-inch torque wrench to tighten the main drain plug to 34 N·m (25 ft-lbs).
Step 6: Add the initial fluid quantity
- Use the CVT fluid transfer pump to add the same measured amount of fresh NS-3-compatible fluid that was removed.
- If the final level will be set through an overflow tube, add approximately 0.5 quart beyond the measured amount so excess fluid can drain during leveling.
- Do not estimate the complete transmission capacity. A drain and refill removes only part of the total fluid.
- Install the fill plug loosely enough to prevent leakage during the warm-up procedure.
Step 7: Circulate the new fluid
- Confirm the parking brake is applied and keep your foot firmly on the brake pedal.
- Start the engine and leave it idling. Do not raise engine speed.
- Move the selector through P > R > N > D, pausing approximately five seconds in each position.
- Repeat the sequence twice, then return the selector to P.
- Use the OBD-II scan tool to watch CVT fluid temperature continuously.
Step 8: Set the fluid level by temperature
- Keep your Altima level, the engine idling, the parking brake applied, and the selector in P.
- When the scan tool shows approximately 35-45°C (95-113°F), place the drain pan beneath the level plug.
- Use the correct socket and 3/8-inch ratchet to remove the level plug carefully.
- If fluid runs in a steady stream, let it drain until it becomes a thin intermittent trickle.
- If no fluid appears, reinstall the plug temporarily, pump in small amounts of NS-3-compatible fluid, and repeat the check while remaining within the temperature window.
- Install a new level-plug sealing washer, start the plug by hand, and tighten it with the 3/8-inch torque wrench to 8 N·m (71 in-lbs).
- Do not overtighten the small level plug. Its threads are easy to damage.
Step 9: Secure the fill plug and inspect
- Use the correct socket and 3/8-inch torque wrench to tighten the fill plug to the specification marked for the plug design or supplied with its replacement seal.
- Clean all serviced areas with brake cleaner and shop towels.
- With the engine idling, use the shop light to check every opened plug for leakage.
Step 10: Reinstall the splash shield
- Shut the engine off.
- Use the metric socket set and plastic trim-clip removal tool to reinstall the lower splash shield and all original fasteners.
- Use the floor jack to raise each support point, remove the jack stands, and lower the vehicle carefully.
✅ After Repair
- ✅ Take a gentle 10-minute test drive. Confirm smooth engagement into Reverse and Drive.
- 👂 Watch for delayed engagement, shuddering, slipping, whining, or warning messages.
- 🔍 Park on clean, level ground and inspect underneath for leaks.
- 🧾 Record the mileage, date, fluid specification, and amount installed.
- 💻 A Nissan-capable scan tool should reset the CVT fluid-deterioration value after replacement when that function is supported.
- 🛑 If the old fluid contained metal, the CVT was already slipping, or the new fluid level cannot be established, stop driving and have the transmission diagnosed.
💰 DIY vs Shop Cost
Shop Cost: $250-$450 (parts + labor)
DIY Cost: $110-$190 (fluid, seals, and basic consumables)
You Save: $140-$260 by doing it yourself!
Regional labor prices vary. This service typically takes a shop approximately 1-2 hours.
🎯 Ready to get started?
HowToo makes it easy: same-day/2-day shipping on every part, plus all the tools and specialty tools you need! Check out the transmission-fluid parts and tools sections below to add everything to your cart.
