


2016 Hyundai Veloster Timing Belt vs Timing Chain: How to Diagnose & Replace the Chain
Learn why the Veloster uses a timing chain, plus step-by-step replacement overview, tools, parts, and safety tips for 2013, 2014, 2015, 2016, 2017
2016 Hyundai Veloster Timing Belt vs Timing Chain: How to Diagnose & Replace the Chain
Learn why the Veloster uses a timing chain, plus step-by-step replacement overview, tools, parts, and safety tips for 2013, 2014, 2015, 2016, 2017
🔧 Veloster - Timing Belt Replacement
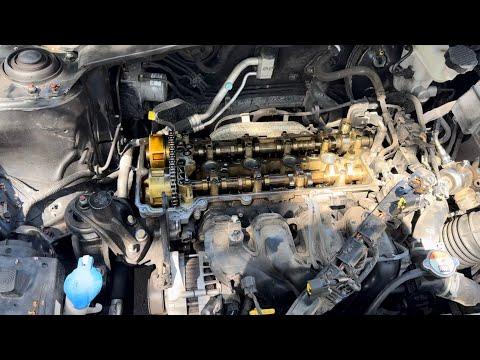
Your Veloster does not use a timing belt. The 1.6L turbo engine uses a timing chain, which is lubricated by engine oil and is not a normal “scheduled belt replacement” item.
If you’re chasing a rattle on cold start, a check-engine light for cam/crank correlation, or high mileage wear, the correct repair is timing chain inspection/replacement (plus related guides/tensioner). This is a precision job because incorrect timing can cause severe engine damage.
Difficulty Level: Advanced | Estimated Time: 6-10 hours
Assumption: You meant timing chain service (not a belt).
⚠️ Safety & Precautions
- ⚠️ Work on a cold engine; hot coolant/oil can burn you.
- ⚠️ Disconnect the negative battery cable to prevent accidental cranking.
- ⚠️ Support the engine before removing the passenger-side engine mount (the engine can drop).
- ⚠️ Keep fingers/tools clear when rotating the crankshaft.
- ⚠️ Do not rotate the crank/cams independently with the chain removed.
🔧 Required Tools
You'll need the following tools for this repair:
- Safety glasses
- Nitrile gloves
- Floor jack (rated 3-ton minimum)
- Jack stands (rated 3-ton minimum)
- Wheel chocks
- Fender cover
- Metric socket set 8mm-19mm
- Metric wrench set 8mm-19mm
- 3/8" drive ratchet
- 1/2" drive breaker bar
- Torque wrench (10-200 ft-lbs range)
- Torx bit set
- Allen bit set
- Screwdriver set
- Trim clip removal tool
- Pry bar
- Oil drain pan (at least 8-quart)
- Coolant drain pan
- Funnel
- Gasket scraper
- Brake cleaner spray
- Shop rags
- Engine support bar (specialty)
- Camshaft holding/locking tool set (specialty)
- Crank pulley holding tool (specialty)
🔩 Required Parts
HowToo sells all the parts you need for this repair:
- Timing chain - Qty: 1
- Timing chain tensioner - Qty: 1
- Timing chain guides - Qty: 1 set
- Crankshaft front oil seal - Qty: 1
- Front timing cover gasket/sealant kit - Qty: 1
- Valve cover gasket set - Qty: 1
- Fresh engine oil (full synthetic, correct grade for your Veloster) - Qty: 5 quarts
- Oil filter - Qty: 1
- Engine coolant (compatible with Hyundai) - Qty: 1-2 gallons
- Accessory drive belt - Qty: 1
- RTV silicone sealant (oil-resistant) - Qty: 1
- One-time-use torque-to-yield bolts (if applicable for crank pulley and/or mount) - Qty: 1 set
📋 Before You Begin
- Park on level ground, set the parking brake, and chock the rear wheels.
- Disconnect the negative battery terminal using a 10mm socket.
- Raise the front of the car with a floor jack and support it on jack stands.
- Remove the passenger front wheel using a 19mm socket (common lug size) and remove the inner fender liner with a trim clip removal tool.
- Set up your engine support bar (a bar that holds the engine from above) so the engine can stay supported when the mount comes off.
🔨 Step-by-Step Instructions
Follow these steps in order:
Step 1: Drain fluids and clear access
- Place an oil drain pan under the oil pan, remove the drain plug with the correct metric socket, and drain the oil.
- Drain coolant into a coolant drain pan (use the radiator drain and/or lower hose with a pliers or socket, depending on clamp type).
- Remove the top engine cover/intake ducting as needed using a socket set and screwdrivers.
Step 2: Remove the accessory belt and crank pulley
- Relieve belt tension using a breaker bar on the tensioner (tool fit varies) and remove the accessory belt.
- Hold the crank pulley with a crank pulley holding tool (specialty) and remove the crank pulley bolt using a 1/2" breaker bar and appropriate socket.
- Remove the crank pulley/harmonic balancer (use a pry bar gently if needed; do not pry on sealing surfaces).
- Torque to Hyundai service manual specification on reassembly for the crank bolt (this fastener is often critical and may be one-time-use).
Step 3: Support the engine and remove the passenger-side mount
- Take the engine weight with the engine support bar (specialty).
- Remove the passenger-side engine mount and bracket using a metric socket set and wrench set.
- Torque to Hyundai service manual specification on reassembly for all mount/bracket bolts.
Step 4: Remove the valve cover and front timing cover
- Unplug ignition coils/sensors and remove coils using a socket set.
- Remove the valve cover fasteners using a socket set, then lift off the valve cover.
- Remove the front timing cover bolts using a socket set and Torx bits where equipped.
- Carefully separate the timing cover using a plastic pry tool or pry bar at designated pry points only.
- Clean mating surfaces with a gasket scraper and brake cleaner spray; keep debris out of the engine.
Step 5: Set engine to Top Dead Center (TDC) on cylinder 1
- Rotate the crankshaft clockwise using a socket and ratchet on the crank bolt (or crank snout if bolt is removed temporarily).
- Align timing marks on the crank sprocket and cam sprockets per Hyundai procedure.
- Install the camshaft holding/locking tool set (specialty) (these tools hold the cams in place so timing doesn’t slip).
Step 6: Remove the timing chain, guides, and tensioner
- Relieve/remove the chain tensioner using a socket set.
- Remove the chain guides using a socket set.
- Remove the timing chain and keep note of routing.
- Take pictures before removal.
Step 7: Install new chain, guides, and tensioner
- Install new guides with a socket set.
- Route the new chain and align colored links (if provided) to the sprocket timing marks.
- Install the new tensioner with a socket set and set/activate it per Hyundai procedure.
- Torque to Hyundai service manual specification for guides and tensioner fasteners.
Step 8: Verify timing by hand-rotating the engine
- Remove the locking tools as required, then rotate the crankshaft clockwise two full turns using a ratchet.
- Re-check that timing marks line up correctly at TDC.
- If marks do not align, do not proceed—re-time the chain before reassembly.
Step 9: Re-seal and reinstall covers
- Install a new crankshaft front oil seal (use an appropriately sized driver from a socket set to press it in square).
- Apply RTV silicone sealant at Hyundai-specified joints/corners, then reinstall the timing cover using a socket set.
- Torque to Hyundai service manual specification for timing cover fasteners.
- Install the valve cover with a new gasket using a socket set.
- Torque to Hyundai service manual specification for valve cover fasteners (these are small bolts—do not overtighten).
Step 10: Reinstall mount, belt, and refill fluids
- Reinstall the engine mount/bracket using a socket set and torque wrench; torque to Hyundai service manual specification.
- Reinstall crank pulley and crank bolt using a crank pulley holding tool (specialty) and torque wrench; torque to Hyundai service manual specification.
- Install a new accessory belt using a breaker bar on the tensioner.
- Refill engine oil (new oil filter installed using a socket set or filter tool if needed).
- Refill coolant using a funnel.
- Reconnect the battery negative terminal using a 10mm socket.
✅ After Repair
- Start the engine and let it idle; listen for abnormal rattles near the timing cover.
- Check for oil leaks around the timing cover, valve cover, and crank seal.
- Bring the engine to operating temperature and confirm the radiator fan cycles; top off coolant as needed after it cools.
- If the check-engine light is on, scan for codes and address any cam/crank correlation faults.
- Recheck fluid levels next day.
💰 DIY vs Shop Cost
Shop Cost: $1,200-$2,500 (parts + labor)
DIY Cost: $250-$650 (parts only)
You Save: $550-$2,250 by doing it yourself!
Shop labor rates vary but typically run $100-$150/hour. This repair takes a shop approximately 6-10 hours.
🎯 Ready to get started?
HowToo makes it easy: same-day/2-day shipping on every part, plus all the tools and specialty tools you need! Check out the parts and tools sections below to add everything to your cart.