









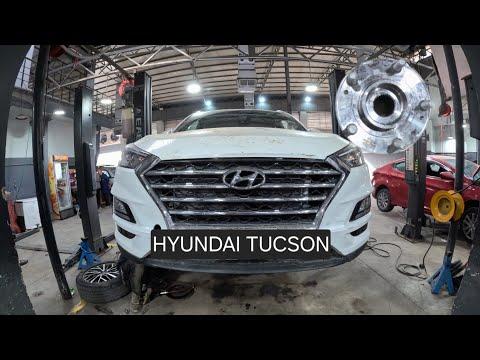







How to Replace Wheel Bearings on a 2010-2015 Hyundai Tucson
Step-by-step front and rear bearing guide with tools, parts, torque specs, and safety tips
How to Replace Wheel Bearings on a 2010-2015 Hyundai Tucson
Step-by-step front and rear bearing guide with tools, parts, torque specs, and safety tips for 2010, 2011, 2012, 2013, 2014, 2015


🔧 Wheel Bearings - Replacement
Your Tucson uses different wheel bearing designs front and rear. The front wheel bearings are press-in bearings inside the steering knuckles, while the rear bearings are serviced as hub assemblies. The steps below cover replacing the wheel bearings, with the front procedure as the main job and notes for the rear style where it differs.
Difficulty Level: Advanced | Estimated Time: 3-5 hours per front side, 1.5-2.5 hours per rear side
⚠️ Safety & Precautions
- ⚠️ Support your Tucson only with jack stands; never work under a vehicle held by a jack alone.
- ⚠️ The front axle nut is very tight. Loosen it before the wheel is fully off the ground.
- ⚠️ Do not let the brake caliper hang by the rubber brake hose.
- ⚠️ Avoid pulling the CV axle outward too far; the inner CV joint can separate internally.
- ⚠️ Disconnecting the battery is not required unless you are unplugging damaged wiring or doing electrical repair.
- ⚠️ After front knuckle removal, a wheel alignment is recommended.
🔧 Required Tools
You'll need the following tools for this repair:
- Floor jack (rated 3-ton minimum)
- Jack stands (rated 3-ton minimum)
- Wheel chocks
- Safety glasses
- Mechanic gloves
- 21mm lug nut socket
- 1/2-inch drive breaker bar
- 1/2-inch drive torque wrench
- 32mm axle nut socket
- 10mm socket
- 12mm socket
- 14mm socket
- 17mm socket
- 19mm socket
- 22mm socket
- Ratchet set 3/8-inch drive
- Ratchet set 1/2-inch drive
- Box-end wrench set 10mm-22mm
- Flat blade screwdriver
- Pry bar 18-inch
- Ball joint separator (specialty)
- Tie rod separator (specialty)
- Snap ring pliers (specialty)
- Hydraulic press 12-ton minimum (specialty)
- Bearing driver kit (specialty)
- Hub puller kit (specialty)
- Dead blow hammer
- Brass punch set
- Bungee cord
- Brake cleaner
- Wire brush
- Paint marker
🔩 Required Parts
HowToo sells all the parts you need for this repair:
- Front wheel bearing - Qty: 1 per side
- Front wheel hub - Qty: 1 per side if damaged or worn
- Front axle nut - Qty: 1 per side
- Front wheel bearing snap ring - Qty: 1 per side
- Rear hub and bearing assembly - Qty: 1 per side if replacing rear bearing
- Brake cleaner - Qty: 1 can
📋 Before You Begin
- 🅿️ Park your Tucson on level ground and set the parking brake.
- 🧱 Place wheel chocks behind the wheels that stay on the ground.
- 🔎 A hydraulic press is a shop tool that pushes parts together or apart with steady force. For a beginner, the safest method is to remove the front steering knuckle and have a machine shop press the bearing.
- 🔎 A snap ring is a strong circular clip that locks the front bearing into the knuckle.
- 🔎 A torque wrench tightens bolts to the correct tightness so parts are secure but not damaged.
- 🖊️ Use a paint marker to mark the strut-to-knuckle bolt positions before removal.
🔨 Step-by-Step Instructions
Follow these steps in order:
Step 1: Loosen the Wheel and Axle Nut
- Use a 21mm lug nut socket and 1/2-inch drive breaker bar to loosen the front wheel lug nuts about half a turn.
- Use a 32mm axle nut socket and 1/2-inch drive breaker bar to loosen the front axle nut while the tire is still on the ground.
- If the axle nut has a staked edge, use a flat blade screwdriver or brass punch set to lift the staked section before loosening.
- Loosen first, lift second.
Step 2: Raise and Support the Vehicle
- Use a floor jack (rated 3-ton minimum) to lift the front of your Tucson at the proper front jacking point.
- Place jack stands (rated 3-ton minimum) under the front support points.
- Use wheel chocks at the rear wheels.
- Use mechanic gloves and safety glasses before working around brakes and suspension.
Step 3: Remove the Wheel
- Use a 21mm lug nut socket and ratchet set 1/2-inch drive to remove the lug nuts.
- Remove the wheel and place it flat under the side of the vehicle as an extra safety backup.
- When reinstalling later, tighten the wheel lug nuts to Torque to 88-107 Nm (65-79 ft-lbs).
Step 4: Remove the Brake Caliper and Rotor
- Use a 14mm socket to remove the front brake caliper slide bolts.
- Lift the caliper off the rotor and hang it from the strut using a bungee cord.
- Use a 17mm socket to remove the caliper bracket bolts.
- Remove the brake rotor by hand. If stuck, tap the rotor hat gently with a dead blow hammer.
- During reassembly, tighten caliper bracket bolts to Torque to 79-98 Nm (58-72 ft-lbs).
- During reassembly, tighten caliper slide bolts to Torque to 22-32 Nm (16-24 ft-lbs).
Step 5: Free the ABS Sensor Wiring
- Use a 10mm socket or 12mm socket to remove the small brackets holding the ABS wheel speed sensor wire to the knuckle area.
- Do not pull on the wire. Move it aside gently.
- If the sensor must be removed, use a 10mm socket and twist the sensor gently by hand.
Step 6: Remove the Axle Nut
- Use the 32mm axle nut socket and ratchet set 1/2-inch drive to remove the loosened axle nut.
- Push the axle inward slightly by hand. If it is stuck, use a brass punch set and dead blow hammer on the axle end only.
- Do not strike the axle threads directly with a steel hammer.
Step 7: Separate the Outer Tie Rod End
- Use a 17mm socket or 19mm socket to remove the outer tie rod nut.
- Use a tie rod separator (specialty) to separate the tie rod from the steering knuckle.
- A tie rod separator pushes the steering joint apart without damaging the knuckle.
- During reassembly, tighten the tie rod nut to Torque to 34-44 Nm (25-32 ft-lbs).
Step 8: Separate the Lower Ball Joint
- Use a 17mm socket or 19mm socket to remove the lower ball joint retaining nut or pinch fastener, depending on the joint hardware fitted.
- Use a ball joint separator (specialty) to separate the lower ball joint from the steering knuckle.
- A ball joint separator is a tool that presses a tapered suspension joint apart safely.
- During reassembly, tighten the lower ball joint nut to Torque to 98-118 Nm (72-87 ft-lbs).
Step 9: Remove the Steering Knuckle
- Use a paint marker to mark the strut-to-knuckle bolt positions.
- Use a 19mm socket, 22mm socket, and matching box-end wrench set 10mm-22mm to remove the strut-to-knuckle bolts and nuts.
- Support the knuckle with one hand while sliding it away from the axle shaft.
- Use a pry bar 18-inch only for gentle movement if needed.
- During reassembly, tighten strut-to-knuckle fasteners to Torque to 137-156 Nm (101-115 ft-lbs).
Step 10: Press Out the Front Hub
- Use a hydraulic press 12-ton minimum (specialty), bearing driver kit (specialty), and hub puller kit (specialty) to support the knuckle squarely.
- Press the wheel hub out of the old bearing.
- If part of the bearing stays on the hub, remove it using the proper bearing splitter from the hub puller kit (specialty).
- Support the part before pressing.
Step 11: Remove the Old Bearing
- Use snap ring pliers (specialty) to remove the bearing snap ring from the steering knuckle.
- Use brake cleaner and a wire brush to clean rust from the snap ring groove.
- Use the hydraulic press 12-ton minimum (specialty) and bearing driver kit (specialty) to press the old bearing out of the knuckle.
Step 12: Press In the New Front Bearing
- Use brake cleaner and a wire brush to clean the bearing bore in the knuckle.
- Use the hydraulic press 12-ton minimum (specialty) and bearing driver kit (specialty) to press the new bearing into the knuckle.
- Press only on the bearing’s outer race. The outer race is the outside metal ring of the bearing.
- Use snap ring pliers (specialty) to install the new snap ring fully into the groove.
Step 13: Press the Hub Into the Bearing
- Use the hydraulic press 12-ton minimum (specialty) and bearing driver kit (specialty) to press the hub into the new bearing.
- Support the bearing’s inner race while pressing the hub in. The inner race is the center metal ring of the bearing.
- If the hub has grooves, blue heat marks, or looseness, replace it instead of reusing it.
Step 14: Reinstall the Steering Knuckle
- Guide the axle through the hub by hand while positioning the knuckle.
- Use a 19mm socket, 22mm socket, and matching box-end wrench set 10mm-22mm to install the strut-to-knuckle bolts.
- Tighten the strut-to-knuckle fasteners to Torque to 137-156 Nm (101-115 ft-lbs).
- Use a 17mm socket or 19mm socket to reconnect the lower ball joint and tighten to Torque to 98-118 Nm (72-87 ft-lbs).
- Use a 17mm socket or 19mm socket to reconnect the tie rod and tighten to Torque to 34-44 Nm (25-32 ft-lbs).
Step 15: Reinstall the Brakes and ABS Wiring
- Use brake cleaner to clean the rotor surface if you touched it with greasy hands.
- Install the rotor by hand.
- Use a 17mm socket to install the caliper bracket bolts and tighten to Torque to 79-98 Nm (58-72 ft-lbs).
- Use a 14mm socket to install the caliper slide bolts and tighten to Torque to 22-32 Nm (16-24 ft-lbs).
- Use a 10mm socket or 12mm socket to reinstall the ABS wire brackets exactly as routed before.
Step 16: Install the New Axle Nut and Wheel
- Thread the new axle nut on by hand first so it does not cross-thread.
- Use a 32mm axle nut socket and 1/2-inch drive torque wrench to tighten the axle nut to Torque to 196-274 Nm (145-202 ft-lbs).
- Stake the axle nut if it is a staked style by using a brass punch set.
- Install the wheel and use a 21mm lug nut socket to snug the lug nuts.
- Lower your Tucson and tighten lug nuts in a star pattern to Torque to 88-107 Nm (65-79 ft-lbs).
Step 17: Rear Bearing Assembly Note
- For the rear wheel bearing on your Tucson, use a 21mm lug nut socket to remove the wheel, then remove the brake caliper and rotor using the same brake tools above.
- Use a 14mm socket or 17mm socket to remove the rear hub assembly retaining bolts from the back side of the knuckle.
- Remove the rear hub and bearing assembly, clean the mounting face with a wire brush, and install the new assembly.
- Rear hub bolts commonly tighten around Torque to 78-98 Nm (58-72 ft-lbs), but verify the exact fastener size before final torque.
✅ After Repair
- ✅ Pump the brake pedal several times before driving. This seats the brake caliper back against the rotor.
- ✅ Start with a slow test drive in a safe area and listen for grinding, clicking, or humming.
- ✅ Confirm the ABS light stays off.
- ✅ Recheck lug nut torque after the first short drive.
- ✅ Get a wheel alignment if a front steering knuckle was removed.
- ✅ If the vehicle pulls, the steering wheel is off-center, or tire wear appears, do not delay the alignment.
💰 DIY vs Shop Cost
Shop Cost: $450-$850 per front side, $300-$550 per rear side (parts + labor)
DIY Cost: $60-$180 per front side, $120-$260 per rear side (parts only)
You Save: $250-$650 per side by doing it yourself!
Shop labor rates vary but typically run $100-$150/hour. This repair takes a shop approximately 2-4 hours for a front bearing and 1-2 hours for a rear hub assembly.
🎯 Ready to get started?
HowToo makes it easy: same-day/2-day shipping on every part, plus all the tools and specialty tools you need! Check out the parts and tools sections below to add everything to your cart.
Guide for Wheel Hub replace for these Hyundai vehicles
| Year Make Model | Sub Model | Engine | Body Style |
|---|---|---|---|
| 2015 Hyundai Tucson | - | - | - |
| 2014 Hyundai Tucson | - | - | - |
| 2013 Hyundai Tucson | - | - | - |
| 2012 Hyundai Tucson | - | - | - |
| 2011 Hyundai Tucson | - | - | - |
| 2010 Hyundai Tucson | - | - | - |