









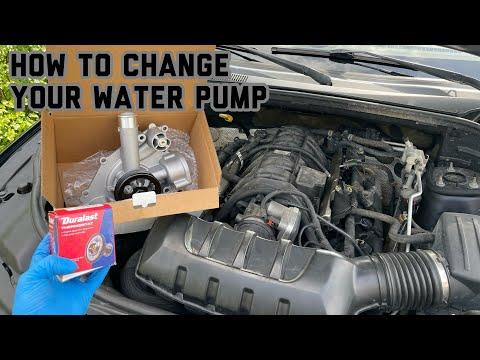





How to Replace the Water Pump on a 2019 Jeep Grand Cherokee 5.7L
Step-by-step DIY guide with tools, parts list, torque specs, safety tips, and bleeding procedure
How to Replace the Water Pump on a 2019 Jeep Grand Cherokee 5.7L
Step-by-step DIY guide with tools, parts list, torque specs, safety tips, and bleeding procedure


🔧 Grand Cherokee - Water Pump Replacement
You’ll be removing the belt-driven water pump from the front of your engine, swapping it for a new one, and refilling/bleeding the cooling system. This restores proper coolant flow and prevents overheating or leaks.
Difficulty Level: Intermediate | Estimated Time: 3-5 hours
⚠️ Safety & Precautions
- ⚠️ Always work on a cold engine. Hot coolant can cause serious burns.
- ⚠️ Disconnect the negative battery cable before working near the fan and belt.
- ⚠️ Coolant is toxic to people and animals. Collect it in a drain pan and dispose of it properly.
- ⚠️ The engine fan can be heavy and has sharp edges. Support it with both hands when removing.
- ⚠️ Keep tools and fingers clear of belt pulleys and sharp brackets.
- ⚠️ After refill, running with trapped air can overheat the engine. Follow the bleed steps carefully.
🔧 Required Tools
You'll need the following tools for this repair:
- 🛠️ Metric socket set (8mm–19mm)
- 🛠️ 1/4" drive ratchet
- 🛠️ 3/8" drive ratchet
- 🛠️ 3/8" drive torque wrench (5–80 ft-lbs range)
- 🛠️ 6" socket extension
- 🛠️ 10mm combination wrench
- 🛠️ 13mm combination wrench
- 🛠️ 36mm fan clutch wrench (specialty)
- 🛠️ Fan clutch holding tool (specialty)
- 🛠️ Serpentine belt tool or 1/2" drive breaker bar
- 🛠️ Flat-blade screwdriver (medium)
- 🛠️ Hose clamp pliers or adjustable pliers
- 🛠️ Plastic trim clip removal tool
- 🛠️ Plastic scraper or gasket scraper (non-metal preferred)
- 🛠️ Drain pan (at least 10 liters)
- 🛠️ Small funnel
- 🛠️ Shop towels or rags
- 🛠️ Safety glasses
- 🛠️ Mechanic gloves
🔩 Required Parts
HowToo sells all the parts you need for this repair:
- 🔩 Engine water pump (5.7L) - Qty: 1
- 🔩 Water pump gasket or O-ring (as required for pump) - Qty: 1
- 🔩 Serpentine drive belt - Qty: 1 (recommended while you’re in there)
- 🔩 Upper radiator hose clamp - Qty: 1 (optional, replace if rusty/damaged)
- 🔩 Lower radiator hose clamp - Qty: 1 (optional)
- 🔩 Coolant bypass/heater hose clamps - Qty: 2-4 (optional)
- 🔩 Engine coolant (HOAT or OAT type specified for 5.7L) - Qty: 10-12 liters premixed
- 🔩 Cooling system seal rings or O-rings (if any hoses use them) - Qty: As needed
- 🔩 RTV silicone sealant (coolant-safe, if specified by pump manufacturer) - Qty: 1 small tube
- 🔩 Fan shroud clips or push pins - Qty: 2-4 (optional if any break)
📋 Before You Begin
- Park the Grand Cherokee on level ground, shift to Park, and set the parking brake.
- Let the engine cool completely (at least 1–2 hours after last running).
- Open the hood using the interior release, then the hood latch at the grille.
- Disconnect the negative battery cable using a 10mm socket or wrench and tuck it aside.
- Place the drain pan under the radiator drain area before loosening anything coolant-related.
🔨 Step-by-Step Instructions
Follow these steps in order:
Step 1: Drain the coolant
- Remove the coolant reservoir cap by hand to relieve any residual pressure.
- Place your drain pan under the radiator drain plug (bottom of radiator, driver side).
- Use a flat-blade screwdriver to carefully open the radiator drain plug and let coolant flow into the pan.
- Once the radiator flow slows, move the pan under the engine area and loosen the lower radiator hose at the water pump using hose clamp pliers to remove more coolant.
- When drained, tighten the radiator drain plug by hand, then snug it gently with the flat-blade screwdriver (do not overtighten).
Step 2: Remove air intake tube for access
- Locate the air intake tube between the air filter box and throttle body.
- Use an 8mm socket or flat-blade screwdriver to loosen the clamps on both ends.
- Disconnect any small hoses or electrical connectors on the tube by hand.
- Lift the intake tube out and set it aside on a clean surface.
Step 3: Remove the fan shroud and mechanical fan
- Locate the plastic fan shroud behind the radiator. Remove the top bolts using a 10mm socket.
- Release any wiring clips from the shroud using a plastic trim clip tool.
- Place the fan clutch holding tool (specialty) on the water pump pulley to hold it steady.
- Use the 36mm fan clutch wrench on the fan clutch nut at the center of the fan. Turn it clockwise to loosen (it is reverse-thread on the 5.7L).
- Once loose, spin off the fan and carefully lift the fan and shroud out together. Use both hands and move slowly to avoid hitting the radiator.
Step 4: Remove the serpentine belt
- Draw or take a picture of the belt routing before removal. Picture avoids wrong routing later
- Insert a 1/2" drive breaker bar or serpentine belt tool into the tensioner square hole.
- Rotate the tensioner clockwise to release belt tension.
- Slide the belt off the water pump pulley by hand, then slowly release the tensioner.
- Remove the belt completely and set aside (or discard if replacing).
Step 5: Disconnect hoses from the water pump
- Place rags under the hose connections to catch remaining coolant.
- Use hose clamp pliers or adjustable pliers to compress the clamps on the upper and lower hoses attached to the water pump and slide the clamps back on the hose.
- Twist each hose gently by hand to break it loose, then pull it off the water pump nipples.
- Disconnect any smaller bypass or heater hoses connected to the pump in the same way.
Step 6: Remove the water pump pulley (if separate)
- If your pump uses a separate pulley bolted to the hub, hold the pulley with your hand or use the fan clutch holding tool to stabilize it.
- Remove the pulley bolts with a 13mm socket and 3/8" ratchet.
- Set the pulley and bolts aside in a clean area.
Step 7: Remove the water pump from the engine
- Locate all the water pump mounting bolts around the pump housing.
- Using a 13mm socket, extension, and 3/8" ratchet, remove the bolts in a crisscross pattern.
- Note any bolts of different lengths and lay them out in order on a piece of cardboard.
- Gently tap the side of the pump with the palm of your hand to break the seal, then pull the pump straight off the engine.
- Be prepared for more coolant to drain; catch it with the drain pan.
Step 8: Clean the gasket surface
- Use a plastic scraper to carefully remove old gasket material from the engine block surface.
- Do not use metal tools that can gouge the aluminum surface.
- Wipe the surface clean with a rag; ensure no debris falls into the openings.
- If allowed by the pump instructions, apply a thin film of coolant-safe RTV at any specified locations (many pumps rely only on the gasket/O-ring; follow the pump’s instructions).
Step 9: Install the new water pump
- Place the new gasket or O-ring onto the new pump, making sure it is properly seated.
- Position the pump against the engine, lining up the bolt holes, and install all bolts finger-tight using a 13mm socket.
- With a 3/8" drive torque wrench and 13mm socket, tighten the bolts in a crisscross pattern to the final torque: Torque to 40 Nm (30 ft-lbs).
Step 10: Reinstall water pump pulley and hoses
- Place the pulley back on the pump hub and start its bolts by hand.
- Hold the pulley with the fan clutch holding tool and tighten the bolts using a 13mm socket and 3/8" ratchet to: Torque to 28 Nm (21 ft-lbs).
- Reconnect the upper and lower radiator hoses, plus any bypass/heater hoses, onto the pump ports.
- Slide the clamps back into position using hose clamp pliers and ensure they are centered over the hose nipples.
Step 11: Reinstall the serpentine belt
- Route the new or reused belt according to your drawing/photo.
- Use the 1/2" breaker bar or serpentine belt tool to rotate the tensioner clockwise.
- Slip the belt over the final pulley (usually the smooth idler or alternator), then slowly release the tensioner.
- Check that the belt sits properly in all pulley grooves.
Step 12: Reinstall fan and shroud
- Lower the fan and shroud together carefully into position between the engine and radiator.
- Thread the fan clutch nut by hand onto the water pump shaft (reverse thread, so turn it counterclockwise to install).
- Use the fan clutch holding tool and 36mm fan clutch wrench to snug the nut: Torque to 54 Nm (40 ft-lbs) (or firmly hand-tight if torque access is limited).
- Reinstall the shroud bolts using a 10mm socket and 3/8" ratchet and reconnect any wiring clips with the trim clip tool.
Step 13: Reinstall the air intake tube
- Refit the air intake tube between the air box and throttle body.
- Reconnect any hoses or sensors by hand until they click into place.
- Tighten both clamps with an 8mm socket or flat-blade screwdriver until snug.
Step 14: Reconnect battery and refill coolant
- Reconnect the negative battery cable using a 10mm wrench and tighten securely.
- Mix coolant to the correct ratio if not pre-mixed.
- Use a funnel to slowly fill the coolant reservoir up to the “MAX” mark.
- Open any bleed screw on the highest point of the system if equipped (some 5.7L systems have a small bleeder near the thermostat housing) using the appropriate socket or wrench.
- Add coolant until it begins to come out steadily (no bubbles) from the bleeder, then close the bleeder: Torque to 3–5 Nm (hand snug).
Step 15: Bleed the cooling system
- Start the engine and set the heater to maximum heat, fan on low.
- Let the engine idle with the coolant reservoir cap off; monitor the coolant level and add as needed using the funnel.
- Watch for air bubbles coming up in the reservoir. As the engine warms, the thermostat will open and the level may drop.
- Once the level stabilizes and warm air blows from the vents, install the coolant reservoir cap by hand.
- Let the engine reach normal operating temperature, then shut it off and allow it to cool completely. Recheck the coolant level and top off if needed.
✅ After Repair
- Check under the Grand Cherokee for any coolant drips or leaks at the water pump, hoses, and radiator drain.
- Start the engine and watch the temperature gauge; it should stay at normal once warmed up.
- Verify the heater works and blows hot air, which indicates coolant circulation.
- After your first short drive, recheck coolant level once the engine cools and inspect for any new leaks.
- Inspect the serpentine belt while running for straight tracking and no squealing.
💰 DIY vs Shop Cost
Shop Cost: $650-$1,000 (parts + labor)
DIY Cost: $180-$350 (parts only)
You Save: $470-$650 by doing it yourself!
Shop labor rates vary but typically run $100-$150/hour. This repair takes a shop approximately 3-4 hours.
🎯 Ready to get started?
HowToo makes it easy: same-day/2-day shipping on every part, plus all the tools and specialty tools you need! Check out the parts and tools sections above to add everything to your cart.
Guide for replace for these Jeep vehicles
| Year Make Model | Sub Model | Engine | Body Style |
|---|