









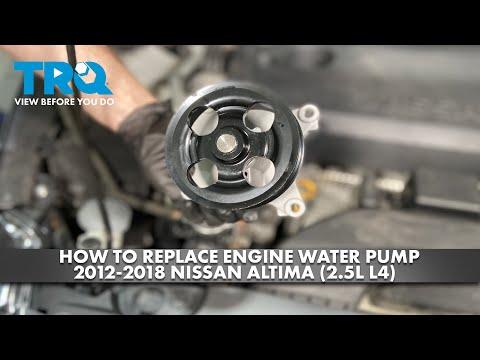







How to Replace the Water Pump on a 2018 Nissan Altima 2.5L (Timing Chain Driven)
Step-by-step DIY instructions with required tools, parts list, torque specs, and leak-prevention tips for 2013, 2014, 2015, 2016, 2017, 2018
How to Replace the Water Pump on a 2018 Nissan Altima 2.5L (Timing Chain Driven)
Step-by-step DIY instructions with required tools, parts list, torque specs, and leak-prevention tips for 2013, 2014, 2015, 2016, 2017, 2018


🔧 Altima - Water Pump Replacement
On your Altima 2.5L, the water pump is timing-chain driven and sits behind the front timing cover. Replacing it requires supporting the engine, removing the right mount, removing the front cover, and re-sealing everything to prevent oil/coolant leaks.
Difficulty Level: Advanced | Estimated Time: 6-10 hours
⚠️ Safety & Precautions
- ⚠️ Let the engine cool completely before opening the cooling system.
- ⚠️ Support the engine with a jack and wood block before removing the right engine mount.
- ⚠️ Keep the timing chain and sprockets aligned; incorrect timing can cause major engine damage.
- ⚠️ Coolant is toxic and slippery; clean spills immediately.
- ⚠️ Battery disconnect is recommended before working near the starter/alternator area.
🔧 Required Tools
You'll need the following tools for this repair:
- Safety glasses
- Nitrile gloves
- Drain pan (at least 10-quart)
- Floor jack (rated 3-ton minimum)
- Jack stands (rated 3-ton minimum)
- Wheel chocks
- Wood block (2x4 or similar)
- Metric socket set (8mm-19mm)
- 1/4" drive ratchet
- 3/8" drive ratchet
- 1/2" drive breaker bar
- Torque wrench (10-200 Nm range)
- Short extension set (1/4" and 3/8")
- Long extension (3/8" drive)
- Universal joint adapter (3/8" drive)
- Serpentine belt tool or 14mm wrench
- Flat trim clip tool
- Phillips screwdriver
- Plastic razor blade scraper
- Brake cleaner spray
- Fender cover
- Harmonic balancer puller kit (specialty)
- Crank pulley holding tool (specialty)
- RTV sealant applicator nozzle
- Coolant funnel spill-free kit
🔩 Required Parts
HowToo sells all the parts you need for this repair:
- Engine water pump - Qty: 1
- Water pump O-ring / gasket (as equipped) - Qty: 1
- Front timing cover sealant (OEM-equivalent RTV) - Qty: 1
- Engine coolant (Nissan Long Life Antifreeze/Coolant, blue premix or equivalent) - Qty: 2-3 gallons
- Serpentine drive belt - Qty: 1 Optional, if worn/cracked
- Thermostat with seal - Qty: 1 Optional, good preventative
📋 Before You Begin
- Park on level ground, set the parking brake, and chock the rear wheels.
- Disconnect the negative battery cable using a 10mm socket.
- Raise the front of the car with a floor jack and support it with jack stands.
- Remove the right front wheel using a 19mm socket.
- Remove the right-side splash shield/fender liner fasteners using a flat trim clip tool and Phillips screwdriver.
- Take photos as you go.
🔨 Step-by-Step Instructions
Follow these steps in order:
Step 1: Drain the coolant
- Place a drain pan (at least 10-quart) under the radiator drain.
- Open the radiator cap slowly (engine cold) and open the drain cock to drain coolant.
Step 2: Remove the accessory drive belt
- Relieve belt tension using a serpentine belt tool or 14mm wrench on the tensioner.
- Slip the belt off and note the belt routing.
Step 3: Support the engine and remove the right engine mount
- Position a floor jack (rated 3-ton minimum) under the oil pan with a wood block between the jack and pan.
- Lightly support the engine (do not lift aggressively).
- Remove the right engine mount and bracket bolts using a metric socket set (14mm-19mm) and 3/8" drive ratchet.
- During reassembly: Torque engine mount fasteners to 62 Nm (46 ft-lbs).
Step 4: Remove the crank pulley (harmonic balancer)
- Hold the crank pulley using a crank pulley holding tool (specialty).
- Loosen the crank bolt using a 1/2" drive breaker bar and the correct socket from your metric socket set (8mm-19mm).
- If the pulley is stuck, remove it with a harmonic balancer puller kit (specialty).
- During reassembly: Torque crank pulley bolt to 180 Nm (133 ft-lbs).
Step 5: Remove front cover access items
- Remove any front cover-attached brackets and the lower/upper cover fasteners using a 10mm socket and 12mm socket.
- Keep bolts organized by location; lengths vary.
Step 6: Set the engine to TDC and relieve timing tension
- Rotate the engine clockwise using a 1/2" drive ratchet on the crank bolt until timing marks align.
- Remove the timing chain tensioner using a 10mm socket.
- During reassembly: Torque timing chain tensioner bolts to 12 Nm (106 in-lbs).
- Do not rotate the crank with the chain loose.
Step 7: Remove the front timing cover
- Remove front cover bolts using a 10mm socket and 12mm socket with extensions.
- Carefully separate the cover without gouging the aluminum using a plastic razor blade scraper (do not use a metal chisel).
- During reassembly: Torque front cover bolts to 12 Nm (106 in-lbs) unless a specific bolt is called out differently by location.
Step 8: Remove the water pump
- Place the drain pan (at least 10-quart) under the pump area; more coolant may spill.
- Remove the water pump fasteners using a 10mm socket.
- Remove the pump and old water pump O-ring / gasket.
- During reassembly: Torque water pump bolts to 12 Nm (106 in-lbs).
Step 9: Clean sealing surfaces and install the new pump
- Clean gasket/RTV surfaces using a plastic razor blade scraper and finish with brake cleaner spray on a clean rag.
- Install the new water pump O-ring / gasket and the new water pump.
- Tighten bolts evenly in a crisscross pattern using a torque wrench (10-200 Nm range).
Step 10: Reseal and reinstall the front timing cover
- Apply a continuous bead of front timing cover sealant (OEM-equivalent RTV) to the specified sealing path.
- Install the cover carefully and start all bolts by hand.
- Tighten cover bolts evenly using a torque wrench (10-200 Nm range): Torque to 12 Nm (106 in-lbs).
- Let RTV skin before adding fluids.
Step 11: Reinstall the timing chain tensioner and verify timing
- Reinstall the tensioner using a 10mm socket.
- Torque to 12 Nm (106 in-lbs).
- Rotate the engine by hand two full turns clockwise using a 1/2" drive ratchet and re-check alignment.
Step 12: Reassemble remaining components
- Install the crank pulley and bolt using the crank pulley holding tool (specialty) and a torque wrench (10-200 Nm range).
- Torque crank pulley bolt to 180 Nm (133 ft-lbs).
- Reinstall the right engine mount using a metric socket set (14mm-19mm).
- Torque engine mount fasteners to 62 Nm (46 ft-lbs).
- Reinstall the serpentine belt using a serpentine belt tool or 14mm wrench.
- Reinstall splash shield/fender liner using a flat trim clip tool and Phillips screwdriver.
- Reinstall wheel using a 19mm socket and tighten lug nuts: Torque to 113 Nm (83 ft-lbs).
Step 13: Refill and bleed the cooling system
- Close the radiator drain.
- Fill with engine coolant (Nissan Long Life Antifreeze/Coolant, blue premix or equivalent) using a coolant funnel spill-free kit.
- Start the engine and set heat to HOT, fan on LOW.
- Let the engine warm up until the radiator fan cycles, topping off as the level drops.
- Install the radiator cap, shut off, let cool fully, then re-check and top off the reservoir.
✅ After Repair
- Check for oil leaks around the timing cover and coolant leaks around the water pump area.
- Test drive 10-15 minutes, then re-check coolant level after a full cool-down.
- If the temperature gauge rises or heat blows cold, stop and re-bleed air from the system.
- Recheck the drive belt tracking; it should run centered on all pulleys.
💰 DIY vs Shop Cost
Shop Cost: $900-$1,600 (parts + labor)
DIY Cost: $120-$350 (parts only)
You Save: $780-$1,250 by doing it yourself!
Shop labor rates vary but typically run $100-$150/hour. This repair takes a shop approximately 6-10 hours.
🎯 Ready to get started?
HowToo makes it easy: same-day/2-day shipping on every part, plus all the tools and specialty tools you need! Check out the parts and tools sections below to add everything to your cart.