









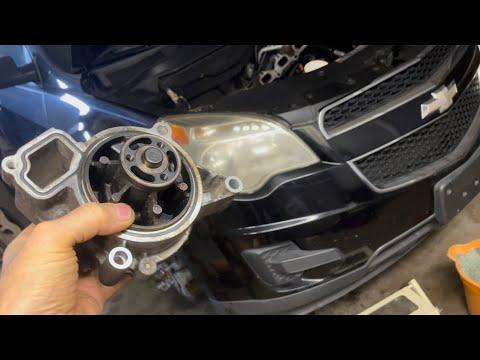







How to Replace the Water Pump on a 2018-2020 Chevrolet Equinox (Engine: Inline 4 2.0L)
Step-by-step instructions with tools, parts, torque specs, safety tips, and cooling system bleed procedure
How to Replace the Water Pump on a 2018-2020 Chevrolet Equinox (Engine: Inline 4 2.0L)
Step-by-step instructions with tools, parts, torque specs, safety tips, and cooling system bleed procedure for 2018, 2019, 2020


🔧 Water Pump - Replacement
This procedure replaces the engine water pump on your Equinox. On the 2.0L turbo, access is tight and several front-engine components usually have to come off before the pump can be reached. The cooling system must be drained and refilled carefully to avoid air pockets and overheating.
Difficulty Level: Advanced | Estimated Time: 4-6 hours
⚠️ Safety & Precautions
- Let the engine cool completely before opening the cooling system. Hot coolant can cause serious burns.
- Disconnect the negative battery cable before starting work.
- Use jack stands if the front of the vehicle must be raised. Never rely on a jack alone.
- Keep coolant away from belts and pulleys. Spilled coolant can cause slipping and belt damage.
- Dispose of old coolant properly. It is toxic to people and animals.
🔧 Required Tools
You'll need the following tools for this repair:
- Metric socket set
- Metric wrench set
- Torque wrench
- Serpentine belt tool (specialty)
- Drain pan
- Funnel
- Trim panel tool
- Pliers
- Jack
- Jack stands
- Safety glasses
- Nitrile gloves
- Clean scraper or plastic razor blade
🔩 Required Parts
HowToo sells all the parts you need for this repair:
- Water pump - Qty: 1
- Water pump gasket or seal - Qty: 1
- Engine coolant - Qty: 1 service fill
- Thermostat housing gasket or seal - Qty: 1
- Serpentine belt - Qty: 1
- Hose clamps or coolant pipe seals - Qty: As needed
📋 Before You Begin
- Park on level ground and engage the parking brake.
- Let the engine cool fully.
- Disconnect the negative battery cable.
- Raise the front of the vehicle only if needed for splash shield access.
- Tip: Take photos before removing hoses.
🔨 Step-by-Step Instructions
Follow these steps in order:
Step 1: Drain the cooling system
- Place a drain pan under the radiator drain area.
- Open the radiator drain or remove the lower hose using pliers if there is no drain valve.
- Let the coolant drain completely.
Step 2: Remove access components
- Use a trim panel tool to remove the lower splash shield if equipped.
- If needed, remove the intake ducting using a metric socket set.
- Remove any brackets or covers blocking access to the front of the engine.
Step 3: Remove the serpentine belt
- Use a serpentine belt tool (specialty) or the correct wrench/socket on the tensioner to relieve belt tension.
- Slip the belt off the pulleys and remove it from the engine bay.
- Tip: Draw the belt path before removal.
Step 4: Remove water pump access parts
- Remove any hoses, brackets, or covers attached to the water pump area using the metric socket set and pliers.
- Label hose positions if more than one line is removed.
Step 5: Remove the old water pump
- Use the metric socket set to remove the water pump bolts evenly.
- Support the pump as the last bolt comes out.
- Remove the pump and old gasket or seal.
Step 6: Clean the mounting surface
- Use a clean scraper or plastic razor blade to remove old gasket material.
- Wipe the surface clean with a lint-free rag.
- Do not scratch the aluminum surface.
Step 7: Install the new water pump
- Install the new gasket or seal in the correct position.
- Set the new water pump in place by hand.
- Install the bolts finger-tight first, then tighten evenly with a torque wrench.
- Torque to 10-12 Nm (89-106 in-lbs)
Step 8: Reinstall hoses, belt, and covers
- Reinstall all hoses and brackets removed earlier.
- Install the serpentine belt using the belt routing you saved.
- Release the tensioner slowly with the serpentine belt tool.
- Reinstall intake parts and splash shields.
Step 9: Refill and bleed the cooling system
- Close the drain point.
- Use a funnel to fill the system with the correct engine coolant.
- Start the engine and let it idle with the heater set to hot.
- Add coolant as the level drops.
- Watch for steady heat from the vents and no bubbling in the reservoir.
Step 10: Check for leaks
- Inspect the water pump, hoses, and drain point with the engine running.
- Shut the engine off and recheck the coolant level after it cools.
- Top off as needed.
✅ After Repair
- Test drive the vehicle and watch the temperature gauge closely.
- Recheck coolant level after the first heat cycle and again the next day.
- Look for drips under the front of the engine.
- If the temperature rises or heat output is weak, air may still be trapped in the system.
💰 DIY vs Shop Cost
Shop Cost: $900-$1,500 (parts + labor)
DIY Cost: $150-$350 (parts only)
You Save: $750-$1,150 by doing it yourself!
Shop labor rates vary but typically run $100-$150/hour. This repair takes a shop approximately 4-6 hours.
🎯 Ready to get started?
HowToo makes it easy: same-day/2-day shipping on every part, plus all the tools and specialty tools you need! Check out the parts and tools sections below to add everything to your cart.
Guide for Engine Water Pump replace for these Chevrolet vehicles
| Year Make Model | Sub Model | Engine | Body Style |
|---|---|---|---|
| 2020 Chevrolet Equinox | - | Inline 4 1.5L | - |
| 2020 Chevrolet Equinox | - | Inline 4 2.0L | - |
| 2019 Chevrolet Equinox | - | Inline 4 1.5L | - |
| 2019 Chevrolet Equinox | - | Inline 4 1.6L | - |
| 2019 Chevrolet Equinox | - | Inline 4 2.0L | - |
| 2018 Chevrolet Equinox | - | Inline 4 1.5L | - |
| 2018 Chevrolet Equinox | - | Inline 4 1.6L | - |
| 2018 Chevrolet Equinox | - | Inline 4 2.0L | - |