









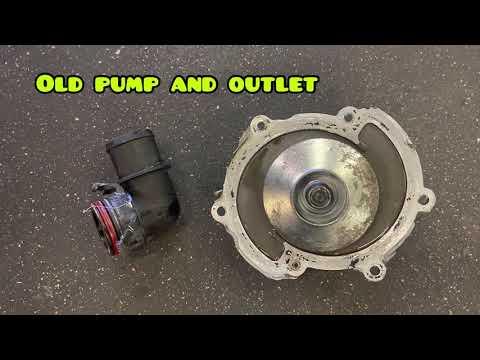







How to Replace the Water Pump on a 2011-2016 Cadillac SRX 3.6L V6 (Timing Cover Removal) (Engine: V6 3.6L)
Step-by-step internal pump replacement with required tools, parts list, timing-chain precautions, and torque spec guidance
How to Replace the Water Pump on a 2011-2016 Cadillac SRX 3.6L V6 (Timing Cover Removal) (Engine: V6 3.6L)
Step-by-step internal pump replacement with required tools, parts list, timing-chain precautions, and torque spec guidance for 2011


🔧 SRX - Water Pump Replacement
On your SRX’s 3.6L V6, the water pump is mounted behind the front (timing) cover and is driven by the timing chain. Replacing it is a major front-engine disassembly job, but it’s the correct fix for a leaking pump, bearing noise, or chronic overheating caused by internal pump failure.
Difficulty Level: Advanced | Estimated Time: 8-12 hours
Assumption: 3.6L V6 uses chain-driven internal water pump.
⚠️ Safety & Precautions
- ⚠️ Let the engine cool fully before opening the coolant tank.
- ⚠️ Disconnect the negative battery cable to prevent accidental cranking.
- ⚠️ Support the engine before removing the right engine mount (the mount helps hold the engine up).
- ⚠️ Keep timing components in order; incorrect timing can cause severe engine damage.
- ⚠️ Use jack stands on solid level ground; never rely on a jack alone.
- ⚠️ Coolant is toxic; capture and dispose of it properly.
🔧 Required Tools
You'll need the following tools for this repair:
- Floor jack (rated 3-ton minimum)
- Jack stands (rated 3-ton minimum)
- Wheel chocks
- Safety glasses
- Nitrile gloves
- Drain pan (10-quart minimum)
- Fender cover
- 3/8" drive ratchet
- 1/2" drive breaker bar
- Torque wrench (10-80 ft-lbs)
- Torque wrench (50-250 ft-lbs)
- Socket set 8mm-21mm
- Deep socket set 10mm-18mm
- Torx bit set E10-E18
- Torx bit set T20-T50
- Extensions set (3", 6", 12")
- Serpentine belt tool (15mm)
- Trim clip remover
- Pry bar (12")
- Hose clamp pliers
- Gasket scraper (plastic)
- Brake cleaner spray
- Shop rags
- Crankshaft balancer puller kit (specialty)
- Crankshaft balancer installer tool (specialty)
- Timing chain holding tool set for GM 3.6L (specialty)
- Engine support bar (specialty)
- Cooling system vacuum fill tool (specialty)
🔩 Required Parts
HowToo sells all the parts you need for this repair:
- Water pump - Qty: 1
- Front cover gasket set - Qty: 1
- Water pump gasket / seal - Qty: 1
- Crankshaft front oil seal - Qty: 1
- Engine coolant (Dex-Cool compatible) - Qty: 2-3 gallons
- RTV sealant (GM-spec equivalent) - Qty: 1
- Serpentine belt - Qty: 1
- Accessory drive belt tensioner - Qty: 1 (optional)
- Upper and lower radiator hoses - Qty: 2 (optional)
📋 Before You Begin
- Park on level ground, set the parking brake, and chock the rear wheels.
- Disconnect the negative battery cable using a 10mm socket.
- Raise the front of the SRX with a floor jack and support it on jack stands.
- Remove the right front wheel using a 19mm socket and set it aside.
- Plan your parts layout: use labeled bags for bolts (front cover bolts are different lengths).
- Take photos before each major removal.
🔨 Step-by-Step Instructions
Follow these steps in order:
Step 1: Drain the coolant
- Place a drain pan (10-quart minimum) under the radiator area.
- Slowly open the coolant surge tank cap (only when cool).
- Disconnect the lower radiator hose using hose clamp pliers and drain the coolant into the pan.
Step 2: Remove the right splash shields and access panels
- Remove the right inner fender liner and lower splash shield fasteners using a trim clip remover and 7mm socket.
- Set shields aside in order.
Step 3: Remove the serpentine belt
- Rotate the belt tensioner with a serpentine belt tool (15mm) and slip the belt off.
- If reusing the belt, note the routing or take a photo.
Step 4: Support the engine and remove the right engine mount
- Install the engine support bar (specialty) to hold the engine from above. (An engine support bar is a crossbar that spans the fenders and holds the engine with a hook/chain.)
- Remove mount fasteners using socket set 13mm-18mm and Torx bit set E10-E18 as equipped.
- Lift the engine slightly with the support bar to free the mount.
Step 5: Remove accessory components blocking the front cover
- Remove any brackets, the tensioner (if needed), and front accessories obstructing the cover using a socket set 10mm-15mm and Torx bit set.
- Unclip wiring harness retainers from the cover using a trim clip remover.
Step 6: Remove the crankshaft balancer
- Remove the crankshaft balancer bolt using a 1/2" drive breaker bar and appropriate socket.
- Use a crankshaft balancer puller kit (specialty) to pull the balancer off.
- Never pry on the balancer sealing surface.
Step 7: Set engine to timing position and lock timing components
- Rotate the engine by hand at the crank using a socket and breaker bar until timing marks align per GM procedure.
- Install the timing chain holding tool set for GM 3.6L (specialty) to keep the chains and cam phasers from moving.
- This holding tool prevents the chain from jumping teeth while the cover and pump are removed.
Step 8: Remove the front (timing) cover
- Remove all front cover bolts using a socket set 8mm-15mm and Torx bit set E10-E18.
- Carefully separate the cover using a pry bar (12") only at approved pry points.
- Clean old RTV/gasket material using a plastic gasket scraper, brake cleaner spray, and shop rags.
- Torque to OEM spec (varies by bolt location/length) when reinstalling.
Step 9: Remove and replace the water pump
- Remove the water pump fasteners using a socket set.
- Remove the pump and gasket/seal. Clean the mating surfaces with a plastic gasket scraper and brake cleaner spray.
- Install the new water pump with the new water pump gasket / seal.
- Torque to OEM spec for the water pump fasteners (do not guess; the 3.6L uses multiple fastener sizes).
Step 10: Replace the crankshaft front seal (recommended)
- Remove the old seal from the cover carefully using a pry bar (12") with light pressure.
- Install the new crankshaft front oil seal squarely (even depth) using the appropriate driver from your crankshaft balancer installer tool (specialty) kit.
Step 11: Reinstall the front cover with new gaskets and RTV
- Install the front cover gasket set and apply RTV sealant only at the GM-specified seam corners (typically where cover meets oil pan/head junctions).
- Set the cover in place and start all bolts by hand.
- Tighten in an even crisscross pattern using a torque wrench.
- Torque to OEM spec (multiple stages/fasteners).
Step 12: Reinstall the crankshaft balancer
- Install the balancer using a crankshaft balancer installer tool (specialty) (do not hammer it on).
- Install the balancer bolt and tighten using a torque wrench.
- Torque to OEM spec (this is a critical torque-angle fastener on many GM 3.6L applications).
Step 13: Reinstall engine mount, accessories, and belt
- Reinstall the right engine mount and brackets using a socket set and torque wrench.
- Torque to OEM spec for mount fasteners (mount fasteners are safety-critical).
- Reinstall accessories and wiring retainers using socket set and Torx bit set.
- Install the serpentine belt using a serpentine belt tool (15mm).
Step 14: Reinstall shields and wheel
- Reinstall the splash shields and fender liner using a 7mm socket and trim clip remover.
- Reinstall the wheel using a 19mm socket.
- Torque to 190 Nm (140 ft-lbs) for the wheel lug nuts using a torque wrench (50-250 ft-lbs).
Step 15: Refill coolant and bleed air
- Close/secure any hoses and clamps using hose clamp pliers.
- Refill with Dex-Cool compatible coolant at the surge tank.
- Best method: use a cooling system vacuum fill tool (specialty) to pull vacuum and refill (this reduces air pockets).
- If filling normally: fill slowly, squeeze upper radiator hose by hand, and top off as the level drops.
✅ After Repair
- Reconnect the battery negative cable using a 10mm socket.
- Start the engine and let it idle with the heater set to max heat (this helps purge air).
- Watch the temperature gauge and check for leaks around the front cover, hoses, and underneath.
- After the cooling fans cycle on/off, shut down and let it cool completely, then recheck coolant level and top off.
- Recheck for leaks again after a short test drive.
💰 DIY vs Shop Cost
Shop Cost: $1,200-$2,200 (parts + labor)
DIY Cost: $250-$650 (parts only)
You Save: $550-$1,950 by doing it yourself!
Shop labor rates vary but typically run $100-$150/hour. This repair takes a shop approximately 8-12 hours.
🎯 Ready to get started?
HowToo makes it easy: same-day/2-day shipping on every part, plus all the tools and specialty tools you need! Check out the parts and tools sections below to add everything to your cart.
Guide for Engine Water Pump replace for these Cadillac vehicles
| Year Make Model | Sub Model | Engine | Body Style |
|---|---|---|---|
| 2016 Cadillac SRX | - | V6 3.6L | - |
| 2015 Cadillac SRX | - | V6 3.6L | - |
| 2014 Cadillac SRX | - | V6 3.6L | - |
| 2013 Cadillac SRX | - | V6 3.6L | - |
| 2012 Cadillac SRX | - | V6 3.6L | - |
| 2011 Cadillac SRX | - | V6 3.0L | - |
| 2011 Cadillac SRX | - | V6 2.8L | - |