









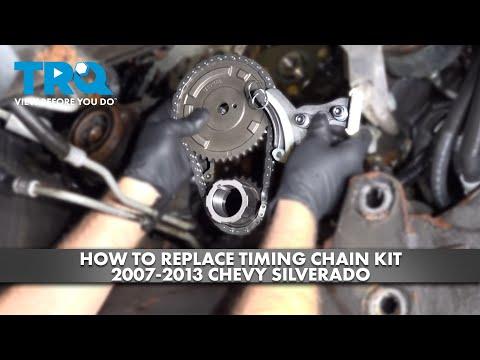







How to Replace the Timing Chain on a 2016 Chevrolet Express 3500 (4.8L V8)
Step-by-step instructions with required tools, parts list, key torque specs, and leak-prevention tips for 2009, 2010, 2011, 2012, 2013, 2014, 2015, 2016, 2017
How to Replace the Timing Chain on a 2016 Chevrolet Express 3500 (4.8L V8)
Step-by-step instructions with required tools, parts list, key torque specs, and leak-prevention tips for 2009, 2010, 2011, 2012, 2013, 2014, 2015, 2016, 2017


🔧 Express - Timing Chain Replacement
Your Express’s 4.8L V8 uses a timing chain, not a timing belt. Replacing the timing chain means removing the front of the engine (accessories, water pump, harmonic balancer, and front cover), swapping the chain/sprockets, then resealing everything so it doesn’t leak.
Difficulty Level: Advanced | Estimated Time: 6-10 hours
Assumption: Stock 4.8L V8 with mechanical fan and standard front cover.
⚠️ Safety & Precautions
- 🛑 Disconnect the negative battery cable before working near the starter/alternator.
- 🛑 Let the engine cool fully; you’ll drain coolant and work around hot parts.
- 🛑 Support the van with jack stands on a solid, level surface; never rely on a jack alone.
- 🛑 Keep fingers/clothes away from the fan and belt path.
- 🛑 Use eye protection; coolant and debris can fall when the cover comes off.
- 🛑 The harmonic balancer bolt is torque-to-yield and should be replaced.
🔧 Required Tools
You'll need the following tools for this repair:
- Safety glasses
- Nitrile gloves
- Wheel chocks
- Floor jack (rated 3-ton minimum)
- Jack stands (rated 3-ton minimum)
- Drain pan (at least 3-gallon)
- Shop towels
- Metric socket set (8mm-21mm)
- 3/8" drive ratchet
- 1/2" drive breaker bar
- Extensions set (3", 6", 12")
- Torque wrench (10-150 ft-lbs range)
- Torque angle gauge (specialty)
- Serpentine belt tool (specialty)
- Fan clutch wrench set (36mm) (specialty)
- Harmonic balancer puller (specialty)
- Harmonic balancer installer tool (specialty)
- Seal puller
- Plastic gasket scraper
- RTV silicone gasket maker
- Threadlocker (blue)
- Pry bar
- Flathead screwdriver
- Pick set
- Torque bit socket set (Torx E-sockets)
- Fuel line/clip pliers
- Flashlight
🔩 Required Parts
HowToo sells all the parts you need for this repair:
- Timing chain and sprocket set - Qty: 1
- Timing cover gasket set - Qty: 1
- Front crankshaft seal - Qty: 1
- Harmonic balancer bolt (torque-to-yield) - Qty: 1
- Water pump gasket set - Qty: 1
- Coolant (DEX-COOL compatible) - Qty: 3-4 gallons premix
- Engine oil (5W-30) - Qty: 6 quarts
- Oil filter - Qty: 1
- Serpentine belt - Qty: 1
- RTV silicone gasket maker - Qty: 1
📋 Before You Begin
- Park on level ground, set the parking brake, and place wheel chocks behind the rear wheels.
- Disconnect the battery using a 10mm socket (negative cable first).
- Raise the front and support with a floor jack and jack stands.
- Place a drain pan under the radiator area.
- Take photos as you remove brackets and bolts.
🔨 Step-by-Step Instructions
Follow these steps in order:
Step 1: Drain coolant
- Place a drain pan (at least 3-gallon) under the radiator.
- Open the drain and remove the cap to help it flow (use a flathead screwdriver if needed).
Step 2: Remove the engine cover and intake ducting
- Remove the plastic cover/ducts using a flathead screwdriver and metric socket set (8mm-10mm).
- Move the ducting aside to open up the front of the engine.
Step 3: Remove the fan and shroud
- Remove shroud fasteners using a 10mm socket.
- Use a fan clutch wrench set (36mm) (specialty) to loosen the fan clutch nut and remove the fan/clutch assembly.
- Fan clutch threads can be stubborn—steady, controlled force.
Step 4: Remove the serpentine belt
- Use a serpentine belt tool (specialty) to rotate the tensioner and slip the belt off.
- If you’re reusing the belt (not recommended), mark its rotation direction with a marker.
Step 5: Remove front accessories (as needed for clearance)
- Remove the alternator and brackets using a metric socket set (13mm-15mm) and extensions set.
- If equipped, unbolt the A/C compressor and power steering pump brackets and set them aside without disconnecting lines using a metric socket set (13mm-15mm).
- Support heavy parts so hoses aren’t strained.
Step 6: Remove the water pump
- Remove water pump bolts using a metric socket set.
- Remove the pump and gaskets; clean the mating surfaces using a plastic gasket scraper.
- When reinstalling later: Torque water pump bolts to 30 Nm (22 ft-lbs).
Step 7: Remove the harmonic balancer (crank pulley)
- Remove the balancer bolt using a 1/2" drive breaker bar and metric socket set.
- Use a harmonic balancer puller (specialty) to pull the balancer off.
- A puller prevents crankshaft damage.
Step 8: Remove the timing cover
- Remove timing cover bolts using a metric socket set and extensions set.
- Gently break the seal with a pry bar (light pressure only) and remove the cover.
- Remove the front crank seal from the cover using a seal puller.
Step 9: Set the engine to timing mark alignment
- Rotate the crankshaft by hand using a breaker bar on the crank bolt (temporarily reinstall the old bolt if needed).
- Align timing marks: the crank sprocket mark at 12 o’clock and the cam sprocket mark at 6 o’clock (the two marks point toward each other).
- This is your “reference” before disassembly.
Step 10: Remove timing chain and sprockets
- Remove the cam sprocket bolt using a metric socket set.
- Remove the cam sprocket and chain together.
- Remove the crank sprocket if your kit includes a replacement (use a pry bar gently if needed).
Step 11: Install the new timing set
- Install the new crank sprocket (if applicable), then hang the new chain on the cam sprocket.
- Position the chain and sprockets so timing marks are still aligned (crank at 12 o’clock, cam at 6 o’clock).
- Install cam sprocket bolt with threadlocker (blue).
- Torque cam sprocket bolt to 35 Nm (26 ft-lbs), then Torque angle +50 degrees.
Step 12: Prep and reseal the timing cover
- Clean all gasket surfaces with a plastic gasket scraper and shop towels.
- Install a new crank seal into the timing cover (use the harmonic balancer installer tool (specialty) carefully as a press if needed).
- Apply a small dab of RTV silicone gasket maker at the oil pan to timing cover “corner” seams.
Step 13: Reinstall timing cover
- Install the timing cover and start all bolts by hand.
- Tighten evenly using a torque wrench.
- Torque timing cover bolts to 25 Nm (18 ft-lbs).
Step 14: Reinstall harmonic balancer
- Use a harmonic balancer installer tool (specialty) to press the balancer on straight.
- Install a new harmonic balancer bolt.
- Torque balancer bolt to 50 Nm (37 ft-lbs), then Torque angle +140 degrees using a torque angle gauge.
Step 15: Reinstall water pump and accessories
- Install the water pump with new gaskets using a metric socket set.
- Torque water pump bolts to 30 Nm (22 ft-lbs).
- Reinstall brackets/accessories using a torque wrench and tighten to OEM spec (bracket bolt sizes vary by location).
Step 16: Reinstall belt, fan, and shroud
- Route the new belt and install it using a serpentine belt tool (specialty).
- Reinstall the fan/shroud using a fan clutch wrench set (36mm) (specialty) and 10mm socket.
Step 17: Refill fluids and reconnect battery
- Refill cooling system with DEX-COOL compatible coolant.
- Change the oil and filter using a drain pan and metric socket set.
- Reconnect the negative battery cable using a 10mm socket.
✅ After Repair
- Start the engine and let it idle; watch for oil/coolant leaks around the timing cover and water pump.
- Bring the engine to operating temperature and confirm the heater blows hot (helps purge air).
- Top off coolant after the first full heat cycle and again the next day when cold.
- Listen for abnormal rattling at startup; a quiet, smooth idle is what you want.
💰 DIY vs Shop Cost
Shop Cost: $1,200-$2,200 (parts + labor)
DIY Cost: $250-$650 (parts only)
You Save: $550-$1,950 by doing it yourself!
Shop labor rates vary but typically run $100-$150/hour. This repair takes a shop approximately 6-10 hours.
🎯 Ready to get started?
HowToo makes it easy: same-day/2-day shipping on every part, plus all the tools and specialty tools you need! Check out the parts and tools sections below to add everything to your cart.