









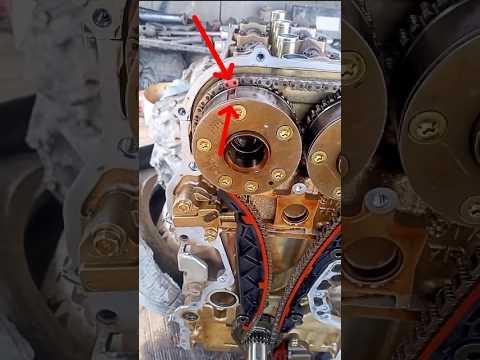



How to Replace the Timing Chain on a 2013-2018 Nissan Altima (Trim: S | Engine: Inline 4 2.5L | Body: Sedan)
Step-by-step guide with tools, parts, torque specs, costs, and safety tips for 2013, 2014, 2015, 2016, 2017
How to Replace the Timing Chain on a 2013-2018 Nissan Altima (Trim: S | Engine: Inline 4 2.5L | Body: Sedan)
Step-by-step guide with tools, parts, torque specs, costs, and safety tips for 2013, 2014, 2015, 2016, 2017


🔧 Altima - Timing Chain Replacement
Your Altima does not use a timing belt. It uses a timing chain, which runs inside the engine and is normally replaced only if it is noisy, stretched, damaged, or causing cam/crank timing trouble codes.
This is an advanced repair because the crankshaft and camshafts must stay perfectly timed. If the timing is set wrong, the engine can be damaged.
Difficulty Level: Advanced | Estimated Time: 8-12 hours
⚠️ Safety & Precautions
- ⚠️ Disconnect the negative battery cable before starting.
- ⚠️ Let the engine cool completely before draining oil or coolant.
- ⚠️ Support the engine before removing the right engine mount.
- ⚠️ Do not rotate the crankshaft or camshafts separately with the chain removed.
- ⚠️ If the engine binds while turning by hand, stop immediately and recheck timing.
🔧 Required Tools
You'll need the following tools for this repair:
- 10mm socket
- 12mm socket
- 14mm socket
- 17mm socket
- 19mm socket
- 21mm socket
- 22mm socket
- 3/8-inch ratchet
- 1/2-inch breaker bar
- 3/8-inch torque wrench
- 1/2-inch torque wrench
- Serpentine belt tool
- Harmonic balancer puller (specialty)
- Crankshaft pulley holding tool (specialty)
- Engine support bar (specialty)
- Floor jack (rated 2-ton minimum)
- Jack stands (rated 2-ton minimum)
- Drain pan
- Funnel
- Plastic gasket scraper
- Razor scraper
- Brake cleaner
- Paint marker
- Trim clip removal tool
- Flathead screwdriver
- Needle-nose pliers
- Safety glasses
- Nitrile gloves
🔩 Required Parts
HowToo sells all the parts you need for this repair:
- Timing chain kit - Qty: 1
- Timing chain tensioner - Qty: 1
- Timing chain guides - Qty: 1 set
- Front crankshaft seal - Qty: 1
- Timing cover RTV sealant - Qty: 1 tube
- Valve cover gasket set - Qty: 1
- Engine oil (0W-20 synthetic) - Qty: 5 quarts
- Oil filter - Qty: 1
- Engine coolant - Qty: As needed
- Serpentine belt - Qty: 1
📋 Before You Begin
- 🚗 Park your Altima on level ground and set the parking brake.
- 🧊 Let the engine cool fully.
- 🔋 Use a 10mm socket to disconnect the negative battery cable.
- 📸 Take photos before removing hoses, brackets, wiring, and the belt.
- 🖊️ Use a paint marker to mark old timing positions before removing the chain.
- 🧰 A harmonic balancer puller removes the crank pulley without bending it.
- 🧰 An engine support bar holds the engine up when the mount is removed.
🔨 Step-by-Step Instructions
Follow these steps in order:
Step 1: Raise and Secure the Front
- Use a floor jack to lift the front of your Altima.
- Place jack stands under the proper front support points.
- Lower the car gently onto the jack stands.
- Use safety glasses and nitrile gloves before working underneath.
- Never trust a jack alone.
Step 2: Remove the Right Front Wheel and Splash Shield
- Use a 21mm socket to remove the right front wheel lug nuts.
- Remove the right front wheel.
- Use a trim clip removal tool to remove the plastic splash shield clips.
- Use a 10mm socket to remove any splash shield bolts.
- Remove the splash shield.
Step 3: Drain the Engine Oil and Coolant
- Place a drain pan under the oil pan.
- Use a 14mm socket to remove the oil drain plug.
- Let the oil drain completely.
- Use a 14mm socket to reinstall the oil drain plug.
- Torque to 34 Nm (25 ft-lbs)
- Move the drain pan under the radiator drain area and drain coolant as needed.
Step 4: Remove the Serpentine Belt
- Use a serpentine belt tool to rotate the belt tensioner.
- The tensioner is the spring-loaded arm that keeps belt tension.
- Slide the belt off the pulleys.
- Remove the belt from the engine bay.
- Photo the belt path first.
Step 5: Support the Engine
- Install the engine support bar across the engine bay.
- Attach it to the engine lifting point.
- Tighten it until the engine weight is lightly supported.
Step 6: Remove the Right Engine Mount
- Use 14mm and 17mm sockets to remove the right engine mount bolts and nuts.
- Remove the mount and brackets blocking the timing cover.
- Keep bolts organized by location.
Step 7: Remove Ignition Coils and Valve Cover
- Use a 10mm socket to remove the ignition coil bolts.
- Unplug the ignition coil connectors.
- Pull the ignition coils straight upward.
- Use a 10mm socket to remove the valve cover bolts.
- Lift off the valve cover and remove the old gasket.
Step 8: Set Cylinder 1 to Top Dead Center
- Use a 22mm socket and 1/2-inch breaker bar on the crankshaft pulley bolt.
- Rotate the engine clockwise only.
- Line up the factory timing marks on the crankshaft and camshaft sprockets.
- Top dead center means piston 1 is at the top of its travel for timing setup.
- Use a paint marker to mark the chain and sprocket positions.
Step 9: Remove the Crankshaft Pulley
- Use the crankshaft pulley holding tool to hold the pulley still.
- Use a 22mm socket and 1/2-inch breaker bar to loosen the crankshaft pulley bolt.
- Use a harmonic balancer puller to remove the crankshaft pulley.
- Do not pry on the aluminum timing cover.
Step 10: Remove the Front Timing Cover
- Use 10mm, 12mm, and 14mm sockets to remove all timing cover bolts.
- Use cardboard to make a bolt map.
- Use a plastic gasket scraper to separate the timing cover.
- Remove the timing cover from the engine.
Step 11: Remove the Tensioner, Guides, and Chain
- Use a 10mm socket to remove the timing chain tensioner bolts.
- Remove the tensioner.
- Use 10mm and 12mm sockets to remove the guide bolts.
- Remove the timing chain guides.
- Remove the timing chain.
- Do not move the crankshaft or camshafts now.
Step 12: Install the New Timing Chain
- Match the colored chain links to the timing marks on the camshaft and crankshaft sprockets.
- Use 10mm and 12mm sockets to install the new timing chain guides.
- Use a 10mm socket to install the new timing chain tensioner.
- Release the tensioner only after the chain is fully seated.
- Confirm all timing marks line up exactly.
Step 13: Turn the Engine by Hand
- Use a 22mm socket and 1/2-inch breaker bar to rotate the crankshaft clockwise two full turns.
- Stop if the engine locks or feels like it hits a hard stop.
- Recheck all timing marks.
- If marks are wrong, reset the chain before reassembly.
Step 14: Clean and Reinstall the Timing Cover
- Use a razor scraper carefully to remove old sealant.
- Use brake cleaner to clean the sealing surfaces.
- RTV sealant is liquid gasket material that seals the cover.
- Apply timing cover RTV sealant in a continuous bead.
- Install the timing cover before the RTV skins over.
- Use 10mm, 12mm, and 14mm sockets to reinstall the timing cover bolts.
Step 15: Reinstall the Crankshaft Pulley
- Slide the crankshaft pulley onto the crankshaft by hand.
- Use the crankshaft pulley holding tool to hold it steady.
- Use a 22mm socket and 1/2-inch torque wrench to tighten the crankshaft pulley bolt.
- Torque to 44 Nm (33 ft-lbs), then turn an additional 60 degrees
Step 16: Reinstall the Valve Cover and Coils
- Install the new valve cover gasket.
- Set the valve cover onto the cylinder head.
- Use a 10mm socket to tighten the valve cover bolts evenly.
- Use a 10mm socket to reinstall the ignition coil bolts.
- Reconnect all ignition coil connectors.
Step 17: Reinstall the Engine Mount and Belt
- Use 14mm and 17mm sockets to reinstall the right engine mount and brackets.
- Use a serpentine belt tool to rotate the belt tensioner.
- Route the serpentine belt over the pulleys.
- Release the tensioner slowly.
- Make sure the belt ribs sit correctly in every pulley.
Step 18: Refill Oil and Coolant
- Use a funnel to add 0W-20 synthetic engine oil.
- Install the new oil filter by hand until snug.
- Refill the cooling system with engine coolant as needed.
- Use a 10mm socket and trim clip removal tool to reinstall the splash shield.
- Use a 21mm socket to install the right front wheel.
- Use a torque wrench to tighten the lug nuts.
- Torque to 113 Nm (83 ft-lbs)
Step 19: Reconnect the Battery
- Use a 10mm socket to reconnect the negative battery cable.
- Make sure the cable is tight and does not twist by hand.
✅ After Repair
- ✅ Start the engine and let it idle.
- ✅ Listen for chain rattle, knocking, misfires, or rough running.
- ✅ Shut the engine off immediately if you hear sharp metallic noise.
- ✅ Check for oil leaks around the timing cover and valve cover.
- ✅ Check coolant level after the engine warms up and cools back down.
- ✅ If the check engine light comes on, scan codes before driving far.
- ✅ Take a gentle road test, then recheck oil and coolant levels.
💰 DIY vs Shop Cost
Shop Cost: $1,500-$2,800 (parts + labor)
DIY Cost: $250-$650 (parts only)
You Save: $1,000-$2,100 by doing it yourself!
Shop labor rates vary but typically run $100-$150/hour. This repair takes a shop approximately 8-12 hours.
🎯 Ready to get started?
HowToo makes it easy: same-day/2-day shipping on every part, plus all the tools and specialty tools you need! Check out the parts and tools sections below to add everything to your cart.