









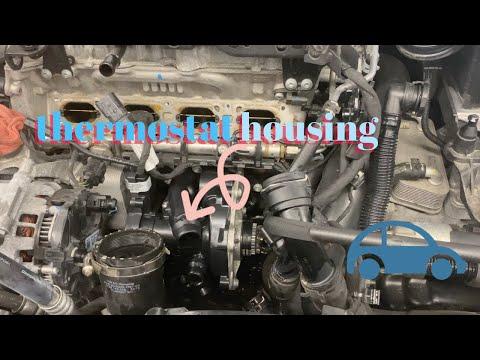







How to Replace the Thermostat/Water Pump Housing on a 2018 Volkswagen Golf
Step-by-step DIY coolant drain, removal, install, bleeding tips, required tools/parts, and key torque specs for 2015, 2016, 2017, 2018
How to Replace the Thermostat/Water Pump Housing on a 2018 Volkswagen Golf
Step-by-step DIY coolant drain, removal, install, bleeding tips, required tools/parts, and key torque specs for 2015, 2016, 2017, 2018


🔧 Golf - Thermostat Replacement
On your Golf, the thermostat is part of the water pump/thermostat housing module, so replacement usually means swapping that whole assembly. This job mainly involves draining coolant, removing components for access, replacing the module with new seals, and then refilling/bleeding the cooling system.
Difficulty Level: Advanced | Estimated Time: 3-6 hours
⚠️ Safety & Precautions
- ⚠️ Never open the coolant tank hot; let the engine cool fully.
- ⚠️ Coolant is toxic; catch it in a drain pan and clean spills.
- ⚠️ Disconnect the battery negative terminal before working near the starter/alternator wiring.
- ⚠️ Support the car with jack stands; never rely on a jack alone.
- ⚠️ Keep fingers clear of the serpentine belt path when releasing tension.
🔧 Required Tools
You'll need the following tools for this repair:
- Floor jack (rated 3-ton minimum)
- Jack stands (rated 3-ton minimum)
- Wheel chocks
- Safety glasses
- Nitrile gloves
- Drain pan (at least 10-quart)
- Funnel
- Trim clip removal tool
- Pick tool
- Hose clamp pliers
- 1/4" drive ratchet
- 3/8" drive ratchet
- 3/8" drive torque wrench (5-60 Nm range)
- Socket set 8mm-18mm
- 16mm wrench
- Torx bit set T20-T30
- Torx screwdriver T30
- Flathead screwdriver
- Coolant vacuum fill tool (specialty)
- OBD2 scan tool with live data (specialty)
🔩 Required Parts
HowToo sells all the parts you need for this repair:
- Water pump/thermostat housing assembly - Qty: 1
- Water pump/thermostat housing seal(s) / O-ring set - Qty: 1
- Coolant (VW-approved G13 or current supersession) - Qty: 2-3 gallons (premix) or 1-1.5 gallons concentrate + distilled water
- Hose clamp(s) (if any are damaged) - Qty: 1-3
📋 Before You Begin
- Park on level ground, set the parking brake, and chock the rear wheels.
- Let the engine cool completely (upper radiator hose should feel cool).
- Disconnect the battery negative cable using a 10mm socket.
- If you have a scan tool, set it up to watch engine coolant temperature (ECT) during the final bleed.
🔨 Step-by-Step Instructions
Follow these steps in order:
Step 1: Raise the front and remove the lower splash shield
- Lift the front using a floor jack (rated 3-ton minimum) and place it on jack stands (rated 3-ton minimum).
- Remove the lower engine splash shield fasteners using a Torx T25/T30 bit and a trim clip removal tool as needed.
Step 2: Drain the coolant
- Place a drain pan (at least 10-quart) under the radiator area.
- Slowly loosen the coolant expansion tank cap to release any residual pressure.
- Drain coolant by removing the lower radiator hose quick-connector (if equipped) using a pick tool, or by loosening the lower hose clamp using hose clamp pliers.
- Keep track of every clip and O-ring.
Step 3: Remove the intake ducting for access
- Remove the engine cover by pulling upward (hands only).
- Loosen intake hose clamps using a flathead screwdriver or 7mm-8mm socket (as equipped).
- Unplug any nearby electrical connectors by lifting the lock tab with a pick tool (don’t pry on wires).
Step 4: Release serpentine belt tension
- Use a 16mm wrench on the belt tensioner to rotate it and relieve tension.
- Slip the belt off the alternator pulley and let it rest out of the way.
- Take a photo of belt routing first.
Step 5: Create working room at the water pump/thermostat module
- Depending on your exact layout, you may need to remove one or both items below for access:
- Remove the alternator mounting bolts using an socket set 13mm-16mm and a 3/8" drive ratchet, then set the alternator aside without stressing the wiring.
- If the intake manifold blocks access, remove it using a Torx T30 bit and a 1/4" drive ratchet after disconnecting vacuum/PCV hoses with hose clamp pliers.
- Torque to 9 Nm (80 in-lbs) for intake manifold fasteners during reassembly.
- If unsure, remove the manifold for space.
Step 6: Disconnect hoses and electrical connectors at the module
- Place rags and the drain pan under the module area (more coolant will spill).
- Remove coolant hoses using hose clamp pliers and carefully twist hoses by hand to break them free.
- Unplug the electrical connector(s) at the housing using a pick tool to lift the locking tab.
Step 7: Remove the water pump/thermostat housing assembly
- Remove the housing bolts using a socket set 10mm and a 1/4" drive ratchet.
- Pull the module straight off the engine and remove the old seal/O-ring.
- Clean the sealing surface using a clean rag (no gouging; no sandpaper).
Step 8: Install the new housing and seals
- Lightly wet the new O-ring/seal with fresh coolant so it seats without pinching.
- Install the new module and hand-start all bolts.
- Tighten evenly in a crisscross pattern using a 3/8" drive torque wrench.
- Torque to 10 Nm (89 in-lbs) for housing bolts.
Step 9: Reconnect hoses, connectors, and reinstall removed components
- Reinstall coolant hoses using hose clamp pliers and confirm clamps are fully seated in their original positions.
- Reconnect electrical connector(s) until they click.
- Reinstall the alternator (if removed) using the socket set 13mm-16mm and torque fasteners with a torque wrench.
- Torque to 45 Nm (33 ft-lbs) for alternator mounting bolts.
- Reinstall the intake manifold (if removed) using a Torx T30 bit.
- Torque to 9 Nm (80 in-lbs) for intake manifold fasteners.
Step 10: Reinstall the serpentine belt
- Route the belt correctly, then use a 16mm wrench to rotate the tensioner and slip the belt onto the last pulley.
- Double-check belt alignment on every pulley rib by sight and touch.
Step 11: Refill and bleed the cooling system
- Lower the vehicle back to the ground.
- If using a vacuum filler, use the coolant vacuum fill tool (specialty) to pull vacuum and refill with the correct coolant mix.
- If filling normally, add coolant slowly into the expansion tank using a funnel until it reaches the MAX line.
- Start the engine and set the heater to HOT with the fan on low.
- Let it idle, then hold ~2000 RPM for 30-60 seconds a few times while watching level.
- Use an OBD2 scan tool with live data (specialty) to monitor ECT and ensure it warms up normally.
- Top off as needed and install the cap.
- Watch for sudden level drops.
Step 12: Reinstall the splash shield and reconnect the battery
- Reinstall the lower splash shield using a Torx T25/T30 bit.
- Reconnect the battery negative terminal using a 10mm socket.
✅ After Repair
- Check for leaks around the new housing and all hose connections with the engine idling.
- Test drive 10-15 minutes, then recheck coolant level after the engine cools fully; top off to MAX if needed.
- Verify cabin heat works and the temperature gauge is stable.
- If you had a check engine light, clear codes and confirm they do not return using an OBD2 scan tool.
💰 DIY vs Shop Cost
Shop Cost: $800-$1,400 (parts + labor)
DIY Cost: $180-$450 (parts only)
You Save: $620-$950 by doing it yourself!
Shop labor rates vary but typically run $100-$150/hour. This repair takes a shop approximately 3-5 hours.
🎯 Ready to get started?
HowToo makes it easy: same-day/2-day shipping on every part, plus all the tools and specialty tools you need! Check out the parts and tools sections below to add everything to your cart.